Image Studio Ribbon
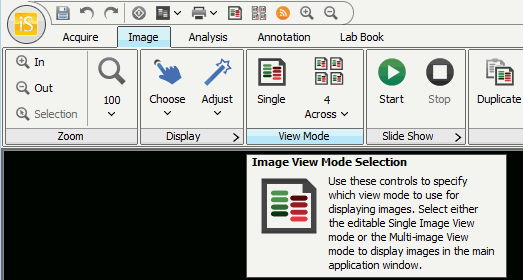
The Image Studio application is designed like other software packages you may be familiar with. Image Studio is built with a ribbon interface, with tabs that reflect the general work-flow of the Image Studio application. Each tab displays its own ribbon of controls. This example shows the Image ribbon with its Zoom, Display, View Mode, Create Print/Export Area, and Copy groups.

Key Tips
Key tips activate keyboard access to the tabs and other features of Image Studio™ Software. Press ALT to display the key tip badges for all ribbon tabs. For example, press F to display the Image Studio Application menu. Press S to save your work. Press any of the key tips beneath the tab names to view the ribbon for the selected tab and the key tips for the commands on that ribbon.

For example, to display the Analysis ribbon key tips, first press ALT to display the key tips. Notice that the key tip for the Analysis tab is H. Press H on your keyboard to display the key tips for the commands on the Analysis ribbon.
To select an Analysis, for example, press B on your keyboard. If the key tip shows two letters, press the keys sequentially. For instance, to add a rectangle, press A then R.
Application Menu
The Image Studio Application button ![]() is the round button at the upper left corner of the application.
is the round button at the upper left corner of the application.
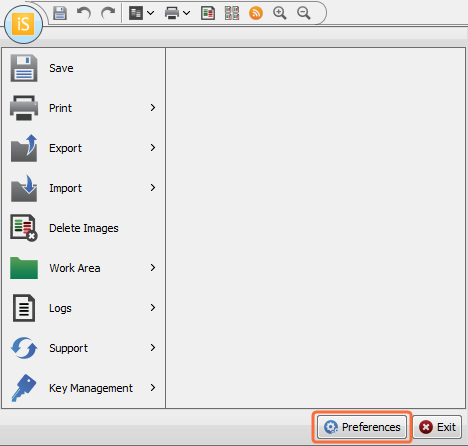
Click the Application button to display the Application menu. The panel on the left is the primary menu. If the menu item is followed by an arrow symbol (>), click the item to display a secondary menu in the panel on the right. The secondary menu displays the choices along with their descriptions.
To access these commands by keyboard, press the ALT key to display the Key Tip badges.

The footer area of the Application menu contains two buttons: Preferences and Exit.
Click the Preferences button to display the Preferences dialog (see Preferences for more information about this dialog).
- Click Exit to exit Image Studio Software.
Save
Click Save to save all the new or edited analyses open within the application.
The Print menu has a secondary menu of choices that includes Single Image Per Page, Lab Book, Page Setup, and Select Printer. See Printing Reports in the Reporting section of this guide for details about these options.
Export
The Export menu has a secondary menu of choices for exporting images. Export Options for details about these options.
Import
The Import menu has a secondary menu of choices for importing images and Acquisition Folders from:
- Image Studio Software
- Odyssey® Application Software
- Odyssey Sa Software
- Aerius Software
- Pearl® Software.
TIFF, PNG, or JPEG images from third-party sources can also be imported. Import Options for details about these options.
Delete Images
The Delete Images command deletes images that you have selected in the Images table. Select the images to delete, and click Delete Images. Deleting an image cannot be undone.
Work Area
The Work Area menu has a secondary menu with choices for changing to a different Work Area or importing the settings from a different Work Area to the current one.
Click Switch to open the Set Active Work Area dialog. Choose an available Work Area and click OK. The current Work Area closes and the new Work Area opens.

Click Import Settings to open the Import Work Area Settings dialog. Select a Work Area and click Import.The settings from the selected Work Area will be applied to the current Work Area.

Instrument
The Instrument menu contains a secondary menu of choices for managing the instrument status.
 Information - Click to display a dialog showing the instrument model, S/N, IP Address, Resolutions, Channels, and embedded software version.
 Connect - Discover available instruments and connect to one.
 Disconnect - Use to disconnect from the current instrument.
 Update Software - Use to update instrument software (also called embedded software).
 Management - Available for the Odyssey Sa, Aerius, and Classic.
- Download Scans - Use to download scans from your instrument's hard drive.
- User - Change a password and manage scan groups. Scan groups can be used to keep scans from multiple researchers working on the same project in one place.
- Administration - Manage users, change passwords, change editing rights, edit scan groups, and run instrument diagnostics.
- Scanner List - Edit the scanner list. The scanner list can be used to add an instrument manually, edit an instrument's configuration settings, delete the scanner from the current Work Area, and Auto Discover instruments.
Logs
The Logs menu contains a secondary menu of choices for printing and exporting the application log files.
Support
Click to open the LI-COR support page with links to the latest updates for Image Studio software, or open the LI-COR Biotech News Feed.
Key Management
![]() Import: Allows
you to install a key that licenses functionality (e.g., Western Analysis). You must have administrator privileges to the computer
to install the key.
Import: Allows
you to install a key that licenses functionality (e.g., Western Analysis). You must have administrator privileges to the computer
to install the key.
![]() Configure: Allows you to configure which instrument and application keys are available from the set of installed keys in the current Work Area.
Configure: Allows you to configure which instrument and application keys are available from the set of installed keys in the current Work Area.
- Disabling an instrument will make the instrument unavailable in the current Work Area until the key is re-enabled. The disabled instrument will be removed from the list of instruments in the Instrument Model Selection dialog.
- Disabling an application will make the application unavailable in the current Work Area until the key is re-enabled. The disabled application will be removed from the list of applications in the Type group.
Quick Launch Buttons
The Image Studio Quick Launch buttons are located on the ribbon task bar above the tabs. These buttons are accessible from all the tabbed ribbon views. They include Save Analysis, Undo, Redo, Start Scan, Analysis Type Print, Show Single Image, Show Multiple Images, LI-COR Biotech News Feed, Zoom In, and Zoom Out.

Preferences
The Preferences dialog has choices for specifying general application features and for selecting the default image display colors for new acquisitions. To open the Preferences dialog:
Click the Image Studio Application button
 .
.The Image Studio Application menu will open.

In the footer of the menu, click Preferences.
The Preferences dialog will open with the General Preferences tab displayed.
General Preferences
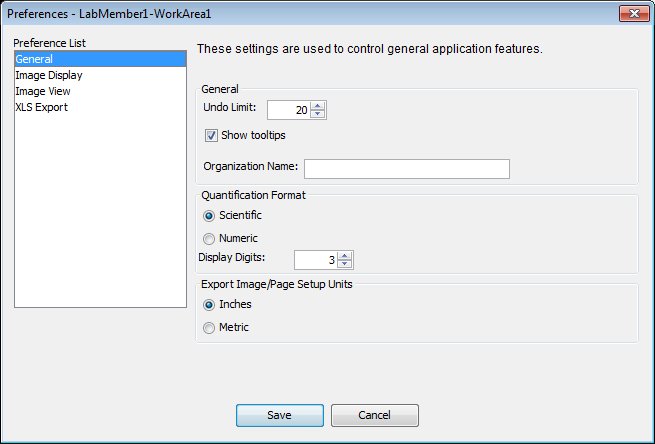
Use General preferences to control application settings.

Show Tooltips: Select to allow tooltips to pop up when the cursor points to a button or label in Image Studio Software.
Organization Name: Specifies the name that will be displayed in the Organization column of the Images table.
Quantification Format: Specifies whether Scientific or Numeric notation is used for floating point values.
Excel reports numeric formats using its default format for floating point fields. These fields my be displayed as both standard and scientific formats unless the formatting is overridden in Excel.
Display Digits: Specifies the number of significant digits to display.
- Export Image/Page Setup Units: Sets the measurement unit in Export dialog boxes and the Page Setup dialog to Inches or Metric.
Image Display Preferences
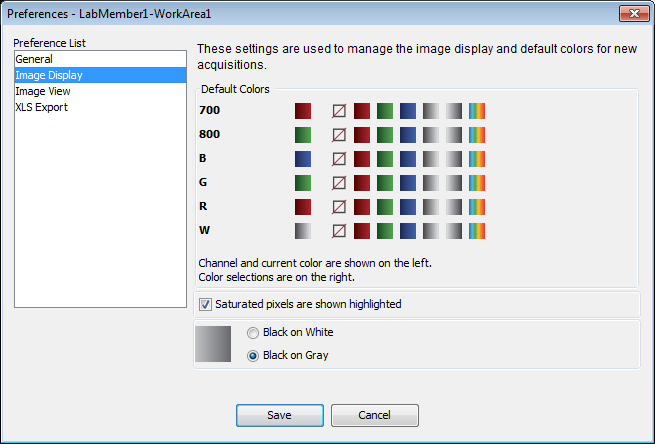
In the Image Display tab, select which default display colors are used for new acquisitions.

Image View
The Image View tab contains the following two options:
- Allow zooming using the Mouse Scroll Wheel: Clear this option if you do not wish to use the scroll wheel for zoom operations (zoom operations can also be accessed using the Zoom group in the Image tab).
- Optimize image display rendering for slow graphics cards: Select this option if images seem to be taking a long time to display after a zoom operation has been performed.
XLS Export
The XLS Export tab contains choices for how NaN (Not a Number - designates an undefined value) or Infinity will appear when table data are exported to a spreadsheet program.
Choose one of the options below based on how Infinity/NaN are supported in the application where data are being exported. Some options may work better than others depending on the application.
- Formula that represents value: This option will use a formula that represents Infinity and NaN.
- Their numeric value: A numeric placeholder for Infinity and NaN will be exported to the spreadsheet program.
- Text of Infinity or Nan: The text 'Infinity' or 'NaN' will be exported to the spreadsheet program.
Tooltips
All buttons and group names on the ribbon have tooltips. To display a tooltip, hover the mouse over a button or group name and an explanation will be displayed in a small window. This example shows the tooltip for the View Mode group.

Make sure that you have "Show Tooltips" checked in the General Preferences dialog.