Export Options
Click the Application button to open the Application menu, then point to Export to view the export options. The following can be exported from Image Studio Software:
Images: Images can be exported individually, in batches of individual files, or multiple images can be exported to a single composite image. Exported images can be in TIFF, PNG, or JPEG format at 150, 300, or 600 dots per inch (dpi) resolution. During export, images can be resized and the chosen resolution will remain the same after resizing.
Image Formats to learn about TIFF, JPEG, and PNG image formats and their uses.
- Color Bar: The color bar from an image can be exported by itself to compare images in a presentation, publication, or lab notebook.
- Movies: Export a QuickTime movie or a batch of individual JPEG images to be made into a movie using third party software.
- Image Studio Files: Export Acquisition Folders containing TIFF images, scan information, and analysis data to Zip Files or to another Work Area. Use this option to backup or archive data.
Exporting Single Images
The following choices for exporting a single image use a standard dialog and include the same choices. Choices in the dialog are pre-set differently for each export option to facilitate exporting a particular type of image.
- Image for Digital Media: The dialog is pre-set to export a 150 dpi PNG.
- Image for Print: The dialog is pre-set to export a 600 dpi TIFF
- Current Single Image View: The dialog is pre-set to export a 300 dpi TIFF
- Image Gallery as a Single Image File: Exports multiple images to a single composite image. The dialog is pre-set to export a 300 dpi TIFF.
To export a single image using the above methods:
Select the image to be exported in the Images table
If using Image Gallery as a Single Image File, the Images Table may need to be filtered.By default, Image Gallery as a Single Image File will export all images in the Images table to a single image. A filter must be applied to the Images table to export only select images. Working with Table Data.
Click the Image Studio Application button, point to export, and then click the appropriate single image export option. The dialog that opens will be named differently for each method but will have the same options.
Hover to expand a thumbnail with quick instructions for using the dialog:

Click the options below to read more about each export option.
Resize image...- Select Pixels or Inches to designate the priority value to be modified.
- Adjust the size in the priority section, and the other section will resize to match the priority section.
Ensure the dimensions of the image being exported are at least as large as the dimensions of the original image (check by comparing with the Original column to the left of the editable fields in the Size box).
Choose an image format...- Select the box next to the desired format for the exported image.
- The TIFF format is better for print publications. The PNG and JPEG formats use less file space and are convenient for digital media applications.
Image Formats to learn about TIFF, JPEG, and PNG image formats and their uses.
Choose an image resolution...- Select the box next to the desired resolution (in dots per inch) for the exported image. The chosen resolution will remain the same even if the image size is modified in the Size section of the dialog.
- Use 150 dpi for digital media and 300 or 600 for print.
Edit the name of the exported image...
- Type the desired file name at the beginning of the File Name: text field.
- Any unwanted characters that may already appear in the File Name: text field can be deleted.
Insert values from the Images Table into the file name...
- Click the dropdown menu to the right of the Insert button to insert a column value from the Images table.
- Click the desired value once to highlight it.
- Click Insert.
- A variable representing the Images table value is inserted into the File Name: text field preceded by a tilde (~).
- How the file name will appear after export is shown in the Example File Name box at the bottom of the Edit File Name dialog.
- Multiple variables can be added to the file name.
- To remove unwanted variables in the File Name: box, place the cursor in the text field and manually delete the variable name including the tilde.
Click Browse to find the folder where the image will be exported.
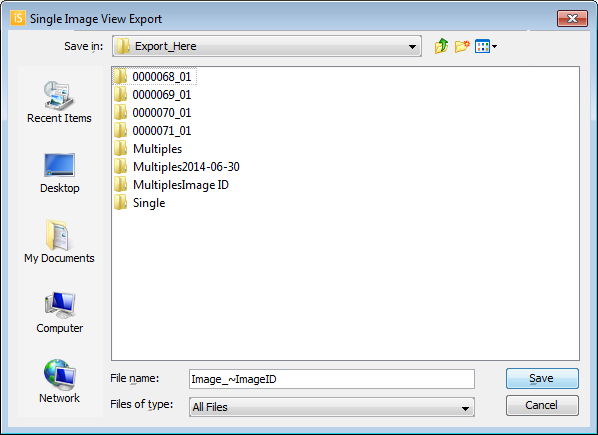
The Single Image View dialog will open (or Image Gallery Export for Image Gallery as a Single Image File).

- In the Single Image View dialog, double click to open the folder where the image should be exported and click Save.
- Click Save again to export the image.
Export Multiple Images in Batch
Use Selected Images as Separate Files to export all selected images in the Images table as individual images.
To use Selected Images as Separate Files:
- Select all the images that need to be exported in the Images table.
Click the Image Studio Application button, point to Export, then point to Additional Options, and then click Selected Images as Separate Files.
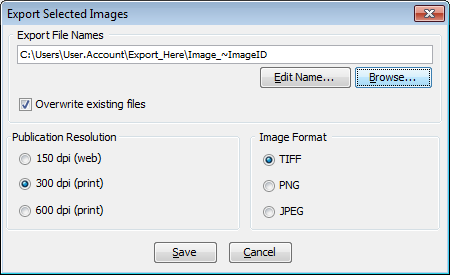
The Export Selected Images dialog will open.
 Choose an image format...
- Select the box next to the desired format for the exported image.
- The TIFF format is better for print publications. The PNG and JPEG formats use less file space and are convenient for digital media applications.
Image Formats to learn about TIFF, JPEG, and PNG image formats and their uses.
Choose an image resolution...- Select the box next to the desired resolution (in dots per inch) for the exported image. The chosen resolution will remain the same even if the image size is modified in the Size section of the dialog.
- Use 150 dpi for digital media and 300 or 600 for print.
To name the exported files, click Edit Name.
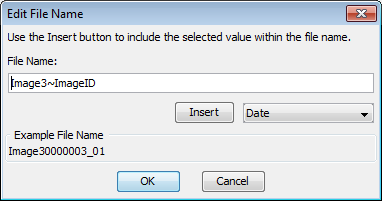
The Edit File Name dialog will open.

Only one file name can be designated to all images exported in the same batch, but a value from the Images table can be added to the end of each file name to distinguish exported images. See Insert values from the Images table into the file name below.
Edit the file name for all exported images in the Edit File Name dialog...
- Type the desired file name at the beginning of the File Name: text field.
- Any unwanted characters that may already appear in the File Name: text field can be deleted.
Insert values from the Images Table into the file name
- Click the dropdown menu to the right of the Insert button to insert a column value from the Images table.
- Click the desired value once to highlight it.
- Click Insert.
- A variable representing the Images table value is inserted into the File Name: text field preceded by a tilde (~).
- How the file name will appear after export is shown in the Example File Name box at the bottom of the Edit File Name dialog.
- Multiple variables can be added to the file name.
- To remove unwanted variables in the File Name: box, place the cursor in the text field and manually delete the variable name including the tilde.
Click Browse to find the folder where the image will be exported.
The Selected Images Export dialog will open.

- In the Selected Images Export dialog, double click to open the folder where the image should be exported and click Save.
- Click Save in the Export Selected Images dialog and the batch of images will be exported.
Export Movies
Use the Movies option to export images:
- To a QuickTime movie (.mov) or,
- Individual JPEG images to be made into a movie using third party software
This feature is primarily used with the Pearl Imaging System. An animal injected with fluor-labeled dye can be imaged at regular intervals. The Movies option allows the images to be compiled into a movie so the path of dye through the animal can be visualized.
To export a movie:
Click the Image Studio Application button, point to Export, then point to Additional Options, and then click Movies.
The Movie Properties dialog will open.

- In the Movie Properties dialog, check the appropriate option next to Create QuickTime movie or Export individual images.
- The frame rate can be adjusted up to a maximum of 10 frames per second.
- If the Add subtitles with Image ID and Acquisition Time box is checked, the Image ID and Acquisition Time from the Images table will be added below the image.
- If the Include annotations as currently displayed on images box is checked, all displayed annotations (such as shapes added for analysis) will be included in the movie.
- Click Browse to find the correct location where the movie or images should be exported.
- The Movie Name text field will be active if the Create QuickTime movie box is checked. Type a name for the movie.
- Click OK to export.
Images being used to make a movie must be the same resolution and scan area.
To do this:
A) Use the Filter option to filter the Images table so only images of the same resolution and scan area are present in the table.
B) Or, select the images to be exported and filter by selection.
Working with Table Data for more detailed information.
Export Color Bar
The Color Bar from an image can be exported by itself to compare images in a presentation, publication, or lab notebook.
Example of a Color Bar:

To export a Color Bar:
Ensure the Color Bar is visible next to the image.
Make the Color Bar visible...In the Show group of the Analysis tab, select Color Bar to make the Color Bar appear next to the image.
Click the Image Studio Application button, point to Export, and then point to Additional Options.
- Click Color Bar.
The Export Color Bar dialog will open.

In the Export Color Bar dialog, the font size, bar width, bar length, and horizontal or vertical orientation of the bar can be adjusted. A resolution, image format, and name for the exported color bar image must also be chosen.
Choose an image format...- Select the box next to the desired format for the exported image.
- The TIFF format is better for print publications. The PNG and JPEG formats use less file space and are convenient for digital media applications.
Image Formats to learn about TIFF, JPEG, and PNG image formats and their uses.
Choose an image resolution...- Select the box next to the desired resolution (in dots per inch) for the exported image. The chosen resolution will remain the same even if the image size is modified in the Size section of the dialog.
- Use 150 dpi for digital media and 300 or 600 for print.
Edit the name of the exported image...Click the Edit Name button to open the Edit File Name dialog.

- Type the desired file name at the beginning of the Edit Name text field.
- Any unwanted characters that may already appear in the File Name: text field can be deleted.
Insert values from the Images table into the file name...
- Click the dropdown menu to the right of the Insert button to insert a column value from the Images table.
- Click the desired value once to highlight it.
- Click Insert.
- A variable representing the Images table value is inserted into the File Name: text field preceded by a tilde (~).
- How the file name will appear after export is shown in the Example File Name box at the bottom of the Edit File Name dialog.
- Multiple variables can be added to the file name.
- To remove unwanted variables in the File Name: box, place the cursor in the text field and manually delete the variable name including the tilde.
Click Browse to find the folder where the image will be exported.
The Single Image View Export dialog will open.

- In the Single Image View dialog, double click to open the folder where the image should be exported and click Save.
- Click Save in the Export Color Bar dialog and the Color Bar image will be exported.
Exporting Zip Files and Copying Data to Another Work Area
Use one of the following ways to export data from Image Studio Software:
- Select an image or images in the Images table to export a Zip File or Zip Files containing the image, scan information, and analysis data.
- Click the Image Studio Application button
 .
. Point first to Export, then point to Image Studio Files and click Zip File.
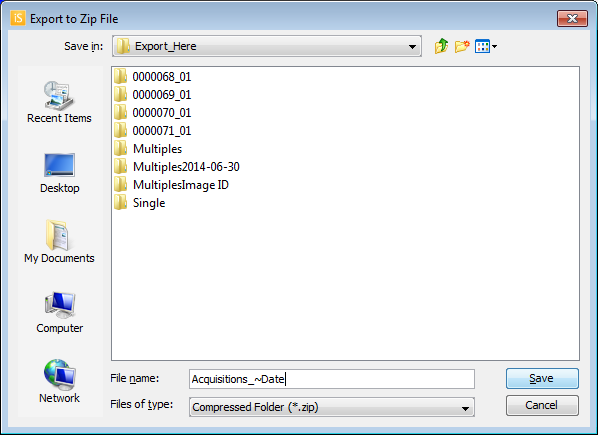
The Export to Zip File dialog will open.

- In the Export to Zip File dialog , open the folder where the Zip File will be saved.
- Click Save.
- Select an image or images in the Images table to copy the image(s), scan information, and analysis data to a different Work Area.
- Click the Image Studio Application button
 .
. Point first to Export, then point to Image Studio Files and click To Another Work Area.
The Export to Another Work Area dialog will open.

- In the Export to Another Work Area dialog, click the Work Area where the folder will be copied.
- Click OK.