Getting Started
Introduction
About C‑DiGit Blot Scanner
The C‑DiGit Blot Scanner is designed to image membranes for chemiluminescent Western blot analysis using digital methods, eliminating the need for traditional exposure to film. Before image acquisition is started, a membrane is placed on the scanning surface and the lid is closed. Image acquisition is started via Image Studio™ Software (see the Image Studio Software help for details).

The C‑DiGit has one detection channel that detects visible wavelength emissions from chemiluminescent substrates.
The C‑DiGit Blot Scanner is a networkable device, and can be connected directly to a computer (Macintosh® or PC) via Ethernet or USB cables.
What’s in the Box
In addition to the C‑DiGit Blot Scanner, you will find the items shown below1 (l-r): 1) Ethernet and 2) USB cables, 3) a power supply with interchangeable plugs, 4) a C‑DiGit Target image, and 5) Image Studio and Resource CDs.
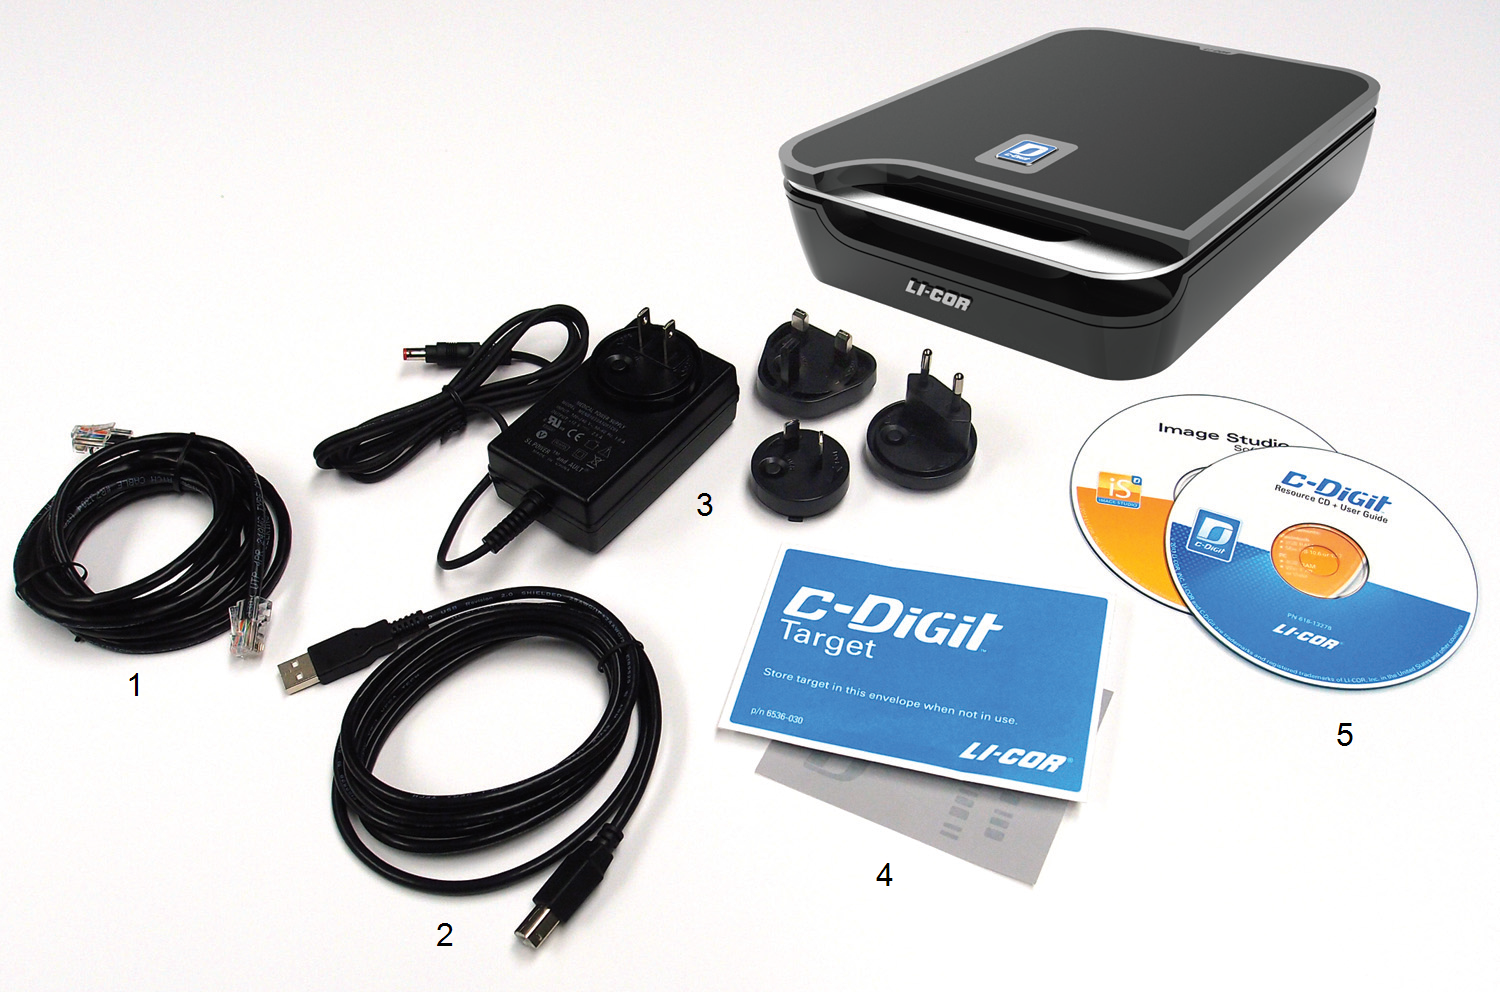
The C‑DiGit Target is a photosensitive card used to verify that your C‑DiGit Blot Scanner is functioning properly; the card is briefly exposed to room light and then imaged on the instrument. If the acquired pattern matches the target image, the C‑DiGit Blot Scanner is functioning as it should, and is ready to image your sample. Instructions for using the Target are given below in the Getting Started. The Target should be stored in the blue envelope when not in use.
Placement in the Laboratory
The C‑DiGit Blot Scanner weighs approximately 2.18 kg (4.8 lbs.). The instrument should be placed on a level surface that is at a workable height for the user.
Ambient Laboratory Conditions
Place the C‑DiGit Blot Scanner away from external heat sources (furnaces, windows, etc.). Additional heating can cause high temperatures within the enclosure. Place the instrument away from sinks or other sources of water that pose a shock hazard. Recommended operating conditions are 15-30 °C and a dew point no greater than 25 °C to prevent condensation on the instrument.
Space Requirements
The C‑DiGit Blot Scanner requires an area 27.94 cm L (11.0") x 22.23 cm W (8.75") x 7.3 cm H (2.875", lid closed), or 31.12 cm, (12.25”, lid open).
Safety Considerations
Chemical Safety
LI‑COR Biosciences recommends that all chemicals be handled carefully, and that safe laboratory procedures be followed at all times. Be aware of the hazards associated with any chemical before you begin work.
WARNING: The C‑DiGit Blot Scanner should not be used with any radioactive materials.
Electrical Considerations
The C‑DiGit Blot Scanner includes a power supply that plugs into a wall outlet, with an output that plugs into the C‑DiGit instrument.
Do not locate the C‑DiGit Blot Scanner where the power supply cord will be walked on or exposed to water or chemical spills.
The C‑DiGit Blot Scanner draws a maximum of 1 ampere at 120V (see Odyssey® F Imager Specifications). If a power strip or surge protector is used, make sure the total of the ampere ratings on the instruments plugged into the extension cord does not exceed the extension cord ampere rating. Also make sure the total amperage of instruments plugged into the wall outlet does not exceed the amperage capacity for the outlet (usually 15 or 20 amperes in the United States).
Scanning Surface and Rear Safety Labels

Fuse Replacement
There are no user replaceable fuses in this instrument.
External Panels and Controls
Front Panel

| Power Indicator: While the C‑DiGit Blot Scanner is performing its startup or shutdown procedure, the blue power indicator light on the instrument front panel blinks. When the blue indicator light is continuously on, the instrument is ready for operation. |
| Image Acquisition Indicator: This green indicator light blinks during image acquisition and is continuously on at other times, as long as communication with the Image Studio software is maintained. The indicator light is off only when communication is lost, the Image Studio software is closed, or the instrument is powered off. |
| Error Indicator: The red error indicator light illuminates when a process could not be completed. See the Status Message History dialog in the Image Studio software and C‑DiGit Blot Scanner Maintenance and Troubleshooting for details about the error condition. |


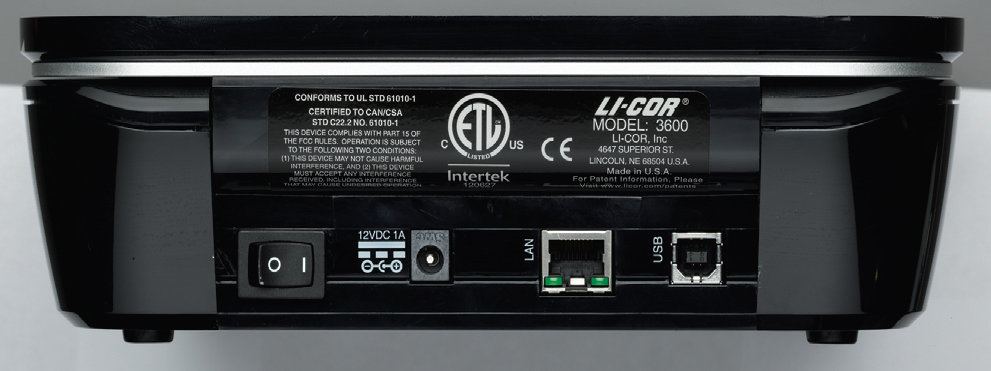
Back Panel
The C‑DiGit back panel has the instrument ON/OFF switch and connectors for the USB and Ethernet cables and the power supply.

Scanning Surface
The scanning surface is accessed by opening the lid on the C‑DiGit Blot Scanner (Figure 141).

Scanning Surface Safety
Be careful not to get your fingers caught between the C‑DiGit instrument lid and the base of the scanning surface when the lid is closed. Do not put excessive pressure on the scanning surface. Clean the scanning surface with 100% methanol, then water. CAUTION: DO NOT use acetone to clean the imaging surface.
Sample Placement
The C‑DiGit Blot Scanner Imaging Surface has a clear window that delineates the edges of the C‑DiGit Blot Scanner scanning surface. Membranes up to 10 cm x 8.5 cm placed within these markers will be fully imaged. Membranes can be placed anywhere within the imaging area to be scanned.
Membranes should be placed sample side down with the top toward the back of the instrument.
Tips for handling and imaging membranes are given in Scanning Membranes.
Quick Start Tutorial
The Quick Start Tutorial Guide included with the C‑DiGit Blot Scanner is intended as a quick verification tool to ensure that the C‑DiGit is working properly, before you proceed to scan your own membranes. The Tutorial Guide is reproduced in this section, with some additional detail.
Unpack C‑DiGit.
In addition to the C‑DiGit Blot Scanner, you will find the items shown below (l-r): 1) Ethernet and 2) USB cables, 3) a power supply with interchangeable plugs, and 4) a C‑DiGit Test Target.
Place C‑DiGit in the lab.
Place the C‑DiGit Blot Scanner away from heat sources (furnaces, windows, etc.) and out of direct sunlight.
Install Image Studio Software or LI‑COR® Acquisition Software.
Remove the yellow warning label on the C‑DiGit Blot Scanner back panel (below).

Install the Power Supply Plug
There are two power supplies available for use with the C‑DiGit; you will have received either the Cincon (p/n 591-13058) or SL Power Electronics (p/n 591-19495) power supply. Each of these power supplies is a universal 100-240VAC input, 12VDC power output supply with interchangeable AC plugs for use in North America and Japan, Australia, Europe, and the United Kingdom. Install the appropriate plug on the power supply as shown below. NOTE: The SL Power Electronics supply has the North American/Japanese plug pre-installed. For use in other countries, remove this plug and replace with the appropriate plug.
Cincon Power Supply

SL Power Electronics Power Supply

Connect the Cables
Plug the power supply into the wall outlet, and plug the power cord into the receptacle on the C‑DiGit back panel (below).
Connect the C-DiGit to your computer using the appropriate connection type for your software (see LI‑COR Acquisition or Image Studio Software for more information).
Turn on C‑DiGit Blot Scanner
Power C‑DiGit Blot Scanner on with the power switch on the back panel. The blue power light on the instrument front panel (below) illuminates and blinks when the instrument is first powered on, and stops blinking when the instrument has fully started up and is ready to use.

- Start Image Studio
Double-click the Image Studio icon (below) on the desktop to start Image Studio.
See the Image Studio Answer Portal for more information about Image Studio.
- Acquire Target Image
Make sure that the Sensitivity is set to Standard. If the Sensitivity is not set to Standard, click on the Sensitivity button and choose Standard from the pull- down menu (below). The image acquisition using Standard sensitivity takes approximately 6 minutes to complete.
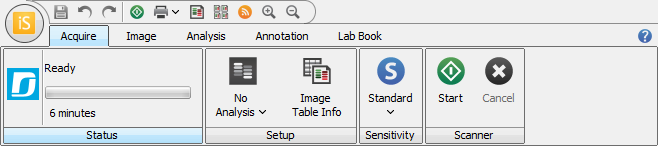
Click the Start button on the Acquire tab ribbon.
The image acquisition will start, and the target image will be displayed as a series of six images of various brightness/contrasts.
Adjust Target Image
Verify that your target image acquisition is similar to that shown below. If it matches, your C‑DiGit is functioning correctly. NOTE: Store the Target in its envelope when not in use. You will generally not need to use the Target after this initial verification step; it may be used later, however, for diagnostic purposes if there is a problem with the instrument.
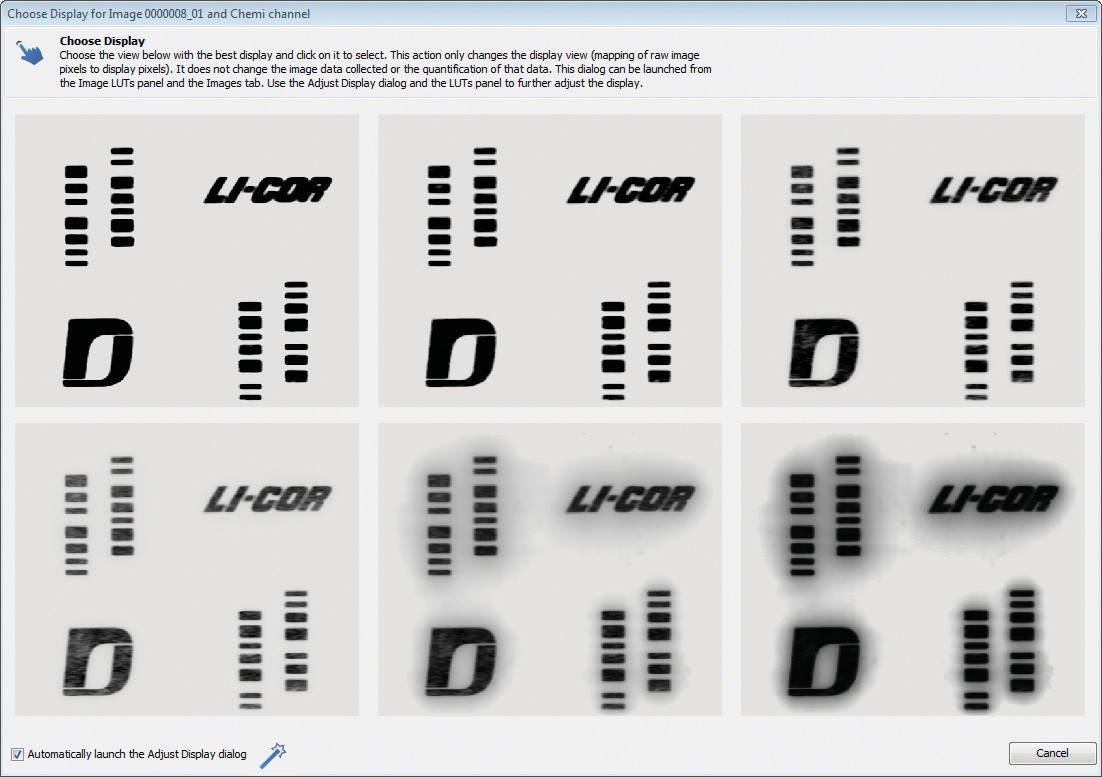
Click on the best image; that image will open in a new window, allowing for further adjustment, if desired. Click on Signal, Background, or Midtones to adjust the brightness for these channels, if needed. Click Done.
Computer Connections & Networking
The C‑DiGit Blot Scanner uses IPv4 and IPv6 Link-Local Addressing to automatically create an IP network without any user configuration or additional servers. If you are using Windows 7, 8 or 8.1 and you experience connection problems, be sure that IPv6 is enabled on the computer.
Note: Use only the supplied USB 2.0 Type A to Type B cable or Cat. 5E RJ45 Ethernet cable to connect the C‑DiGit Blot Scanner and computer. The Ethernet port on the C‑DiGit Blot Scanner is Auto-MDIX, so a crossover cable is not needed.
When Image Studio™ Software starts, it searches for and discovers any
C‑DiGit Blot Scanners automatically. If only one instrument is found, Image Studio Application Software establishes communication.
If more than one instrument is found, the user is presented with a list of instruments and asked which to use.
Because the C‑DiGit Blot Scanner is a networkable device, there are a variety of connection and/or networking options available. Some networking configurations may require assistance from your IT professional.
In general, there are two basic cabling configurations outlined below: 1) computer is connected to C‑DiGit directly via the USB cable included, or; 2) computer is connected to C‑DiGit directly via the Ethernet cable included.
Computer Connections and Networking
Direct Connection Via USB Cable
Use the supplied USB cable (p/n 392-13201) to connect your computer and C‑DiGit Blot Scanner, as shown below.

Direct Connection Via Ethernet Cable
Use the supplied Ethernet cable (p/n 616-06116) to connect your computer and C‑DiGit Blot Scanner, as shown below.
