Installation
Connecting an Anesthesia System
WARNING: Isoflurane gas can leak in the amount supplied to the Pearl Imaging System if the product is not used properly. Carefully follow the instructions in this chapter to ensure that the scavenging charcoal filter and user-supplied anesthesia system are properly connected, and that the nose cone on the image bed has a nose cone plug inserted. Correctly fitting the animals into the nose cone is discussed in Import Options.
L'anesthésie d'isoflurane peut fuir dans la quantité fournie à Pearl si le produit n'est pas employé correctement. Suivez soigneusement les instructions dans ce chapitre pour vous assurer que le port d'échappement est relié à un filtre à charbon, que le système d'anesthésie fourni par l'utilisateur est correctement relié, et que le cone de nez est équipé d'un bouchon inséré. Adaptant correctement les animaux dans le cône de nez est discuté en Chapitre 4.
Installing the Rotameter and Charcoal Filter
If you have already installed the rotameter, skip the instructions below. A detailed diagram of the anesthesia gas flow system can be found at the end of this chapter.
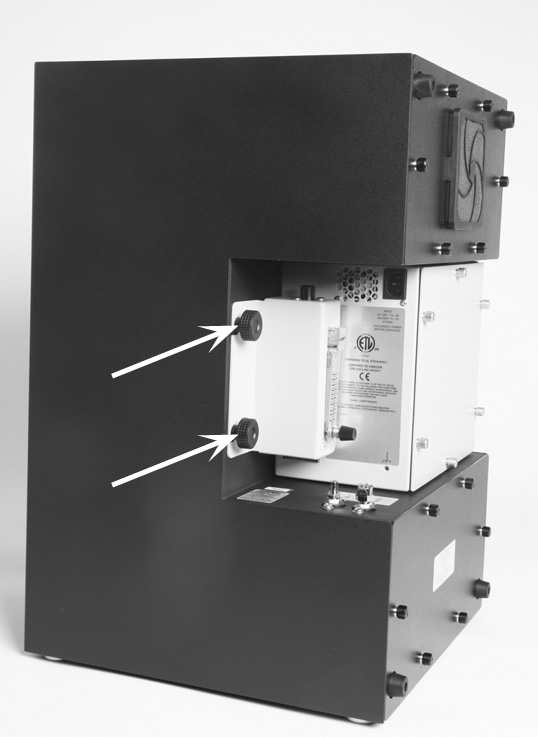
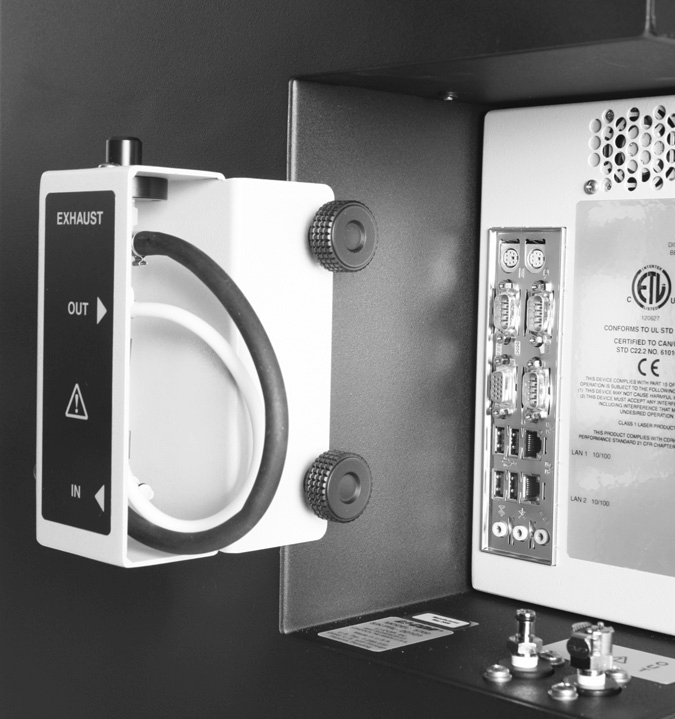
- Remove the two thumb nuts holding the rotameter in its storage position (Figure 92). Remove the rotameter and mount it back on the same studs with the rotameter facing the front of the instrument (Figure 93). Reattach the thumb nuts and tighten until the rotameter body is secured firmly against the Pearl Imaging System enclosure.
- Connect the tube from the rotameter port labeled OUT to the port labeled IN on the Pearl Imaging System instrument body (Figure 94). The connector snaps in place when fully seated.
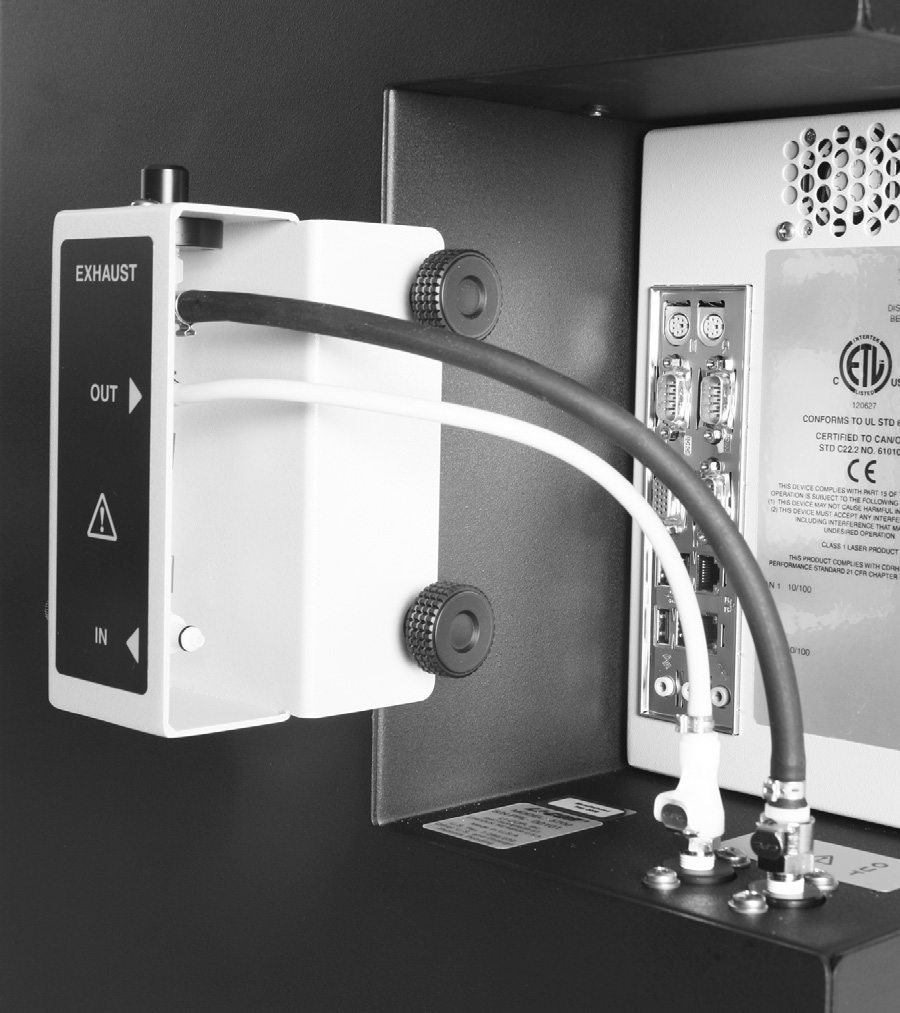
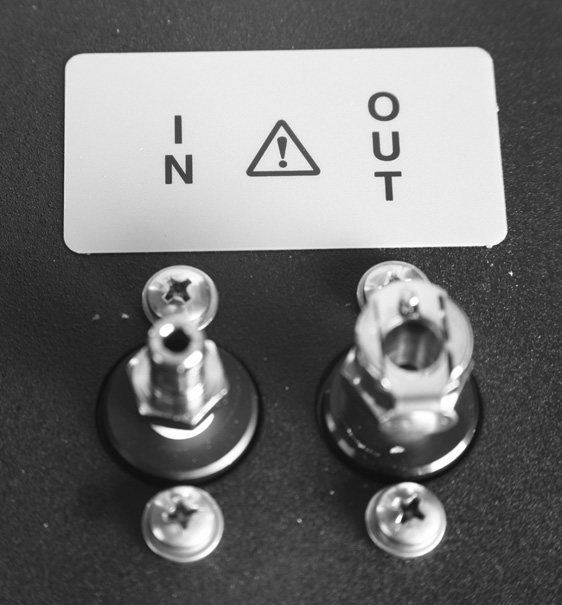
- Connect the tube from the rotameter port labeled EXHAUST to the port labeled OUT on the Pearl Imaging System instrument body (Figure 94). The connector snaps in place when fully seated.
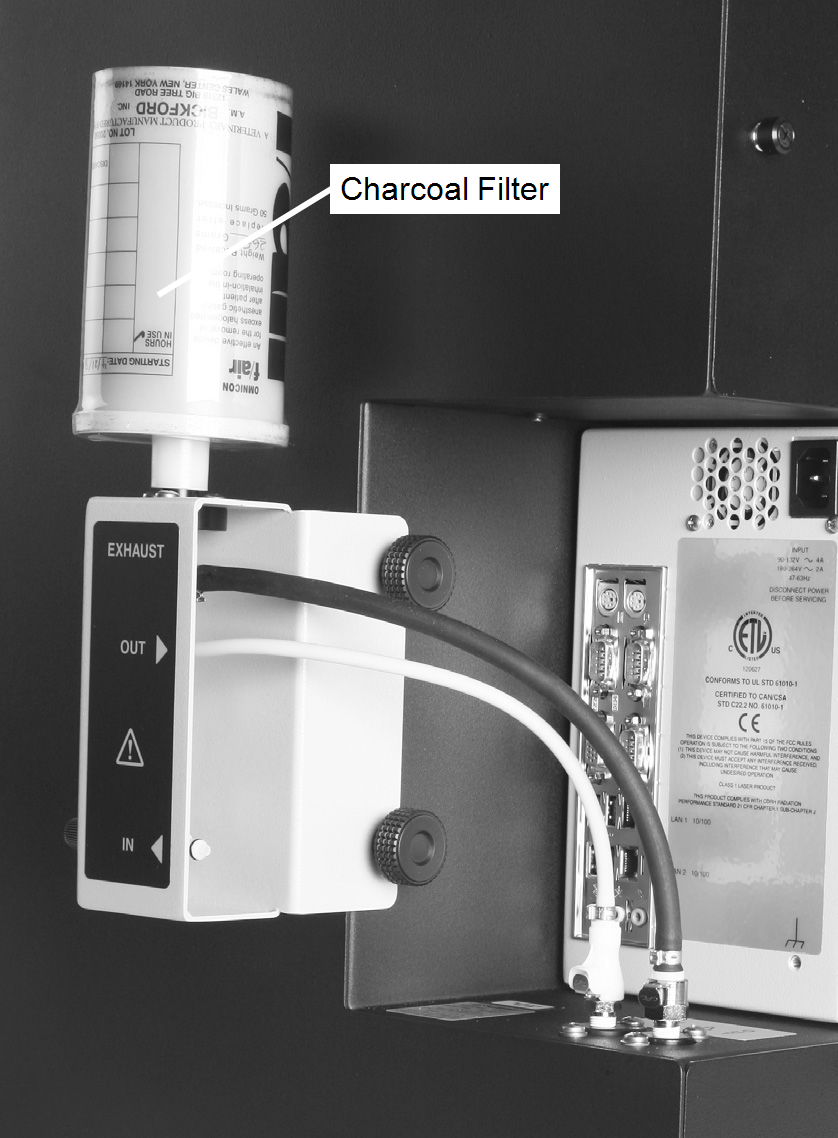
- Press the scavenging charcoal filter onto the EXHAUST port on the top of the rotameter as shown in Figure 95.
Note: The hose connectors used to connect the rotameter all have built-in shutoff valves that stop the gas flow when disconnected.
Connection of an isoflurane system to the rotameter IN port is discussed later in this chapter.
To monitor the saturation levels, the charcoal filter should be removed and weighed daily prior to turning on the gas. Operation protocols for the Pearl Imaging System should include weighing the filter prior to use, recording the initial weight, and then weighing the canister again after each use. Once the filter canister has removed 50 grams of pure halogenated anesthesia gas, it should be replaced.
Connecting an Alternate Scavenging System
A user-supplied scavenging method can be connected by removing the standard scavenging charcoal filter and connecting the scavenging system to the port labeled EXHAUST on the top of the rotameter.
If using an alternate system to scavenge anesthesia gas, follow the manufacturer’s operation and maintenance recommendations to avoid venting anesthesia gas.
Connecting an Anesthesia System
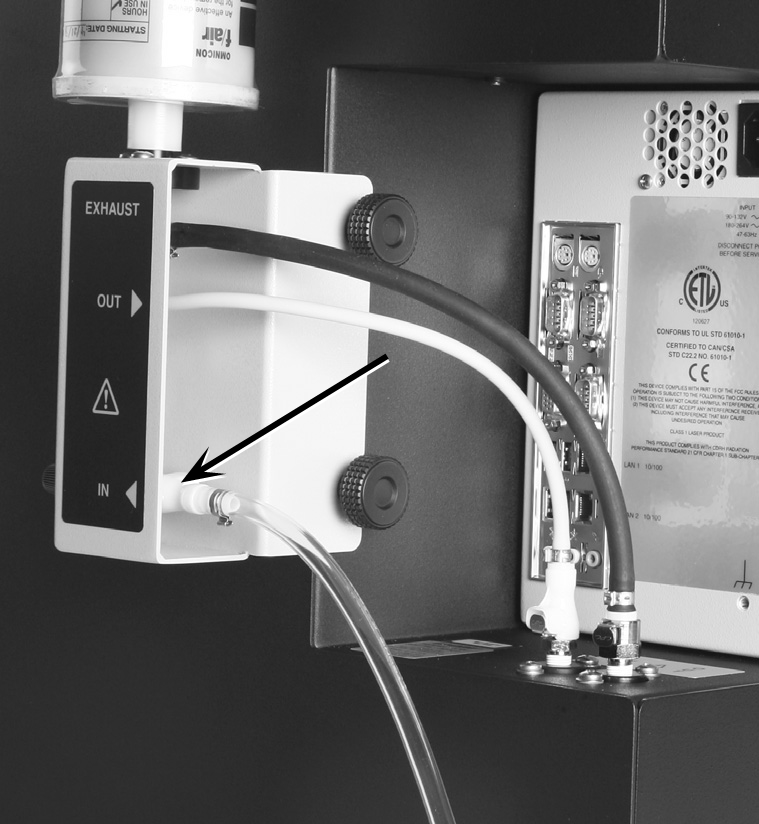
An anesthesia system is not supplied with the Pearl Imaging System, however, a recommended accessory is the SmartFlow Anesthesia System (Figure 98. ). The spare parts kit contains a coupling with a built-in shutoff valve and a length of 1/4” I.D. tubing to connect the SmartFlow System or other similar anesthesia system. Use this coupling to connect the anesthesia system to the inlet port labeled IN on the rotameter (Figure 96), but do not turn on the flow from the vaporizer. When making the connection, be sure the coupling snaps into place and is fully seated. The built-in shutoff valve will not open if the connector is not seated. If the connector does not mate correctly, press the metal button to reset the connector.
CAUTION: The Pearl Imager is compatible only with anesthesia systems that supply isoflurane gas. The flow rate and pressure into the instrument should not exceed 1 liter per minute and 1 psi, respectively. If the pressure exceeds 5 psi, the rotameter will not accurately show the flow to the nose cone.
ATTENTION:
Le Pearl n'est compatible qu'avec les systèmes d'anesthésie qui fournissent le gaz isoflurane. Le débit et la pression dans l'instrument ne devraient pas excéder 1 litre par minute et 6.9 kPa, respectivement. Si la pression excède l'estimation de 34.5 kPa, le rotamètre ne montrera pas en juste proportion l'écoulement au cône de nez.
Checking the Imaging Bed Connections
The imaging bed inside the imaging drawer is part of the anesthesia flow system (Figure 98. ). Press the drawer button on the Pearl® Imaging System front panel to open the imaging drawer. Make sure the imaging bed is locked in place (see System Overview) and dry if recently cleaned.
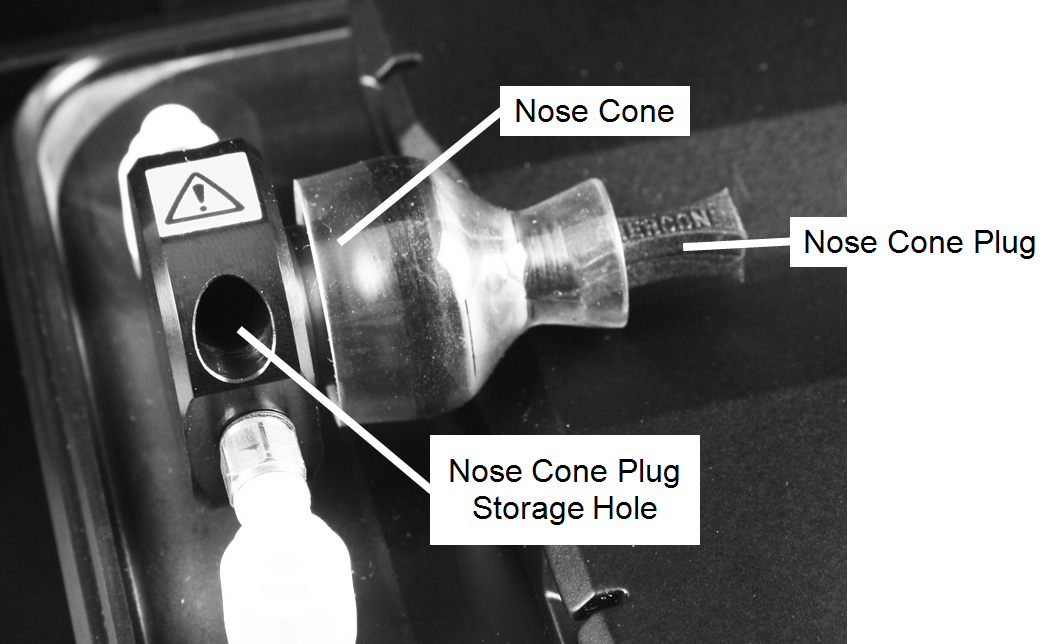
WARNING: Make sure a black nose cone plug (Figure 97) is tightly inserted in the nose cone before turning on the anesthesia gas. Failure to insert a nose cone plug will result in the release of isoflurane gas.
AVERTISSEMENT:
Pour empêcher l'accumulation de pression dans le système externe d'anesthésie, ne fermez pas le rotamètre sur l'instrument Pearl à moins que le système d'anesthésie soit correctement aéré.
Starting the Anesthesia Gas Flow
Set the rotameter for a flow rate of 0.5 liters per minute, which is a good starting flow rate for typical mice. Adjustments can be made once the flow of isoflurane gas is started.
Start the flow of anesthesia gas according to the instructions from the manufacturer of the anesthesia system.
WARNING: Isoflurane gas is a human inhalation hazard that needs to be ventilated away from workers. It can cause coughing, sore throat, dizziness, drowsiness, headache, and unconsciousness. Pregnant women should not work in an environment where there is any potential isoflurane risk.
AVERTISSEMENT:
Le gaz isoflurane est un danger pour le système respiratoire humain et il doit être dispersé par ventilation loin des ouvriers. Il peut provoquer la toux, la gorge endolorie, le vertige, la somnolence, le mal de tête, et l'inconscience. Les femmes enceintes ne devraient pas travailler dans un environnement où il existe un danger d'inhalation d'isoflurane.
Stopping the Anesthesia Gas Flow
Anesthesia gas flow to the Pearl Imager can be deliberately stopped in one of three ways;
- Disconnecting the external supply from the Pearl instrument,
- Closing the adjustment valve on the rotameter,
- Removing the imaging bed or raising the imaging bed handle to the vertical position.
In all cases, the external anesthesia system should be properly configured with a drain or relief (such as an induction chamber) so as not to harm the user or anesthesia equipment with the buildup of pressure.
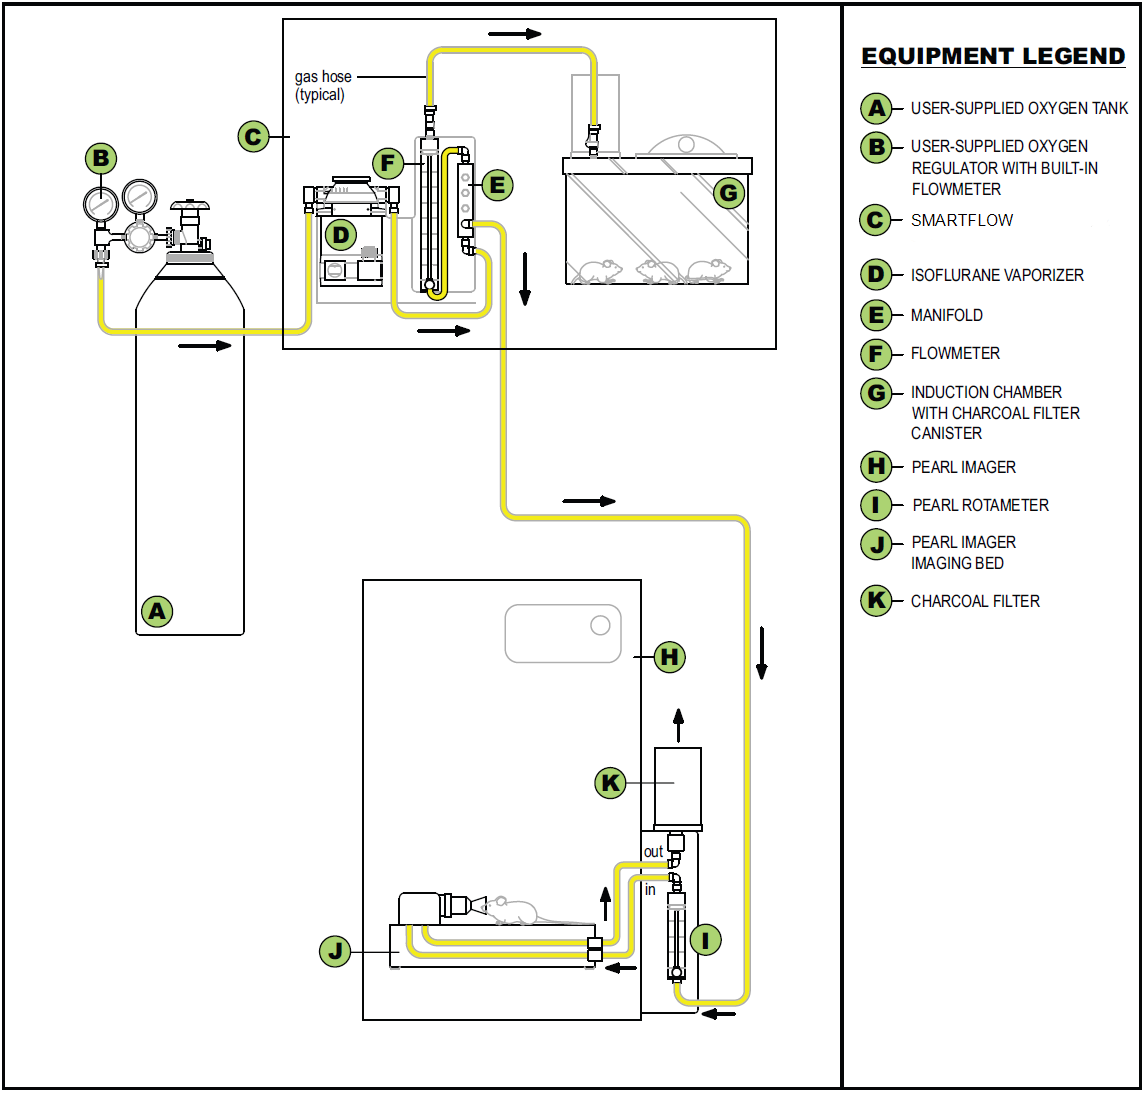
Flow Path for Anesthesia Gas
The flow of isoflurane gas through a typical system consisting of a Pearl Imaging System and the SmartFlow Anesthesia System is illustrated in Figure 98. When using an anesthesia system other than the SmartFlow System, the anesthesia system should be vented to prevent pressure build-up if the Pearl Imaging System rotameter is closed or the imaging bed is removed. Either of these actions stops the flow inside the Pearl Imaging System instrument. The Pearl Imaging System instrument itself is protected by a 10 psi relief valve that releases excess pressure to the exhaust port when the imaging bed is removed or the imaging bed handle is in the vertical position.