Getting started
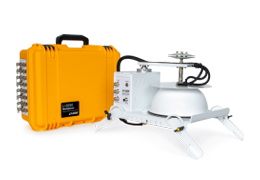
This section serves to help you get started with any LI-8250 configuration. Everything should be powered off when you connect the cables and tubes. You may find that it is easiest to set everything up in the comfort of your lab or office before deploying the system to the field.
Initial setup tutorial
The following steps can be undertaken in the field or lab. It may be helpful to review the Configuration examples - soil and canopy chambers.
1. Attach tubes and cables for gas analyzers to the LI-8250
- The LI-870 connects with cable bundle 9982-010. See LI-870 cables and tubes.
- LI-78xx Trace Gas Analyzers connect with cable bundle 9982-011. See LI-78xx Trace Gas Analyzer cables and tubes.
- If using multiple gas analyzers, install one or more tube T-split (part number 9982-073) to divide the flow. See Connecting multiple gas analyzers.
2. Attach tubes and cables for chambers, ext. manifolds, and the cal. manifold
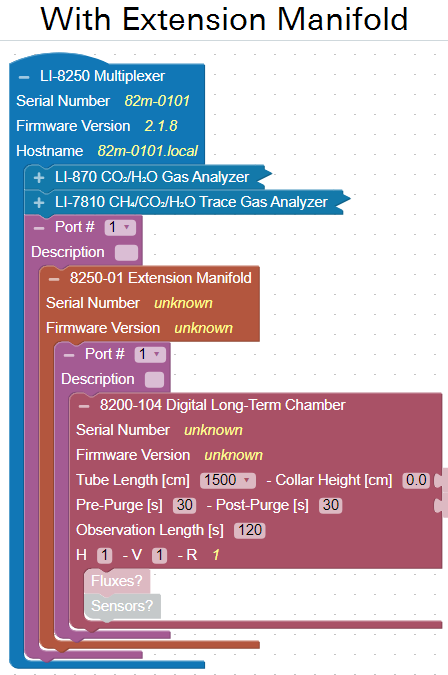
Each chamber and 8250-01 Extension Manifold connects to a port with a cable and tube bundle (part number 9982-056). If using one or more extension manifolds (up to four total), connect them to the multiplexer and then connect chambers. Additional steps are described later in the Support: LI-8250 Multiplexer.
- See Chamber cables and tubes for guidance with chambers.
- See 8250-01 Extension Manifold cable and tubes for the 8250-01.
- See Using the 8250-02 Calibration Manifold for an 8250-02.
3. Power on the LI-8250 and Trace Gas Analyzers
Choose the power supply that is easiest for you from Powering the LI-8250 Multiplexer.
- The LI-8250 powers on automatically when power is supplied.
- The LI-870, 8250-01 Extension Manifolds, and 8250-02 Calibration Manifold are powered by the LI-8250. These devices will power on automatically when power is supplied to the LI-8250.
- LI-78xx Trace Gas Analyzers must be powered externally, either from the power adapter (recommended) or batteries. Power on each Trace Gas Analyzer.
4. Connect with the LI-8250 Wi-Fi network or with a network cable
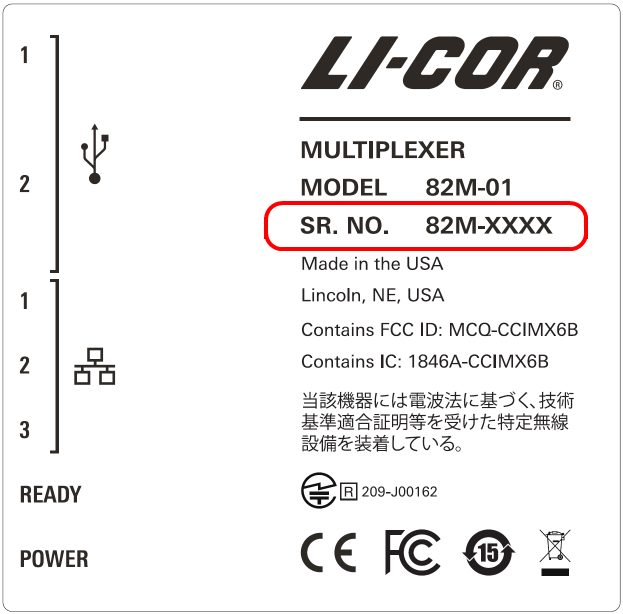
On your computer or mobile device, follow your standard procedure for identifying Wi-Fi networks. The network name is the serial number of the LI-8250 Multiplexer (82m-nnnn). The serial number is on the label inside the multiplexer (see Figure 2‑1). Select the network and enter the password licorenv to connect. If Wi-Fi is not enabled, connect the network cable between the LI-8250 and your computer.
Note: Broadcasting a Wi-Fi signal is not permitted in all locations. LI-COR, Inc. cannot be held liable for use of Wi-Fi/WLAN where it is prohibited. If WLAN is restricted in your area, and you are interested in other options for Wi-Fi, please contact LI-COR technical support. To change the setting Enabling and disabling Wi-Fi.
5. Connect to the LI-8250 using a web browser
In a web browser, enter one of the following.
- Hostname: Enter http://82m-nnnn.local, where 82m-nnnn is the hostname (and the serial number) of your LI-8250 Multiplexer.
- Alternate Hostname: Some Android OS devices do not support multicast Domain Name Service (mDNS). You may need to enter the hostname in this format instead: http://82m-nnnn.li8250.licor.com.
- If the hostname does not work, try the fixed IP address: 192.168.46.1.
The LI-8250 Multiplexer Home page will load in your browser window. It is mostly blank at first, beckoning your interactions that will make it informative and useful.
6. Set the time zone
Under Settings () > Time > Time zone, you can set the time zone to ensure that your data are aligned in time. You only need to do this once; the setting will be stored unless the internal clock battery is depleted. Click Apply to save the setting.
Note: We recommend standard time (do not adjust for daylight saving time). Arbitrary changes to the clock can cause data to have the appearance of gaps and overlaps.
7. Connect to gas analyzers
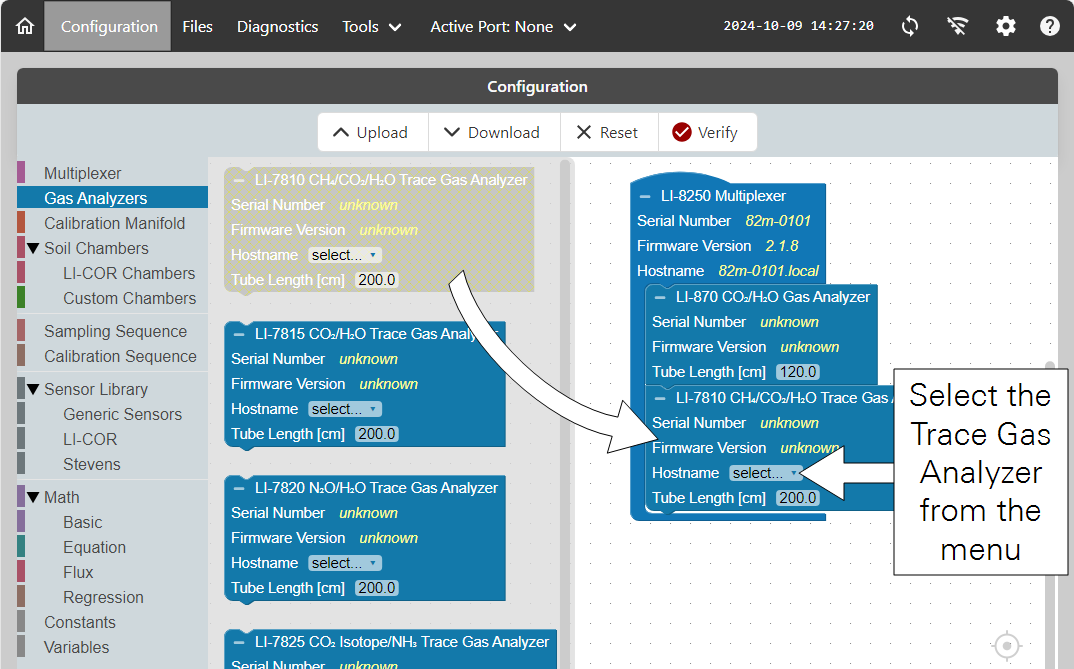
In the Configuration workspace, click Gas Analyzers and add a block for each analyzer in your system. Volumes for each gas analyzer will be filled automatically, but you can edit them if you have added or removed tubing.
- The LI-870 will connect automatically if the USB and power cable are installed. Confirm the connection by observing that the device serial number populates the field.
- LI-78xx Trace Gas Analyzers are selected from the Hostname menu. Confirm the connection by observing that the device serial number automatically populates the field.
- If you are using the T-spitter (9982-073) and multiple analyzers, add 15 cm to the Tube Length for each analyzer. If you are using two T-splitters, add 30 cm to the tube length for each analyzer that uses two legs of a T-splitter.
8. Add ports for each chamber and extension manifold
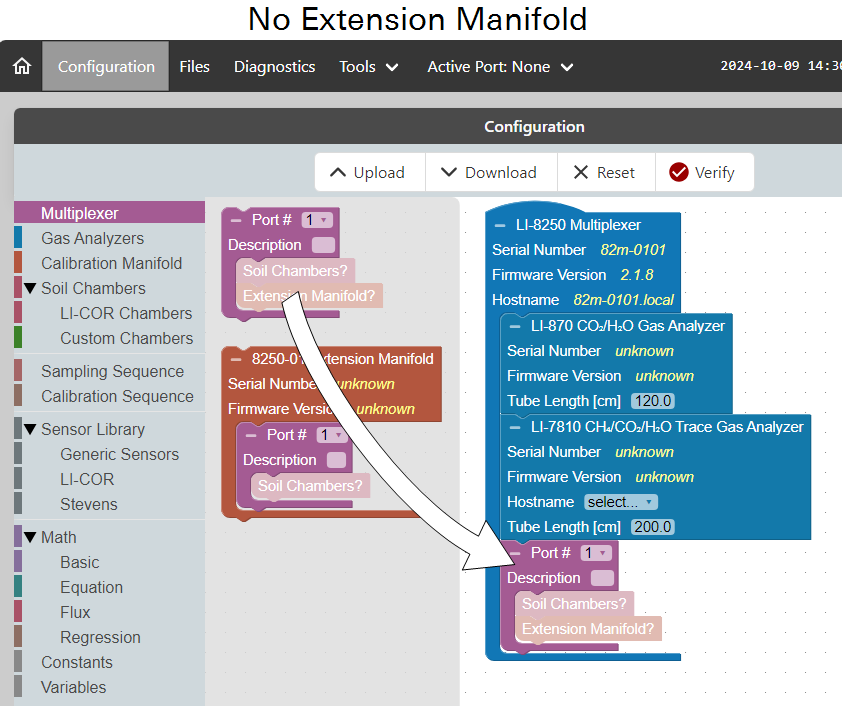
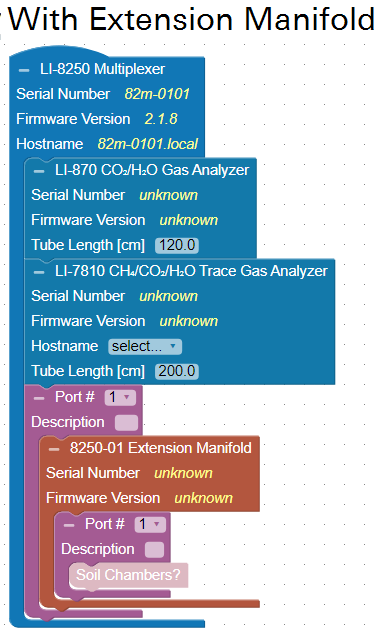
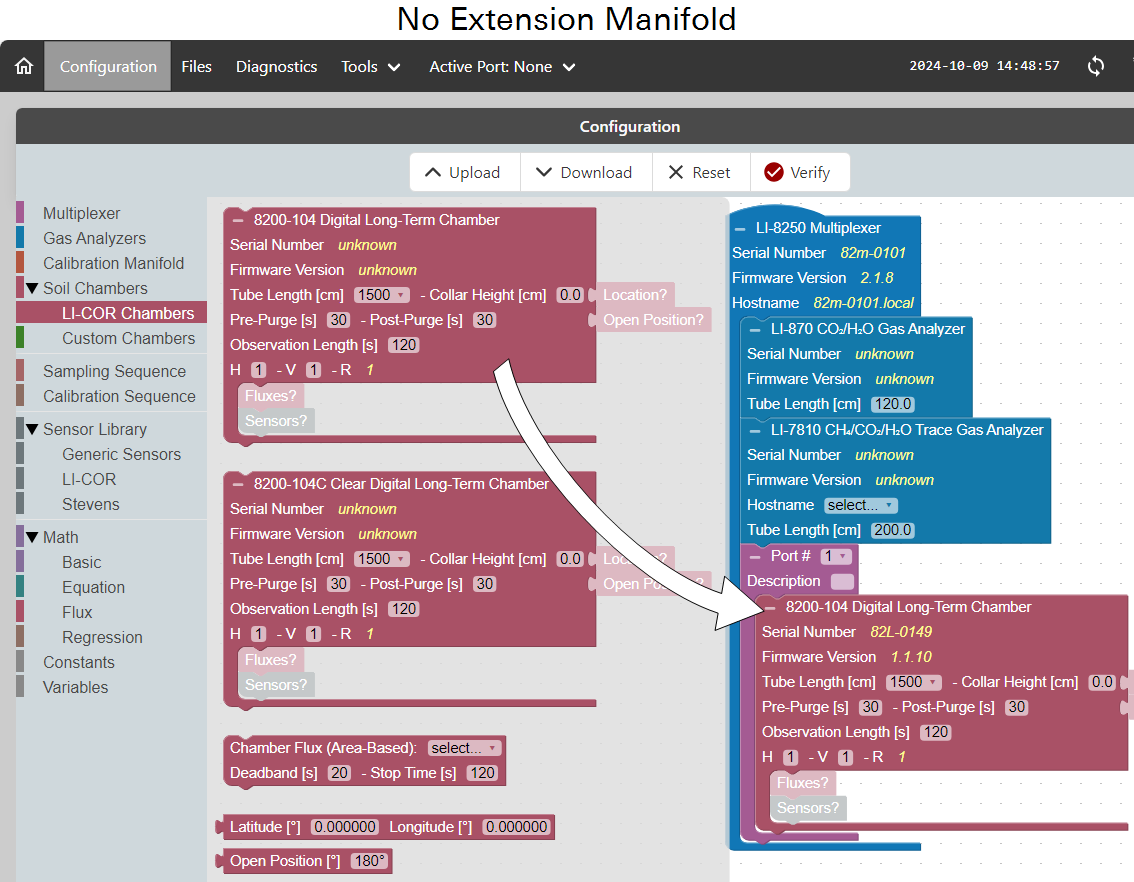
You can add a port that hosts a chamber or a port that hosts an Extension Manifold and then add chambers to ports on the manifold.
Extension manifolds and chambers are connected to ports. Add items to the Configuration workspace to create the configuration.
For each port, configure the following:
- Add a Chamber block: 8200-104 Long-term Chamber, 8200-104C Clear Long-term Chamber, 8200-105 Large Chamber, or 8200-105C Clear Large Chamber.
- If it is different from default, enter a Tube Length. This is used to compute total system volume. Tube length in the interface represents the length of a single piece of tubing in the cable/tube bundle. The software accounts for both pieces of tubing when it computes the total volume. If you have altered the volume by adding or removing tubing, you can enter different lengths, which will be used to compute the total volume.
- Enter the Pre-Purge and Post-Purge times. The default settings are fine for now, but you may need to optimize the settings to ensure the tubing is purged.
Some parameters require information that will be collected at the field site. You can configure them now if you have the information, or do it later. The steps are described again in the Support: LI-8250 Multiplexer.
- Enter the Collar Height. This is used to compute total system volume.
- Add a Location block and enter the precise latitude and longitude for the chamber. If no location block is added, the multiplexer location is used instead, as determined from its internal GPS receiver.
- Set the Open Position. The default setting is the maximum position: 180° for Long-term Chambers or 90° for Automated Canopy Chambers.
- Configure the Maximum Temperature Increase, which is the permitted temperature increase inside the closed chamber before aborting the measurement. 10° is the default setting, but 3° may be better.
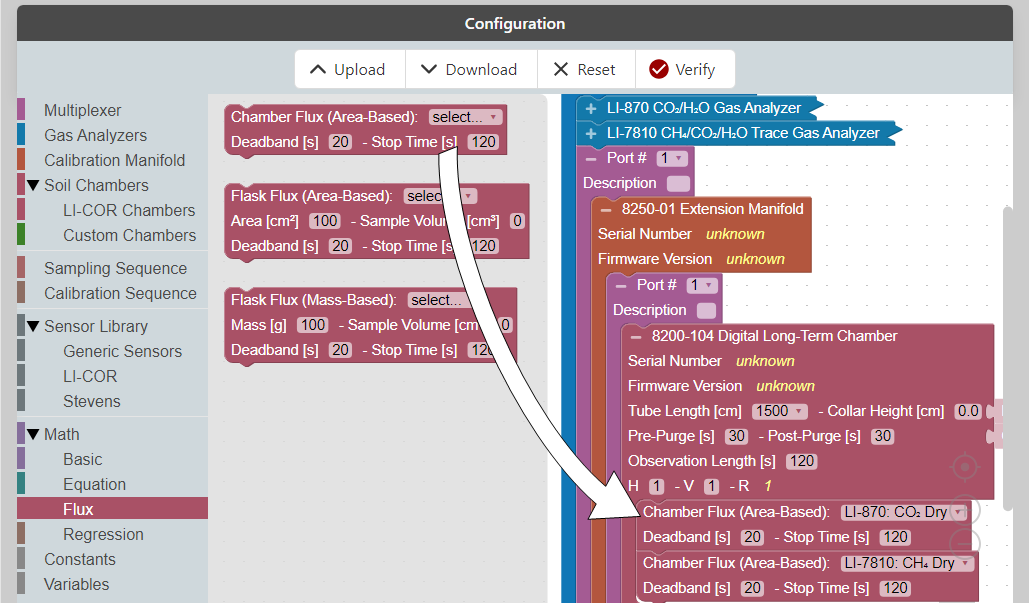
10. Configure the flux computations
After adding a Flux block, you can select a variable to use for flux computations. Configure the Deadband and Stop Time for each flux computation. These parameters can be altered in post-processing. See Flux blocks for a description of the blocks.
11. Connect and configure chamber sensors
This step can be completed when you are preparing for field deployment or while you are deploying the system. If you prefer to do it later, skip to the next step.
Each chamber has a built-in air temperature thermistor and connectors for light sensors and HydraProbes. For Long-term Chambers, connect the thermistor cable to one of the chamber Sensor connectors. For Automated Canopy Chambers, connect the motor cable to the MOTOR connector.
-
Connect the LI-190R or LI-200R light sensor cable to a chamber. Enter the serial number of the light sensor and the calibration multiplier. See LI-190R and LI-200R light sensors for field installation instructions and more details.
- Connect one Stevens HydraProbe to a chamber and then configure its address (see Using the SDI-12 console). The default settings will record soil water content and soil temperature with the dataset. For the best results, however, you can set the soil type for the HydraProbe. When you are deploying the system, follow the steps in Stevens HydraProbe. Repeat this for each probe and chamber.
Leave the sensors attached after entering the calibration and configuration information to prevent risk of attaching sensors to the incorrect chambers or ports.
12. Configure the sampling sequence
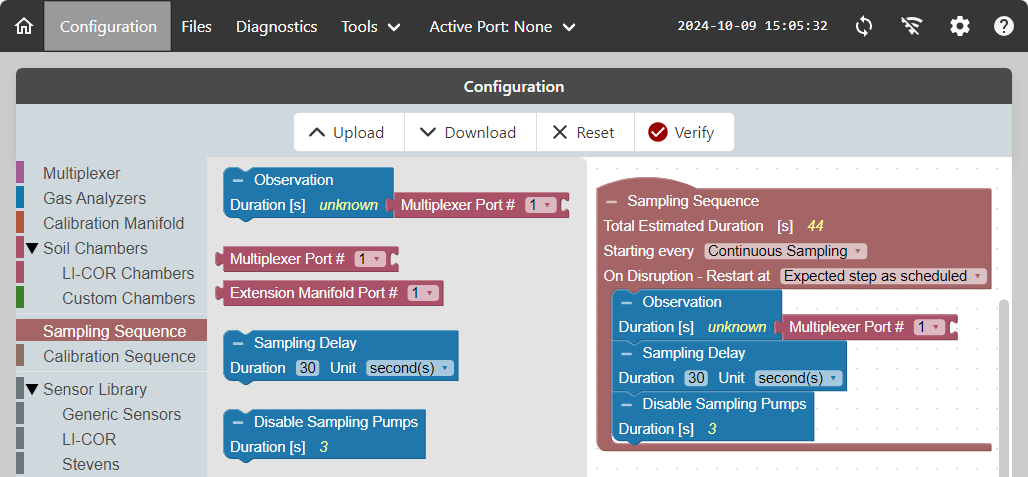
The Sampling Sequence sets the order of events. Each block added will contribute to the Total Estimated Duration of the sequence. This must be taken into consideration when choosing when to start the sequence. The Sampling Sequence runs in order from top to bottom.
- Configure the Start Sequence: Choose a time interval or continuous.
- Configure the On Disruption behavior: Specify the action to take after the system restarts. Once applied, this action will be taken the next time you start up the device.
And configure the first step in the sequence:
- Observation: Specify which port to associate with the observation. It can be a port on the multiplexer, or a port on an 8250-01 Extension Manifold (which is connected to a port on the multiplexer).
- Delay: The time to wait before starting the measurement.
- Disable Sampling Pumps: Simply add this block to instruct the device to disable sampling pumps when they are not needed. This is to reduce wear on the pumps and allow quieter operation.
Add more blocks in the measurement sequence until each port is configured. When configuring a system with multiple chambers and extension manifolds, you can copy/paste or duplicate blocks to speed things up.
13. Configure the calibration sequence (optional)
If you are using the 8250-02 Calibration Manifold, additional settings should be applied. See Using the 8250-02 Calibration Manifold.
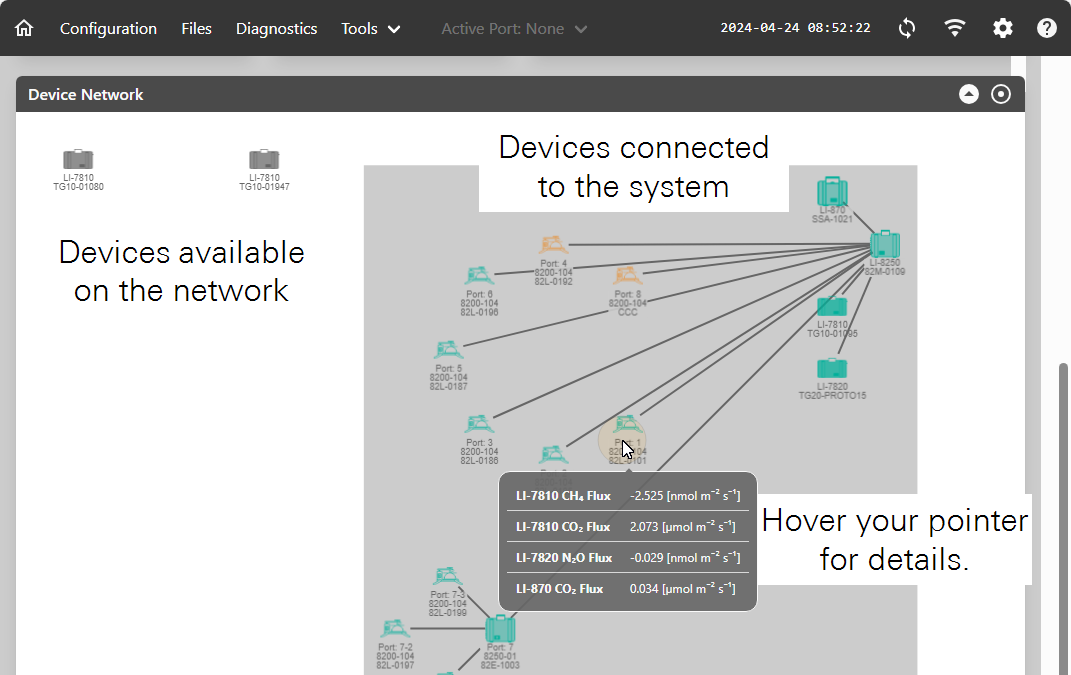
14. Review the device network and live data from the instruments
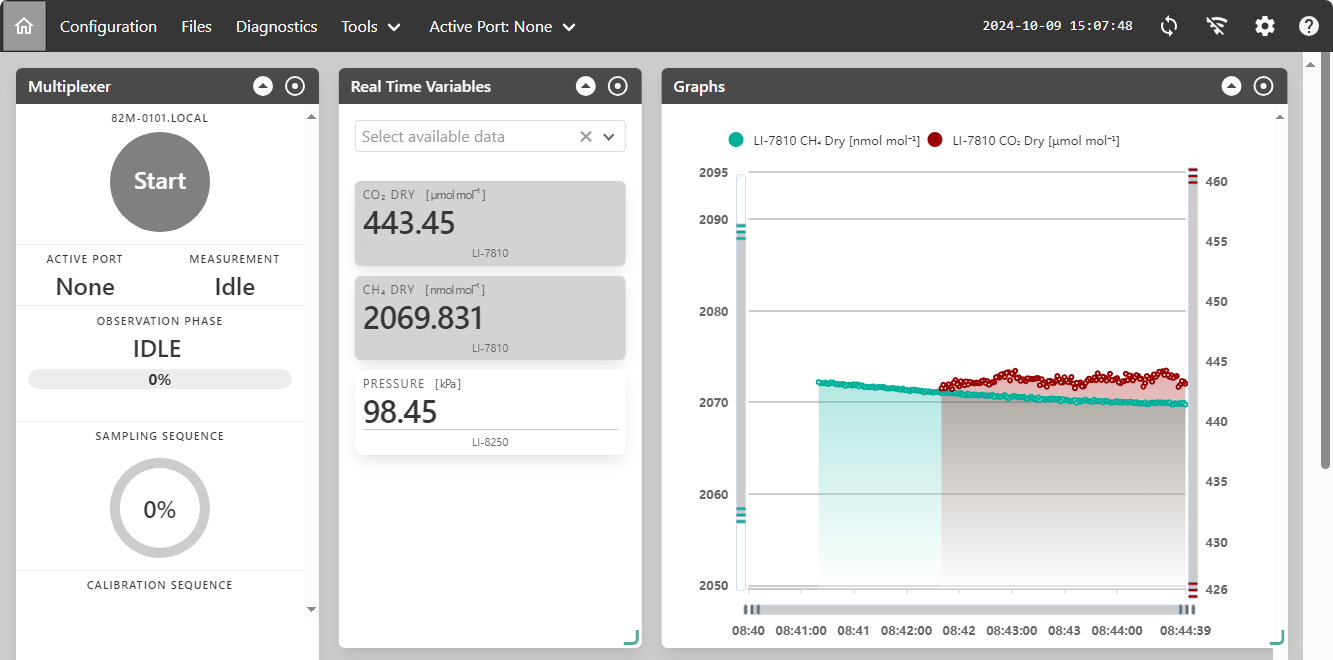
Sensor data can be viewed in the LI-8250 interface under Real Time Variables. It is good practice to verify that measured values are reasonable after configuring the sensors.
In the Real Time Variables pane, expand the menu and choose a variable. Variables are added to the list, and you can simply select one or more to view it on the graph. Click the trash icon to remove a variable from the list.
With the variable(s) added to the list, use the Active Port menu to select the chamber with the sensor. Data, including sensor data, will begin streaming from the chamber on that port. This data can also be seen when a sequence is running but only from the currently active port.
Enabling and disabling Wi-Fi
Note: Broadcasting a Wi-Fi signal is not permitted in all locations. LI-COR, Inc. cannot be held liable for use of Wi-Fi/WLAN where it is prohibited. If WLAN is restricted in your area, and you are interested in other options for Wi-Fi, please contact LI-COR Technical Support.
You can disable and re-enable Wi-Fi using while connected with a network cable. Connect the multiplexer to a computer using the RJ-45 network cable (part number 616-06116). After connecting the cable, connect to the LI-8250 with a web browser (see Connect to the LI-8250 using a web browser). Select the Wi-Fi settings icon (or

When enabling Wi-Fi, leave Channel at the default setting (this may be used to troubleshoot connectivity issues if necessary).
Note: You must always Apply after changing Wi-Fi settings. If you navigate to other pages without clicking Apply, your changes will not be saved.
