Working with Table Data
The top right of the Table section has commands to Filter the Table, Report table information, and choose Columns to display in the table. You can also Copy selected rows from the table onto the clipboard for pasting into other programs and Paste the contents of the clipboard into the table.

Copy
The Copy button copies to the
clipboard the selected rows of the table view in the current order. If
you want all visible rows from the table, Ctrl-A
will select them all, or click the Select All button ![]() in the upper left corner of the table . Column headings are included.
in the upper left corner of the table . Column headings are included.
- Click the tab on the left top of the Table section to select the Table you want to work with.
- Select one or more rows in the table. (Press Ctrl-A
to select them all, including the column headings, or click Select All
 in the upper left corner of the table.)
 - Click Copy or press CTRL+C on your keyboard. This copies the selection to the clipboard. You can now paste the rows with the column headings in another program.
Paste
The Paste button pastes data from the clipboard down a table column starting at the current selection.
- In the selected table, select any editable row or column.
- Click Paste or press CTRL-V on your keyboard. This adds the rows from the clipboard in the selected column beginning with the selected row. Each entry in the paste buffer fills one row in the table view. Rows are filled starting with the selected row down one row per entry until reaching the last row in the table view.
- If there are fewer entries in the paste buffer than remaining rows in the table view, all the entries in the paste buffer are used, but all the rows may not be filled with new entries.
- If there are more entries in the paste buffer than remaining rows in the table view, the new entries are pasted into the selected column beginning at the selected row with a new entry in each subsequent row until the end of the table view is reached. A warning message displays stating that some entries in the paste buffer are discarded.
When the paste with multiple entries in the clipboard function is used on tables outside of the Images table on an Images table column, all rows of this column will be the same. All values in this column will have the value of the last row filled in with this paste operation. This is because only one value is applied to this column of the Images table for a given Image ID. Since the non-image table is only of one Image ID, all rows of any Images table column are the same.
Launch Spreadsheet
To export data to a spreadsheet:
- Select the rows that you want to export to a spreadsheet.
- Click Report in the upper right corner of the Table section and select Launch Spreadsheet from the list to create a (*.xls) file containing the selected rows of the table view in the current order.
- If you have Excel on your computer, or another spreadsheet program that can open .xls files, the program is launched. First you will be prompted for a name. You can accept the default, or change the name and location. The program then opens.
If you do not have an Excel or compatible program installed, you will get a message that an application to read Excel files must be installed before using this feature. You must also set the file association to open the application for files with the .xls extension (this is done in the Windows Control Panel –> Default Programs –>Set Associations dialog).
Filter the Table
After you apply a filter, only entries that meet the filter criteria are visible in the Table section.
- Click Filter at the top right of the Table section to view filter options appropriate for the selected table. For example, the MPX Western Bands table is selected below.
- If a filter is applied, click
 at the bottom of the window to view currently applied filters.

Filters are preserved when you save and exit Image Studio™ Software. The next time you open Image Studio Software, the filters you applied in the previous session are used.
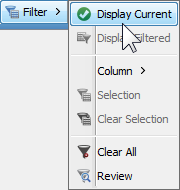
Display Current
The Display Current filter option filters data tables to only show table entries from the currently selected image in the Images table. Display Current is applied by default.
Click Display Current in the Filter list to clear the filter and show all relevant data from images in the current Work Area.
In Image Studio 21 CFR Part 11, clearing the Display Current filter will only show data for images that have already been viewed in the current Image Studio session.
Define Filter
Select Display Filtered in the Filter list to display only the table entries in the filter.
- Click Images at the top left of the Table section to display the Images table.
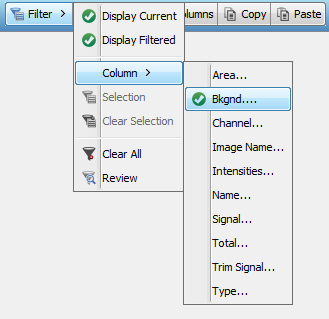
- Click Filter at the top right of the Table section and point to Column.
- Select a column name from the list to open the Define Filter dialog. This example shows the choices for the Channel column.
- Select the channel to include in the filter. Filters from multiple columns can be active at the same time.
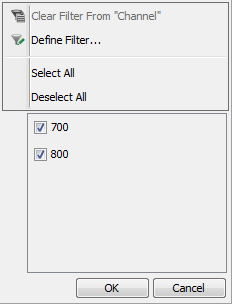
Check marks indicate the filters that are currently defined. Multiple active filters are logically added together — the rows displayed are the intersection of the rows that are displayed by each of the filters individually.
Filter Selection
Click Selection to display only the currently selected rows in the table.
Filter Clear Selection
Click Clear Selection to remove the Selection filter but leave other defined filters in place.
Filter Clear All
Click Clear All to remove all existing filters so that a new filter (or set of filters) can be created.
Review
Click Review to display a list of all filters currently applied in the table. You can also click the icon () at the bottom of the application window to open the Review Filters dialog where all filters currently applied are listed.
Table Columns
Each of the Tables contain a number of default columns that are pertinent to that Table. Additional columns are available in the Columns dialog. Click the appropriate tab at the top left of the Table section to display the desired table. In this example, the Images table is displayed.

The table can be filtered to display only the images of interest (see Filter the Table).
Adding or Removing Columns
You can add and remove columns any of the Tables.
- Click the appropriate tab at the top left of the Table section.
- Click Columns on the top right of the Table section to display the Columns dialog. In this example, the Image Columns dialog is displayed.
- Enable (click) the columns that you want to include (click again to disable), and click Save when you have finished.
Customizing Columns
There are 3 columns that can be renamed (Custom Image Column 1, Custom Image Column 2, and Custom Image Column 3 in this example). The fields in these columns are editable fields where you can add text, similar to the Comment field.
To Customize (rename) any of these columns, type the desired text in the text field. Click Save when you have finished. The new name(s) replaces the default column name(s) in the table. Enable (click) the columns in the top part of the dialog to include these columns in the Table.
Grid Sheet
The Grid Sheet tab appears at the top left of the Table section when a Plate, Plate Array, Grid, Grid Array, or In-Cell Western Analysis is applied. Click on the tab to view the Grid Sheet.
Choose the value to display from the Column: drop-down menu.
Select the channel from the Channel: drop-down menu.