Lane Finding
Adaptive Lane Finding
Starting in version 1.3, can automatically find lanes on a Western blot image using a patent-pending process called Adaptive Lane Finding (ALF). ALF detects the number of lanes and the precise boundaries of each lane. Using ALF to find lanes has three main advantages over finding lanes manually:
Faster analysis: The researcher does not spend time manually defining placement of each lane.
Fewer sources of variability: Because the researcher does not manually define lane placement, variability caused by subjective choices during lane placement is eliminated. Replicate lanes found using ALF can be compared knowing that all the lanes were found objectively according to the same criteria.
Improved total protein stain quantification: Because lane location can be found precisely, relevant background can also be found precisely to consequently improve total protein stain (TPS) quantification. Quantifying the total protein in a lane is useful for accurate normalization that is recommended by journal guidelines (Journal of Biological Chemistry Collecting and Presenting Data. Journal of Biological Chemistry. American Society for Biochemistry and Molecular Biology. Web. 24 September 2018.), so accurate TPS quantification is important for reliable Western blot results.
The ALF process provides these benefits by working with the patented Adaptive Background Subtraction (ABS) process (introduced in Empiria Studio 1.1). Lanes can still be found manually in Empiria Studio 1.3 (if necessary), providing consistency with previous versions of Empiria Studio.
Adaptive Lane Finding Process
The Adaptive Lane Finding (ALF) process precisely determines lane location and relevant background, which enables more accurate quantification of lanes stained with a total protein stain (TPS lanes). The Adaptive Lane Finding process precisely determines lane location and relevant background, which enables more accurate quantification of lanes stained with a total protein stain (TPS lanes).
Step 1: Find Lanes
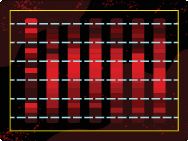
The user draws a boundary that encloses all lanes on the image (even if some lanes will not be used for analysis). This is called the Region of Interest (ROI).
Empiria Studio performs the rest of the lane finding and lane quantification process automatically.

The ALF process begins by dividing the ROI into horizontal segments.
Intensity of pixels in each horizontal segment is summed along the y-axis to find a segment intensity profile (SIP). The SIP is a cross-section of lane intensity along the x-axis for each of the horizontal segments.
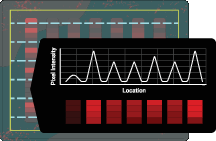
Intensity peaks within each SIP are analyzed to determine lane width, and lane widths are compared across SIPs to determine the left/right boundaries of the entire lane.
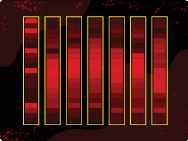
At the conclusion of this process, the lanes have been identified for further analysis, including background subtraction. The ALF process has identified the widths of the lanes, and the top/bottom of each lane corresponds to the ROI defined by the researcher.
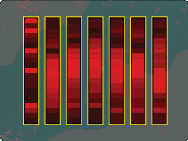
Step 2: Find Background
The region inside the ROI but outside the lanes is relevant for background subtraction. This is the region where the gel contacted the membrane, not including signal from within a sample lane. The top and bottom of the ROI, drawn by the researcher, should not include regions on the image that are outside the membrane.
Step 3: Subtract Background
Now that the background region for each lane has been identified, the pixels from that region are processed using ABS to calculate a background value. The background value is then subtracted from the total pixel intensity for the TPS lane to calculate the lane’s signal value.
The background subtraction method for bands has not changed in Empiria Studio 1.3.
Manual Lane Finding
In Manual mode, the researcher chooses the number of lanes and can place lane lines manually.
In versions of Empiria Studio before version 1.2, lanes were only defined manually. When lanes are defined manually in version 1.2 and 1.3, background is subtracted using the same procedure that was used in Empiria Studio 1.1 and earlier.
Adaptive Lane Finding Compared to Manual Lane Finding
The Adaptive Background Subtraction (ABS) method is used to calculate background values in both Empiria Studio 1.3 and earlier versions. However, a different background region is used when lanes are found using ALF compared to when lanes are found manually in version 1.3 and earlier versions.
When ALF is used to find lanes, the location of lanes and the regions to the left and right of each lane are known exactly. The region to the left and right of each lane represents background specifically relevant to the lane. The ABS method is used to calculate an accurate background value for a lane from that background region.
This background value is then subtracted from the total pixel intensity in the lane to calculate the lane’s signal value.
When lanes are found manually, one background value is calculated for the entire membrane. That single background value is used for every lane being quantified.
This background value is then subtracted from the total pixel intensity in the lane to calculate the lane’s signal value.