Scanning
Scanning
Samples should be placed on the scan surface in the lower-left corner next to the arrow (Figure 66).

Using Membranes
For Western blotting methods, nitrocellulose or PVDF membranes may be used (see licor.com/membranes for the latest membranes and kits).
The following are general tips for handling membranes and imaging membranes with the Odyssey® DLx.
Handling Near-Infrared Western Blot Membranes
Important: Do not touch the membrane – handle only with clean forceps. Lift the membrane only by the corners. Fingerprints, even from a glove, will show clearly when imaged.
Use clean containers to avoid cross-contamination and reduce background.
Protect near-infrared (NIR) Western blot membranes from light prior to imaging.
Keep the membrane wet if it is to be stripped and re-used.
Store in PBS or TBS at 4 °C or store dry at room temperature. The fluorescent signal on a dried membrane will remain stable for several months or longer if protected from light and air.
Scanning Membranes
Blots can be imaged wet or dry.
Scanning Dry Membrane
Place the membrane on the scan surface sample-side down with the silicone mat on top of the membrane.
Scanning Wet Membrane
Place the membrane on the scan surface sample-side down.

Remove any air bubbles using the 4" soft roller.
Place 1 - 2 mL of PBS or TBS on top of the membrane. If you are imaging multiple membranes, place the silicone mat on top of the membranes.
If the signal on the membrane is too strong, saturated pixels will be shown in bright contrast to the rest of the image. Re-scan at a lower intensity setting or use Auto Mode.
LI‑COR Acquisition Software Steps for Scanning Membranes
Start LI‑COR Acquisition Software
 .
.Click Scan
 .
.Enter a Username.
Choose your Odyssey DLx in the list of imagers.
Choose the Membrane workflow and follow the steps in the workflow to acquire an image.
The following imaging settings are used in this workflow. Other settings can be entered in the Custom workflow.
Resolution: 169 µm
Focus Offset: 0.00 mm
Using Gels
You can find a detailed In-Gel Western protocol for use with the Odyssey® DLx at licor.com/support. Coomassie-stained gels can also be scanned since Coomassie Blue dye can be seen clearly in the 700 nm channel, and faintly in the 800 nm channel. Nucleic acids stained with Syto® 60 and separated in a gel can be imaged in the 700 nm channel (see licor.com/support for more information).
Scanning Gels
Thoroughly rinse the gel with destaining solution or water to remove dye particulates.
When placing the gel on the scanning surface, take care not to trap air bubbles underneath.

Adjust the focus offset for the gel thickness. The correct focus offset is 1/2 the thickness of the gel; for a 1 mm gel, set the focus offset to 0.5 mm. The maximum offset is 4 mm in the Odyssey® DLx Imaging system, allowing gels of up to 8 mm to be scanned.
Scan the gel in the appropriate channel.
After removing the gel, clean the glass surface to remove any residual dye by following the instructions in the section Operation.
LI‑COR Acquisition Software Steps for Scanning Gels
Start LI‑COR Acquisition Software
.Click Scan
.Enter a Username.
Choose your Odyssey DLx in the list of imagers.
Choose the Gel workflow and follow the steps in the workflow to acquire an image.
The following imaging settings are used in this workflow. Other settings can be entered in the Custom workflow.
Resolution: 169 µm
Focus Offset: 0.50 mm
Using Multiwell Plates
Multiwell plates that meet certain physical characteristics can be scanned directly on the Odyssey DLx scanning surface. Proper selection of multiwell plates significantly affects the results of your analysis. Different models of plate differ with regard to properties such as well depth and autofluorescence.
- Plate dimensions must be such that the distance from the Odyssey DLx scanning surface to the target detection area of the plate is 4.0 mm or less.
- Do not use plates with white walls, because the white surface will create significant noise.
- For an In‑Cell Western™ Assay, LI‑COR recommends the following plates.
- For adherent cells, LI‑COR recommends a 96-well plate with a clear, flat bottom and black wells, such as the Greiner Bio-One CELLSTAR® Black μClear® Microplate, LI‑COR PN 926-19156 (8 pack) or 926-19157 (32 pack).
- For suspension cells, LI‑COR recommends growing cells in a 96-well U-bottom plate and transferring cells to Greiner Bio-One CELLSTAR® Black μClear® Microplate, LI‑COR PN 926-19156 (8 pack) or 926-19157 (32 pack), for imaging.
- Before plate scanning, clean the bottom plate surface with lint-free tissue and 70% ethanol. Additionally, the Odyssey DLx scanning surface should be thoroughly cleaned using the procedures described earlier in this chapter.
- Protect plates from light before imaging to ensure highest sensitivity.
Scanning Multiwell Plates
Place the Plate Alignment Guide (P/N 9891-080) on the scan surface so that the corner of the guide contacts the front, left corner of the bezel. Push the guide into the corner until it contacts the bezel on both the front and left sides.
Place the multiwell plate on the scan surface and slide it into place so that it contacts both the front and left sides of the Plate Alignment Guide. The first well in the first row (A1) should be toward the back and left side of the Plate Alignment Guide as shown (Figure 67).
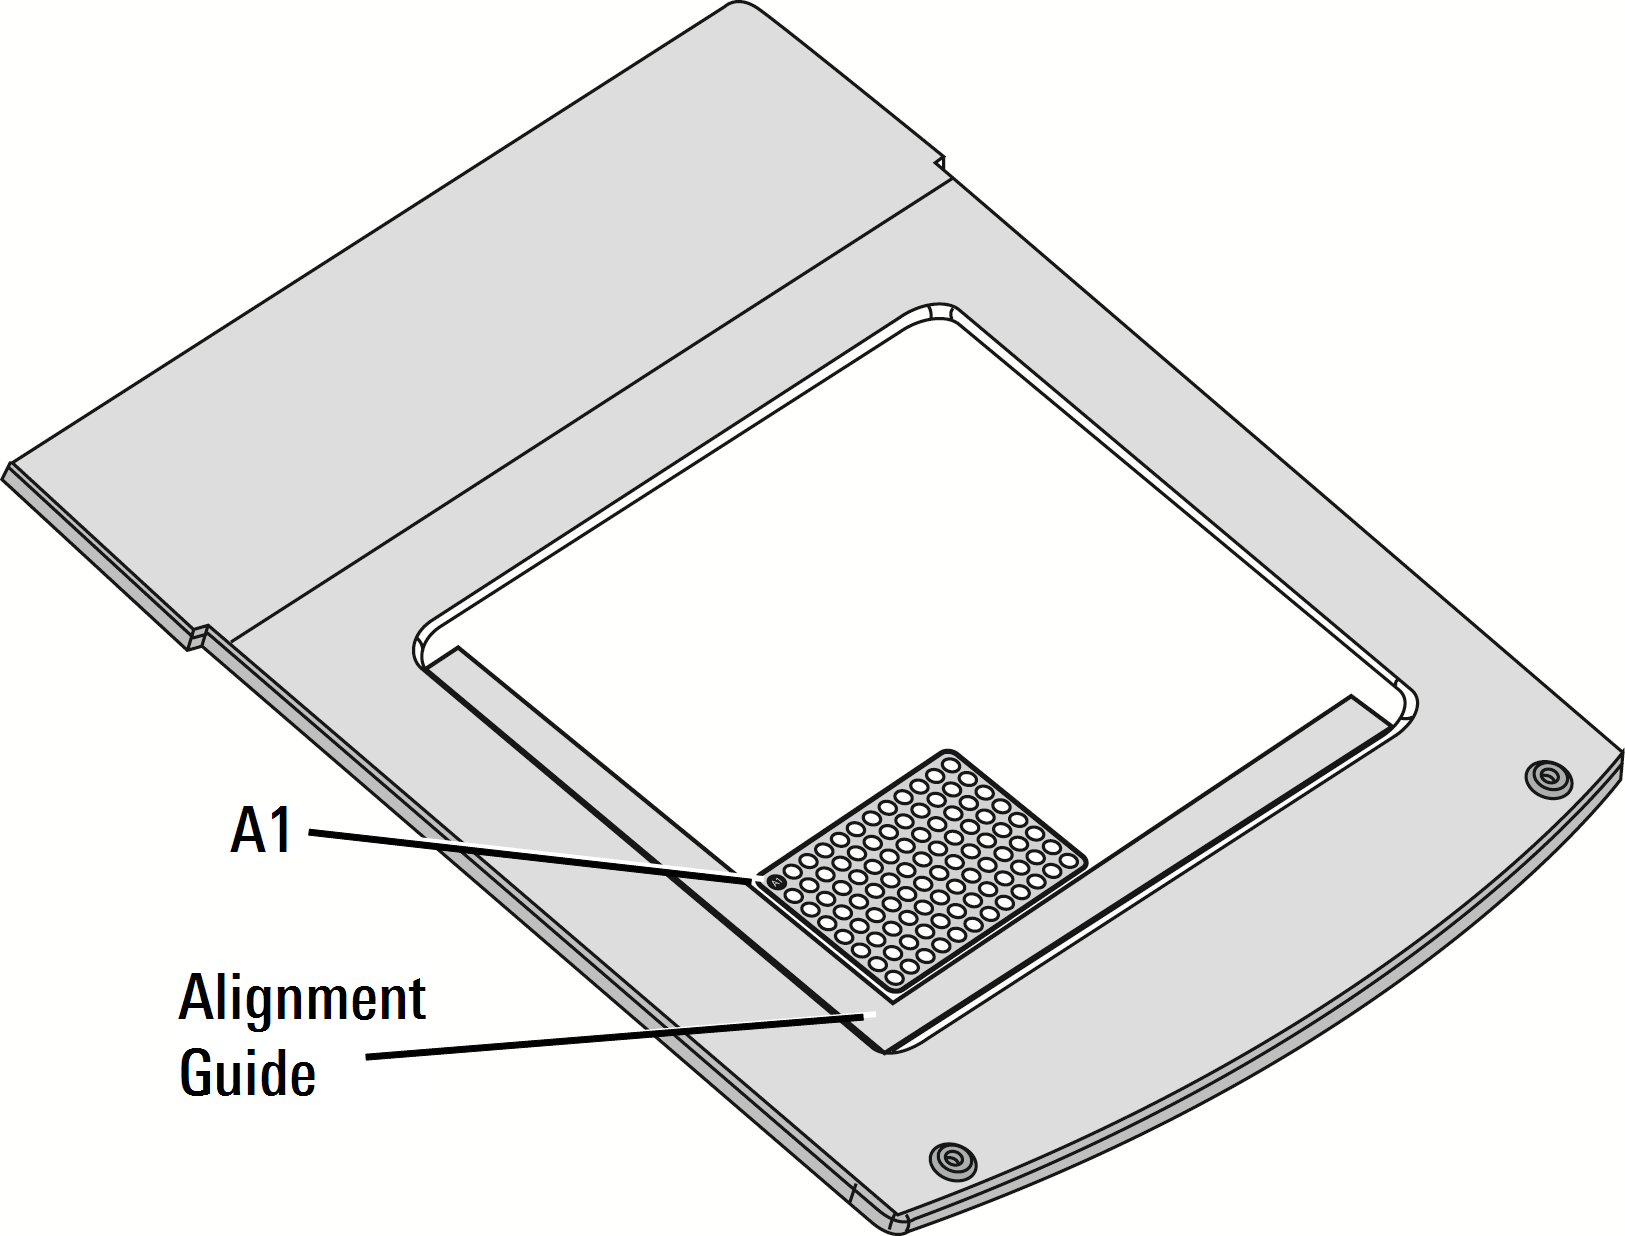
Figure 67. Multiwell plates can be scanned in Image Studio™ Software using the Plate preset. Multiple multiwell plates can be imaged at one time by drawing multiple scan areas on the scan surface representation shown when the Acquire ribbon is selected.
Multiwell plates can be scanned in LI‑COR® Acquisition Software. Multiple multiwell plates can be imaged at one time by drawing multiple Scan Areas on the page.
Multiwell plates can be scanned in Image Studio™ Software using the Plate preset. Multiple multiwell plates can be imaged at one time by drawing multiple scan areas on the scan surface representation shown when the Acquire ribbon is selected.
Multiwell plates can be scanned in LI‑COR® Acquisition Software. Multiple multiwell plates can be imaged at one time by drawing multiple Scan Areas on the page.
LI‑COR Acquisition Software Steps for Scanning Multiwell Plates
Start LI‑COR Acquisition Software
.Click Scan
.Enter a Username.
Choose your Odyssey DLx in the list of imagers.
Choose the Multiwell Plate workflow and follow the steps in the workflow to acquire an image.
The following imaging settings are used in this workflow. Other settings can be entered in the Custom workflow.
In-Cell Western Cell Analysis Resolution (96-Well Plate): 169 µm Resolution: 169 µm Resolution (384-Well Plate): 84 µm Resolution Options: 84, 169 µm (default) Resolution Options: 84, 169 µm (default) Focus Offset: 4.00 mm Focus Offset: 4.00 mm Available Focus Offset Range: 0.00 – 4.00 mm Available Focus Offset Range: 0.00 - 4.00 mm
Scanning Slides
Clean slides and scan surface with 70% ethanol or 70% isopropanol.
Place slides with the coverslip facing up (tissue facing up) on the scan surface.
Follow acquisition software instructions to acquire the image.
For more information about preparing and imaging tissue sections, please see the the Tissue Section Imaging Guide (licor.com/tissue_section_guide).
For information about ex vivo imaging, please visit licor.com/support.
LI‑COR Acquisition Software Steps for Scanning Slides
Start LI‑COR Acquisition Software
.Click Scan
.Enter a Username.
Choose your Odyssey DLx in the list of imagers.
Choose the workflow and follow the steps in the workflow to acquire an image.
The following imaging settings are used in this workflow. Other settings can be entered in the Custom workflow.
Resolution: 21 µm
Resolution Options: 21 (default), 42, 84, 169 µm
Focus Offset: 1.00 mm