Software for the D‑DiGit Gel Scanner
D‑DiGit Image Acquisition Software Overview
D‑DiGit Image Acquisition Software allows you to capture images from the D‑DiGit Gel Scanner. After capture, images can be imported into Image Studio™ Software for convenient analysis, annotation, and storage.
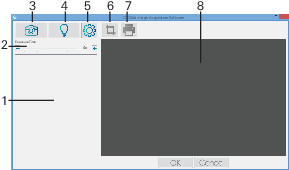
Thumbnail view: This area displays thumbnails of scanned images.
Exposure Time: Drag the slider to adjust exposure time.
Image capture: Click to start a scan.
Light: Click to activate the blue LED for gel excision or observation.
Settings: Click to open the Settings window where you can adjust scan settings, image file settings, and storage settings.
Crop: Crop the selected image.
Print: Print the selected image.
Preview: This area displays an enlarged view of the thumbnail selected in the Thumbnail view.
Modify D‑DiGit Image Acquisition Software Settings
Click Settings ![]() on the Main Control Panel to adjust the following parameters.
on the Main Control Panel to adjust the following parameters.
- Image name options
- Image format
- Folder where images will be saved after scan completes
Image Folder
The Image Folder is the folder where images are saved after a scan completes.
To specify a folder location, click the ellipsis button and select the folder where you want images to be saved.
Gray Mode
The Gray Mode setting allows you to specify the grayscale mode that will be applied the next time you scan a gel. Grayscale images use shades of gray to represent gradations of color.
Gray (8-bits) This mode saves grayscale images with 8 bits per pixel. Approximately 256 shades of gray are available in this mode.
Gray (16-bits) This mode saves grayscale images with 16 bits per pixel. Approximately 65,536 shades of gray are available in this mode.
When the Gray 16-bit mode is chosen, images can only be saved in the TIFF format.
Resolution
The Resolution list allows you to pick the resolution for the next scan. The options are 150, 300, and 600 dpi. The default resolution is 300 dpi.
Image Name
The options in the File Name group allow you to specify a format for image names. The format of an image name is comprised of a prefix and a suffix, in the form Prefix-Suffix.
Prefix
The Prefix option allows you to specify the beginning part of a file name for scanned images.
Date + Time: If Date + Time is selected, the first part of the image name will be the year (Y), month (M), day (D), and time (hour, minute, second) when the image was acquired.
The date and time will appear with the format YYYY-MM-DD_hh.mm.ss in the image name.
Text: If text is selected, you will be able to enter text in the text field. The text you enter will be used as the first part of the image name. The word Image is the default text.
Suffix
If the Suffix option is selected, you can choose a starting number to be appended to the image name. The number you set will be incremented by one for each successive scan (unless you change the number again).
Example
If Text is selected in the Prefix section and Suffix is selected and set to 2, the first image acquired with these File Name settings will be Image-000002.
Image Format
The File Format list lets you choose a file format to use for scanned images. The options are TIFF and JPEG.
Show Warning Messages
If the Show warning message(s) option is selected, you will be warned each time you attempt to delete a thumbnail image from the Thumbnail View.
D‑DiGit Gel Scanner Analysis in Image Studio™ Software
Settings
The following settings are recommended for images that you want to analyze in Image Studio Software.
Exposure time: 4X is a good starting point, but you must adjust as needed for your target.
Image format: 16-bit TIFF
Resolution: 600 dpi
Import Image for Analysis
Start Image Studio Software.
Click the Application button
 , then point your cursor to Import > Third-Party Images. You can import individual files or a folder containing images.
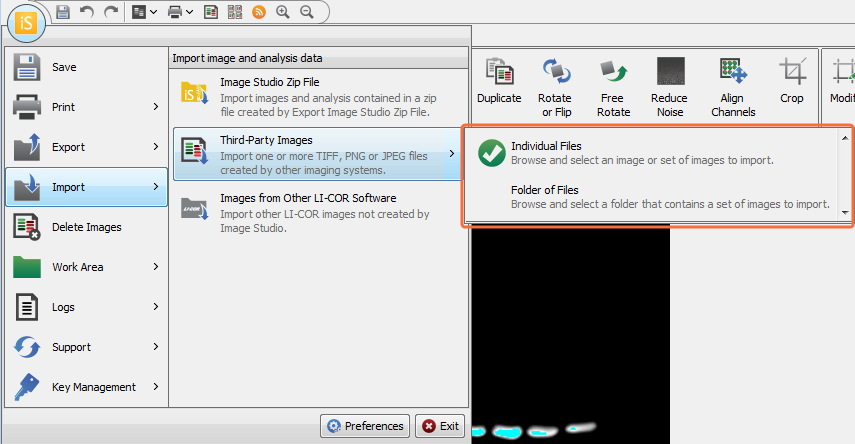
Choose the image(s) you want to import, then click Start (Open on macOS).
To learn more about analysis options, please visit the Image Studio Answer Portal.