Determining the Linear Range for Quantitative Western Blot Detection
Introduction
In quantitative Western blotting (QWB), normalization mathematically corrects for unavoidable sample-to-sample and lane-to-lane variation by comparing the target protein to an internal loading control. The internal loading control is used as an indicator of sample protein loading, to correct for loading variation and confirm that changes observed in target protein bands represent actual differences between samples.
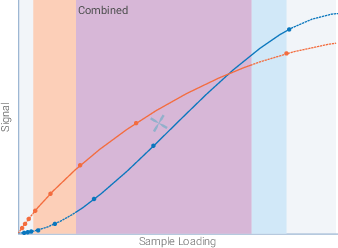
QWB analysis is accurate only if the target protein and internal loading control can both be detected within the same linear range – a range that must be determined experimentally for each target and loading control. The combined linear range is then used to determine how much sample should be loaded to produce a linear signal response for both the target protein and the internal loading control (Figure 45).
Empiria Studio® Software provides a dedicated workflow for this process. Go to licor.com/empiria to learn more.
Linear Range, Saturation, and Proportional Signals
In QWB analysis, the linear range of detection is the range of sample loading that produces a linear relationship between the amount of target on the membrane and the band intensity recorded by the detector (Figure 45). Outside this range, signal intensity is not dependent on sample loading and does not accurately reflect the amount of target.
Within the linear range of detection, band intensity should be proportional to the amount of target. A change in target abundance should produce an equivalent change in signal response. For example, a two-fold increase in sample loading is expected to produce a two-fold increase in band intensity. At the upper and lower ends of the linear range, this proportional relationship is lost. Band intensity no longer reflects the abundance of target, and quantification is not possible.

Saturation occurs when increasing amounts of target fail to produce the expected increase in band intensity. Saturated bands yield similar intensity values, regardless of the actual amount of target present, and cannot be accurately quantified. Intensity of strong bands is underestimated, interfering with comparison of relative protein levels across the blot. Error introduced by saturation may alter data analysis and interpretation.
- Membrane saturation is the result of sample overloading. It frequently interferes with accurate detection of abundant proteins, including HKP loading controls. When samples are overloaded, abundant proteins can bind in layers on the membrane surface that limit antibody access during detection. Highly abundant proteins may also exceed the local binding capacity of the membrane and be washed away.
- Signal saturation occurs when the signal intensity of a band is too bright for the detection system to record. Increasing amounts of target do not produce a proportional increase in the recorded signal.
This protocol explains how to use serial dilutions of sample protein to determine the linear ranges of detection for a target and internal loading control, and choose an appropriate amount of sample to load for QWB analysis.
This protocol is intended for use with near-infrared fluorescent Western blots.
Key Factors
- Linear range of sample loading. This range must be determined individually for the target protein and internal loading control. Compare the linear ranges to determine the amount of sample you should load to produce a linear response for both target and control.
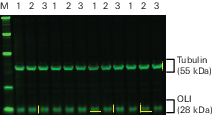
- Housekeeping proteins. With two proteins of very different abundance, such as a target protein and highly expressed HKP loading control, it is absolutely critical to detect both proteins within the linear range. If the HKP is not detected in the linear range of sample loading, these strong bands will be underestimated and normalization will not be accurate.
- Quantification of faint bands. Faint bands that are near the lower limit of detection generally have much larger coefficients of variation. They are difficult to discriminate from membrane background and may not be statistically significant. The high variability of faint bands introduces error that may affect data analysis and interpretation.
- Antibody validation. Two-color Western blot detection requires careful selection of primary and secondary antibodies to prevent cross-reactivity. Always perform single-color control blots first to verify antibody specificity, and to identify possible interference from background bands.
Required Reagents
Treated and untreated samples
Samples should represent the specific range of treatments or conditions you will use in your experiment (drug treatment, time course, dose response, etc.). Protein concentration must be determined for all samples.
Revert™ 700 Total Protein Stain Kit (licor.com/revertkit)
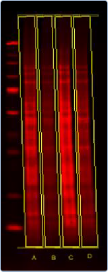
Revert 700 Total Protein Stain is used to assess sample protein loading in each lane as an internal loading control. After transfer and prior to immunodetection, the membrane is treated with this near-infrared fluorescent protein stain and imaged at 700 nm. Membrane staining can verify that sample protein was uniformly loaded across the gel, and assess the quality and consistency of protein transfer.
Electrophoresis reagents
Transfer reagents
Western blot detection reagents (near-infrared fluorescence)
Perform near-infrared Western blot detection according to the Near-Infrared Western Blot Detection Protocol (licor.com/NIRWesternProtocol; LICORbio).
Protocol: Determining the Linear Range for a Target Protein and Revert™ 700 Total Protein Stain
Follow the instructions in this section if total protein staining of the membrane will be used as the internal loading control for QWB normalization. For normalization with a housekeeping protein, see Section
Empiria Studio® Software provides a dedicated workflow for this process. Go to licor.com/empiria to learn more.
Step 1. Prepare and Transfer Proteins
Generate a set of experimental samples (drug treatment, time course, dose-response, etc).
A minimum of three replicates should be performed for each sample.
Determine the protein concentration of each sample using a BCA, Bradford, or similar protein assay.
Dilute the samples to equal concentrations to enable consistent, uniform loading of total sample protein across the gel.
Prepare samples to be loaded on the gel with sample loading buffer.
Denature sample by heating at 95 °C for 3 minutes (or 70 °C for 10 minutes).
Load a uniform amount of sample protein in each lane.
Separate sample proteins by SDS-PAGE.
Transfer proteins to blotting membrane.
Step 2. Stain with Revert™ 700 Total Protein Stain
- Add methanol to the stain reagents as indicated on each bottle.
After transfer is complete, fully dry the membrane. Place the membrane on top of a piece of clean filter paper and allow it to dry by choosing one of the following:
40 to 60 minutes at room temperature.
10 minutes in an oven at 37 °C.
Overnight at room temperature as a stopping point.
Rehydrate the membrane after fully drying.
For nitrocellulose membranes, incubate the membrane in TBS or PBS (no detergent) for 5 minutes at room temperature with gentle shaking.
For PVDF membranes, first rehydrate using 100% methanol for 30 seconds. Then rinse in TBS or PBS (no detergent) for 5 minutes at room temperature with gentle shaking.
Do not allow the membrane to dry from this point on.
Rinse the membrane with ultrapure water.
Before moving to the next step, ensure the membrane container provides a minimum clearance of 1/8th of an inch on all sides. Revert 700 Total Protein Stain will cause the membrane to swell. Without clearance, staining may be uneven.
Stain membrane with Revert 700 Total Protein Stain. Incubate the membrane in 5 mL of Revert 700 Total Protein Stain solution for 5 minutes at room temperature with gentle shaking.
For more information about the Revert protocol, see licor.com/revert.
Decant total protein stain solution thoroughly. Using approximately 5 mL of Revert 700 Wash Solution (P/N 926-11012), rinse the membrane two times for 30 seconds at room temperature with gentle shaking.
Decant wash solution thoroughly, then briefly rinse the membrane with ultrapure water.
You do not need to destain Revert 700 Total Protein Stain in this protocol as you will be visualizing your HKP and OLI in the 800 nm channel. If you wish to visualize several HKPs in the 700 nm and 800 nm channels, you can do so by destaining Revert according to the instructions in your pack insert.
Step 3. Image Membrane
Do not allow the membrane to dry during imaging. If you are using an Odyssey M, Odyssey DLx, or Odyssey F, it is best to place the silicone mat on top of the membrane. See the Operator's Manual for your imager for detailed instructions (licor.com/support).
Immediately image the membrane in the 700 nm channel using an Odyssey Imaging System. If saturation occurs, reduce the scan intensity or acquisition time, or use AutoScan if your instrument includes this.
Proceed immediately to blocking and follow your normal Western blot protocol using IRDye® 800CW Secondary Antibody to detect your target in the 800 nm channel.
Image the membrane in the 800 nm channel with an Odyssey Imaging System. If saturation occurs, reduce the scan intensity or acquisition time, or use AutoScan if your instrument includes this.
Visible color from stain will wash off during processing and residual total protein signal may be detected in the 700 nm channel.
Total Protein and Target Quantification
Quantify the fluorescent signals from Revert staining (700 nm) and your target protein (800 nm). The Empiria Studio® Software Linear Range Determination workflows guide you step-by-step through the process. The following instructions are for using Image Studio™ Software.
Total Protein Quantification
The Empiria Studio® Software Linear Range Determination workflows guide you step-by-step through this process. For more detailed information, see the Linear Range Determination in Empiria Studio Software (licor.com/LinearRangePaper) white paper. The following instructions are for using Image Studio™ Software.
Before you begin, under the Analysis tab change the type to Manual. Use the Draw Rectangle tool in Image Studio Software to quantify the total protein signal in each lane.
|
|
Target Protein Quantification
The Empiria Studio® Software Linear Range Determination workflows guide you step-by-step through this process. For more detailed information, see the Linear Range Determination in Empiria Studio Software white paper (licor.com/LinearRangePaper). The following instructions are for using Image Studio™ Software.
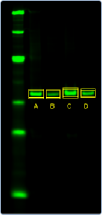
Before you begin, under the Analysis tab change the type to Manual. Use the Add Rectangle tool in Image Studio Software to quantify the target bands.
|
|
Estimate Combined Linear Range for Target and Total Protein
Plot signal intensity vs. sample loading for both the target and Revert™ 700 Total Protein Stain (as shown in Figure 46).
Estimate the boundaries of the linear range of sample loading for the target and the total protein stain (shaded regions, Figure 46).
Estimate the low end of the linear range by selecting a level of sample loading that is above the level of membrane background (black dashed lines, Figure 46).
Estimate the upper end of the linear range by selecting a level of sample loading that is below the region where band intensity begins to plateau due to saturation (red dashed lines, Figure 46).
Figure 46. Estimate the boundaries for the linear range of sample loading. The estimated lower end (black dashed lines) and upper end (red dashed lines) are indicated for the target protein (A) and total protein stain (B). Shaded regions indicate the range of sample loading that produces a linear signal response on each graph. Linear range boundaries may be different for the target and total protein stain.
Combine the linear ranges of sample loading to identify the available range where the target and total protein stain can both be detected with a linear signal response (Figure 47). Use a secondary y-axis to plot the 700 nm and 800 nm signals on the same graph.
For your experiments, choose a level of sample loading that falls in the middle of the combined linear range for the target protein and Revert 700 Total Protein Stain (X, Figure 47). Avoid working near the boundaries of the combined range.

Figure 47. Determine the appropriate amount of sample to load. This combined graph indicates the appropriate range of sample loading for accurate detection of the target and total protein stain in a QWB experiment (X, center).
If the target protein is strongly upregulated or downregulated, you should examine the linear range of sample loading for both untreated and treated samples.
Protocol: Determining the Linear Range for a Target Protein and HKP
Follow the instructions in this section if a housekeeping protein will be used as the internal loading control for QWB normalization. This section also applies to normalization with a pan-specific antibody for analysis of phosphorylation or other post-translational modifications. If you plan to use a total protein stain for normalization, see Section
Empiria Studio® Software provides a dedicated workflow for this process. Go to licor.com/empiria to learn more.
Perform a Western blot with a serial dilution of sample (an 8-12 point, two-fold serial dilution is a good place to start).
Make sure the dilution series includes sample loading amounts above and below the amount of sample you expect to load in each lane.
Prepare samples to be loaded on the gel with sample loading buffer.
Denature sample by heating at 95 °C for 3 min (or 70 °C for 10 min).
Load a uniform amount of sample protein in each lane.
Separate protein by SDS-PAGE.
Transfer proteins to immobilizing membrane.
Perform Western blot detection of target protein and HKP, according to the Near-Infrared Western Blot Detection Protocol (licor.com/NIRWesternProtocol; LICORbio).
Use the 800 nm channel to detect the target protein. This channel provides the lowest membrane background and will maximize the sensitivity of detection.
Image membrane with an Odyssey M, Odyssey DLx, Odyssey XF, or Odyssey F in the 700 and 800 nm channels.
Adjust settings so that no saturation appears in the bands to be quantified.
Target Protein and HKP Quantification
Quantify the fluorescent signals of the HKP (700 nm) and target protein (800 nm). The Empiria Studio® Software Linear Range Determination workflows guide you step-by-step through the process. The following instructions are for using Image Studio™ Software.
HKP Quantification (700 nm)
Select and view the 700 nm channel image only.
Add shapes to bands.
In the Shape group on the Analysis tab, click Add Rectangle.

Click each band to be analyzed, and an appropriately sized shape will be added around the band.
For help choosing the right background subtraction method, see licor.com/BgSubtractHelp.
Export the quantification data for your HKP.
Click Shapes to open the Shapes data table.

Select shape data, then copy and paste data into a spreadsheet.
All data fields will be exported, but “Signal” is the field of interest for analysis.
Target Protein Quantification (800 nm)
Select and view the 800 nm channel image only.
Add shapes to bands.
In the Shape group on the Analysis tab, click Add Rectangle.

Click each band to be analyzed, and an appropriately sized shape will be added around the band.
For help choosing the right background subtraction method, see licor.com/BgSubtractHelp.
Export the quantification data for your target.
Click Shapes to open the Shapes data table.

Select shape data, then copy and paste data into a spreadsheet.
All data fields will be exported, but “Signal” is the field of interest for analysis.
Estimate Combined Linear Range for Target and HKP
Plot signal intensity vs. sample loading for the target and HKP (as shown in Figure 48).
Estimate the boundaries of the linear range of sample loading for the target and HKP (shaded regions, Figure 48).
Estimate the low end of the linear range by selecting a level of sample loading that is above the level of membrane background (black dashed lines, Figure 48).
Estimate the upper end of the linear range by selecting a level of sample loading that is below the region where band intensity begins to plateau due to saturation (red dashed lines, Figure 48).
Figure 48. Estimate the boundaries for the linear range of sample loading. The estimated lower end (black dashed lines) and upper end (red dashed lines) are indicated for the target protein (A) and abundant HKP (B). Shaded regions indicate the range of sample loading that produces a linear signal response on each graph. Linear range boundaries may be very different for the target and HKP.
Combine the linear ranges of sample loading to identify the available range where the target and HKP can both be detected with a linear signal response (Figure 49). Use a secondary y-axis to plot the 700 nm and 800 nm signals on the same graph.
For your experiments, choose a level of sample loading that falls in the middle of the combined linear range for the target protein and HKP (X, Figure 49). Avoid working near the boundaries of the combined range.
Figure 49. Determine the appropriate amount of sample to load. This combined graph indicates the appropriate range of sample loading for accurate detection of the target and HKP loading control in a QWB experiment (X, center). If the target is low in abundance and the HKP is highly expressed, it may not be possible to identify a level of sample loading that is appropriate for both proteins. Consider using a total protein stain as an internal loading control for QWB normalization.
If the target protein is strongly upregulated or downregulated, you should examine the linear range of sample loading for both untreated and treated samples.
References
1. Janes KA (2015) An analysis of critical factors for quantitative immunoblotting. Sci Signal. 8(371): rs2.
2. Robasky, K, Lewis NE, and Church GM. Nat. Rev. Genet. 15: 56–62 (2014). http://www.nature.com/nmeth/journal/v11/n9/pdf/nmeth.3091.pdf
3. Naegle K, Gough NR, and Yaffe MB. Sci Signal. 8:fs7 (2015). https://www.ncbi.nlm.nih.gov/pubmed/25852186


