Optimizing Chemiluminescent Western Blots
Maximizing sensitivity on chemiluminescent Western blots
Introduction
Western blotting was introduced by Towbin, et al. in 1979 as a simple method to electrophoretically blot proteins onto nitrocellulose sheets. It is now a common laboratory technique with many variations. First, proteins are separated using gel electrophoresis. Next, the proteins are transferred to a nitrocellulose or polyvinylidene fluoride (PVDF) membrane. The membrane is blocked to prevent non-specific antibody binding. Then the membrane is probed with a detection antibody or conjugate.
Chemiluminescent Western blots are probed with a primary antibody against the target protein, followed by a secondary antibody labeled with an enzyme, such as horseradish peroxidase (HRP) or alkaline phosphatase (AP). A chemiluminescent substrate for the enzyme is carefully applied to the blot, and light is emitted when the enzyme modifies the substrate. Photographic film or an imaging system using a digital CCD camera captures the emitted light as an image.
LI-COR Chemiluminescent Imagers
The following LI-COR imagers support chemiluminescence imaging and other detection labels.
| Imager/Scanner | Chemiluminescence | Other Supported Channels |
|---|---|---|
| C‑DiGit | Yes | - |
| Odyssey® Fc | Yes | 800, 700, 600 |
| Odyssey XF | Yes | 800, 700, 600 |
| Odyssey M | Optional | 800, 700, 520, 488, Epi (RGB, 630, 525, 470), Trans (RGB, 630, 525, 470) |
The C‑DiGit Blot Scanner is a chemiluminescent detection system only, whereas the Odyssey Fc, Odyssey XF, and Odyssey M are capable of fluorescent detection, as well. This additional capability enables the use of fluorescent markers on the same blot as the chemiluminescent targets.
Chemiluminescent Western Blot Workflow
Determine protein concentrations and prepare samples
Separate protein samples by SDS-PAGE
Transfer to a membrane (nitrocellulose or PVDF)
Dry the membrane
Wet the membrane according to membrane type (nitrocellulose or PVDF)
Block the membrane
Incubate with primary antibody
Wash membrane
Incubate with HRP- or AP-conjugated secondary antibody
Wash membrane
Add substrate
Detect with an Odyssey M Imager, Odyssey XF, Odyssey Fc, or C‑DiGit Blot Scanner
Factors that Affect a Chemiluminescent Western Blot
Below are some things that can affect the results you receive from a chemiluminescent Western blot.
Membrane
Your choice of membrane is critical to the success of a chemiluminescent Western blot. Sensitivity is affected by many factors, including protein transfer efficiency, protein binding capacity, and membrane autofluorescence–particularly when visualizing blue molecular weight marker bands in the 700 nm channel. Panel A in Figure 1 highlights the background differences between two PVDF membranes in the 700 nm channel.

Figure 2 compares Western blot performance on a wide selection of PVDF membranes. Detection sensitivities can be greatly affected by your choice of membrane, and you should evaluate multiple membranes. Protein characteristics, such as molecular weight, amino acid composition, and post-translational modifications (e.g., glycosylation or phosphorylation) can alter the transfer efficiency and, ultimately, detection sensitivity. Protein Electrotransfer Methods and the Odyssey Infrared Imaging System (LICORbio) provides additional information for optimizing protein transfer.

Dry and Rewet the Membrane
After transfer is complete and before blocking, fully dry the membrane to maximize protein retention for increased signal and sharper bands. To do this, place the membrane on top of a piece of clean filter paper and allow it to dry:
40 to 60 minutes at room temperature.
10 minutes in an oven at 37 °C.
Overnight at room temperature as a stopping point.
After drying, rewet the membrane according to the membrane type you are using.
For nitrocellulose membranes, incubate the membrane in TBS or PBS (no detergent) for 5 minutes at room temperature with gentle shaking.
For PVDF membranes, first rehydrate using 100% methanol for 30 seconds. Then incubate in TBS or PBS (no detergent) for 5 minutes at room temperature with gentle shaking.
Blocking Buffer
Incubating the membrane in blocking buffer after transfer enhances the sensitivity of your blot. Blocking buffers contain proteins that stick to the membrane and minimize non-specific interactions which can improve primary antibody specificity. Figure 3 demonstrates how different blocking buffers can affect results. Blocking buffer is also often used as a diluent for the primary and secondary antibodies. We do not recommend using a detergent at the blocking step of your protocol.


Various blocking buffers are available. Because no single blocking reagent will be suitable for all antigen-antibody pairs, it is important to try several blockers to find the optimal solution for your experiment. See the Western Blot Blocker Optimization Protocol (licor.com/optimize) for more information.
Here are some considerations for choosing the optimal blocking buffer for your chemiluminescent Western blot.
Milk is a common blocking buffer, but milk-based blockers may result in higher background. Milk-based blockers that contain endogenous biotin and glycoproteins may increase background on the membrane when detecting with streptavidin and milk may also contain active phosphatases that can de-phosphorylate phosphoproteins on the membrane. Milk contains phosphoepitopes and is not recommended for the detection of post-translational modifications.
Intercept® Blocking Buffer (licor.com/intercept) provides low background and is available in protein-based and protein-free formulations of TBS and PBS.
Do not dilute HRP-conjugated secondary antibodies in any solution containing sodium azide. Sodium azide irreversibly binds to the HRP enzyme, which inhibits substrate binding and slows the reaction. The result is less light production, which may affect the appearance of less bright bands or even the entire blot. All varieties of Intercept Blocking Buffer are free from sodium azide and can be used with chemiluminescent Western blots.
Be sure to keep your buffer system consistent throughout the protocol for blocking, antibody dilutions, and washes. For example, if you use a TBS-based buffer system, choose Intercept® (TBS) Blocking Buffer. If you use a PBS-based buffer system, choose Intercept (PBS) Blocking Buffer.
Primary Antibody
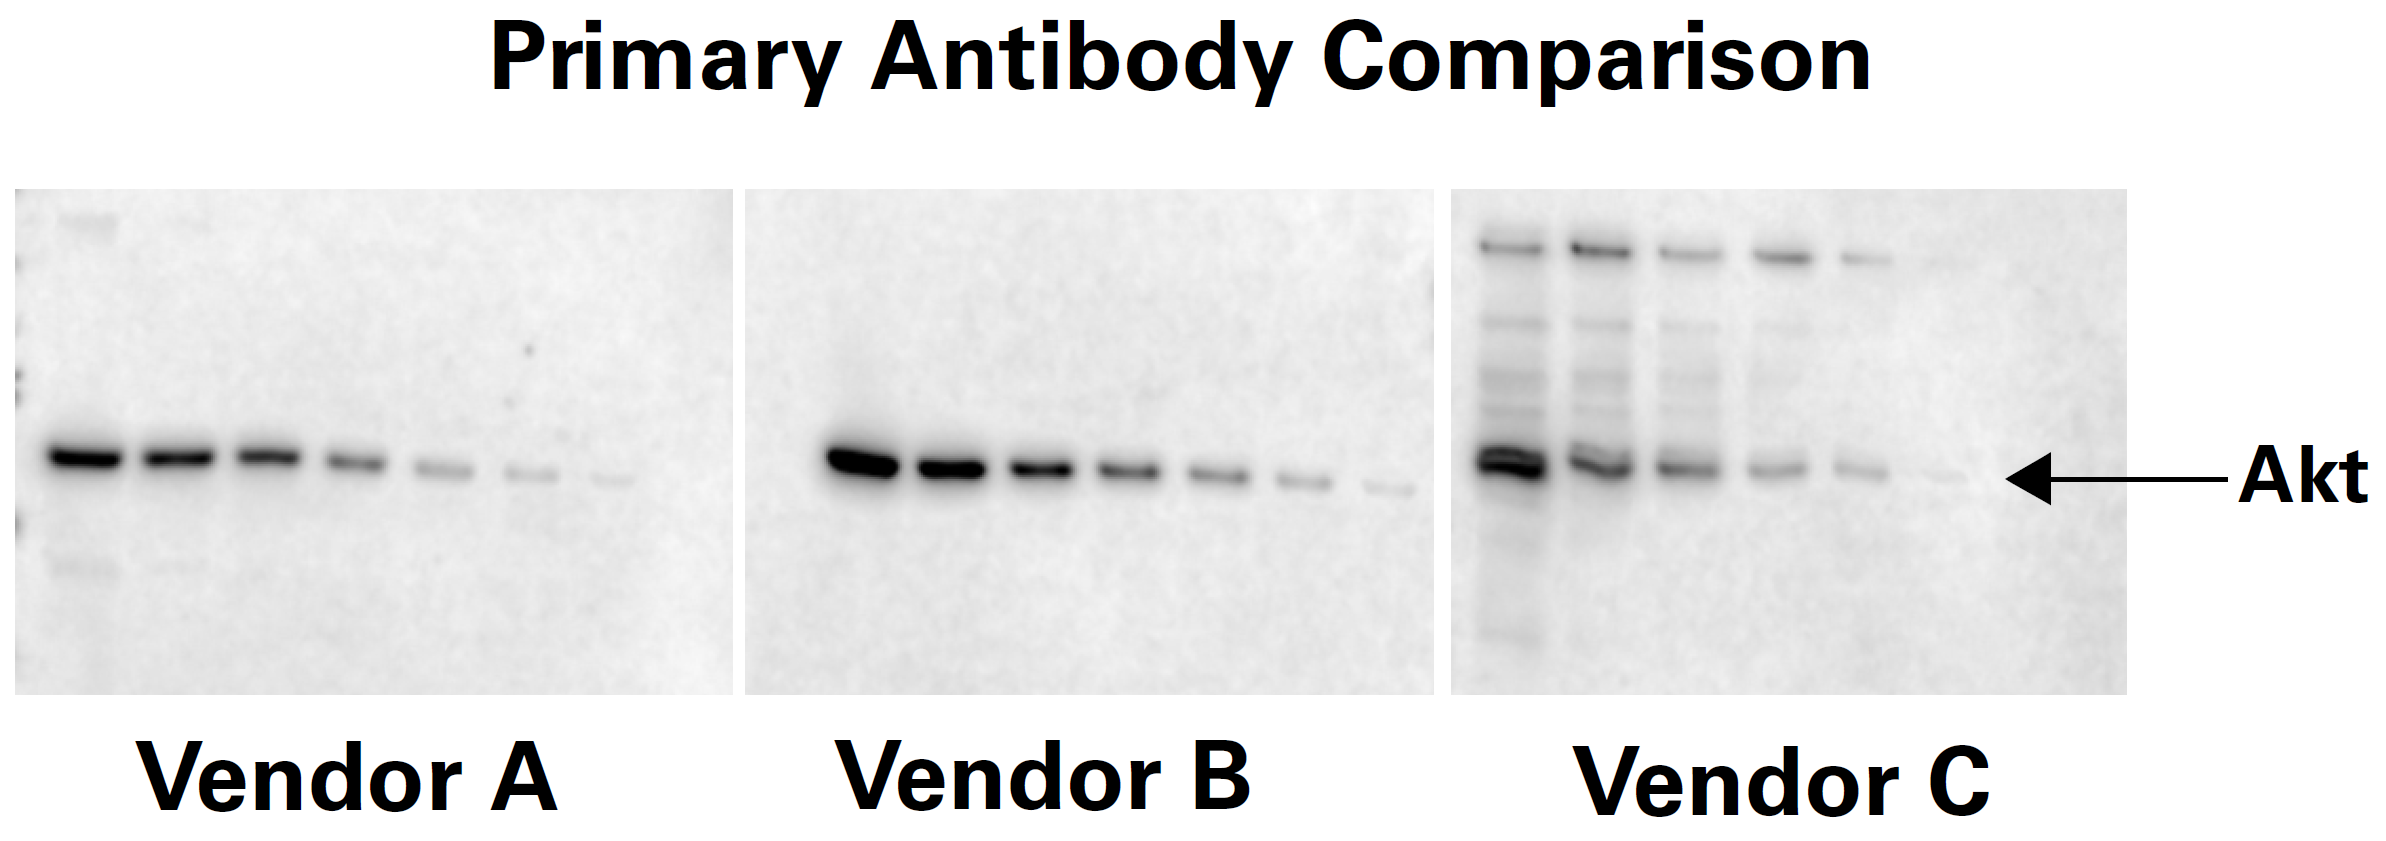
An antibody produced to detect a specific antigen is called a primary antibody. It binds directly to the molecule of interest. Primary antibodies can be produced in a wide variety of species such as mouse, rabbit, goat, chicken, rat, guinea pig, human, and many others. Primary antibodies for the same antigen can perform very differently. It may be necessary to test multiple primary antibodies for the best performance in your Western blot system. Figure 4 is an example of how different primary antibodies to the same target may react.
Secondary Antibody
Secondary antibody reactivity differs between vendors, even within the same species and especially between host species. The ratio of HRP enzyme to antibody varies and may affect the detection of the target. Try secondary antibodies from several vendors.
When evaluating the performance of the primary and secondary antibodies, try different blocking buffers, as the choice of blocker can affect antibody performance.
Antibody Concentration
HRP-labeled secondary antibody concentration directly affects the appearance of the bands on a chemiluminescent Western blot as shown in Figure 5. Too little HRP enzyme will result in low signal and light or missing bands. On the other hand, too much HRP enzyme will deplete all the substrate in that area and result in bands without signal in the middle. Image acquisition time also makes a difference.
Both primary and secondary antibodies should be diluted in blocking buffer with detergent. Intercept T20 Antibody Diluents contain Tween® 20 and are available in TBS and PBS formulations, so you can use the appropriate buffer for your antibody diluent, without having to spend time measuring and adding Tween 20.
Optimal concentrations may be different for a CCD-based imaging system than for film methods. Try different primary and secondary antibody concentrations to find a combination that gives the best data.

Washes
Adequately washing the membranes after incubating with the primary and secondary antibodies will greatly improve the appearance of your chemiluminescent Western blot. Wash your membrane with a saline-buffered solution or another suitable wash buffer. Including a non-ionic detergent (e.g., Tween® 20) at a final concentration of 0.1 to 0.2% may also help reduce background signal.
Wash four times for at least five minutes each time with ample wash solution and gentle shaking. Keep your wash times consistent for better results.
Chemiluminescent Substrates
There are many chemiluminescent substrates for HRP detection, and some are better suited for digital imaging than others. Figure 6 compares the performance of various substrates. In general, choose a substrate with a fast rate of reaction for use with the Odyssey® Fc, Odyssey XF, Odyssey M, and C‑DiGit Blot Scanner, such as WesternSure® PREMIUM Chemiluminescent Substrate (licor.com/westernsure).
Some substrates designed for optimal performance on film may not be suitable for detection on a CCD-based imaging system. Try different substrates to find the one that gives the most desirable image.

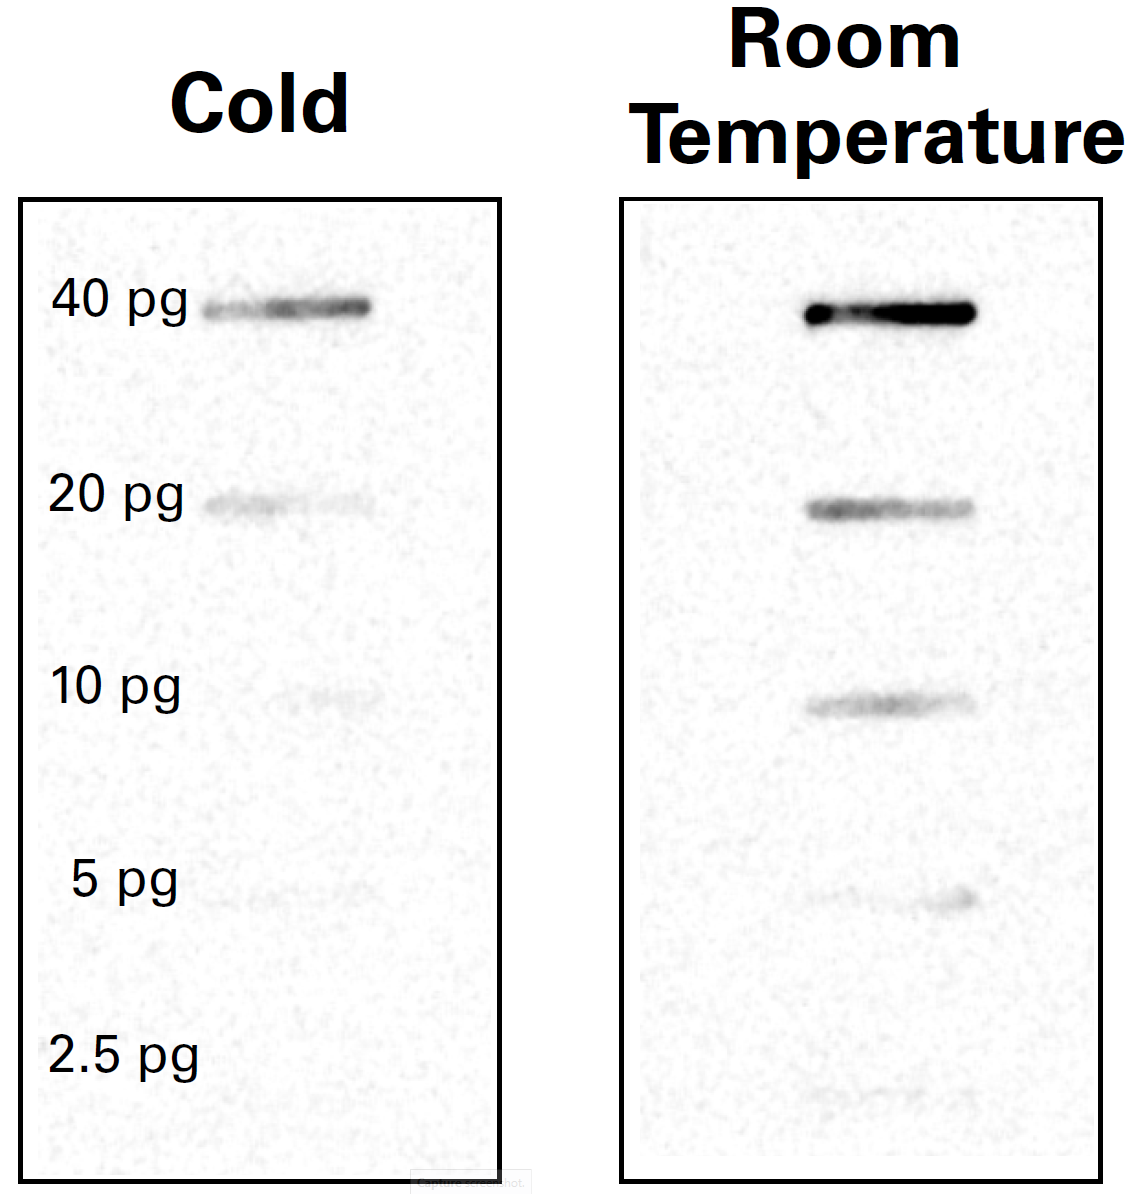
Some manufacturers of chemiluminescent substrates may recommend you store the substrates at 4 °C and warm them to room temperature before use. If so, ensure the substrate is at room temperature before use for optimum signal. Cold temperatures slow the HRP enzyme reaction, resulting in less light production and less intense or missing bands (Figure 7).
Troubleshooting Chemiluminescent Western Blots
Below are some suggestions for resolving issues with your chemiluminescent Western blot.
High Background Due to Substrate
Pools of excess substrate on the membrane can create areas of high background, as can adding more substrate to a membrane that has dried. Apply the substrate carefully and wick off any pools of substrate before imaging. Do not allow the membrane to dry.

A clear, flat plastic covering, such as a sheet protector, placed over the chemiluminescent Western blot may prevent the blot from drying out by keeping the substrate in contact with the HRP enzyme. It can also minimize substrate pooling. Image the plastic covering by itself first to determine if it scatters light, causing high background, and ensure it is cleaned before each use. You may need to try several types of plastic coverings before finding the best one.
Contaminated Imaging Tray (Odyssey XF and Odyssey Fc)
It is important to clean the imaging tray before and after each use to prevent unwanted background, as shown in Figure 9. You can clean a used tray using ultrapure water and lint-free wipes, then rinse with 70% ethanol or 70% isopropanol to remove any traces of substrate or dye. Detailed cleaning instructions may be found in your instrument operator's manual (Odyssey XF, Odyssey Fc).
If you have cleaned a used tray, image the tray by itself to see if there is any contamination left. If you still detect signal, clean the tray again and re-image. Dispose of the contaminated tray and use a new tray if necessary. New trays can be found at licor.com/bio/accessories/odyssey-fc-imaging-trays.
Contaminated Scan Surface or Silicone Mat (Odyssey M)
On the Odyssey M, covering chemiluminescent Western blots with a silicone mat produces the best results. Because of this, it is very important to clean the glass scan surface and silicone mat before each use. These must be free of smudges, dust, and dye before placing membranes onto the Odyssey M. Contaminated surfaces may cause unwanted background or blotches and streaks that cannot be removed with washing. You can clean the scan surface using ultrapure water and lintfree wipes, then rinse with 70% ethanol. The mat can be washed using warm water and gentle lab soap. Detailed cleaning instructions may be found in you instrument operator's manual.
Optimize the Image Display (Image Studio™ Software)
For the Odyssey Fc Imager and C‑DiGit Blot Scanner, use the Display panel in Image Studio to adjust how the data are mapped to the display pixels of your computer screen.
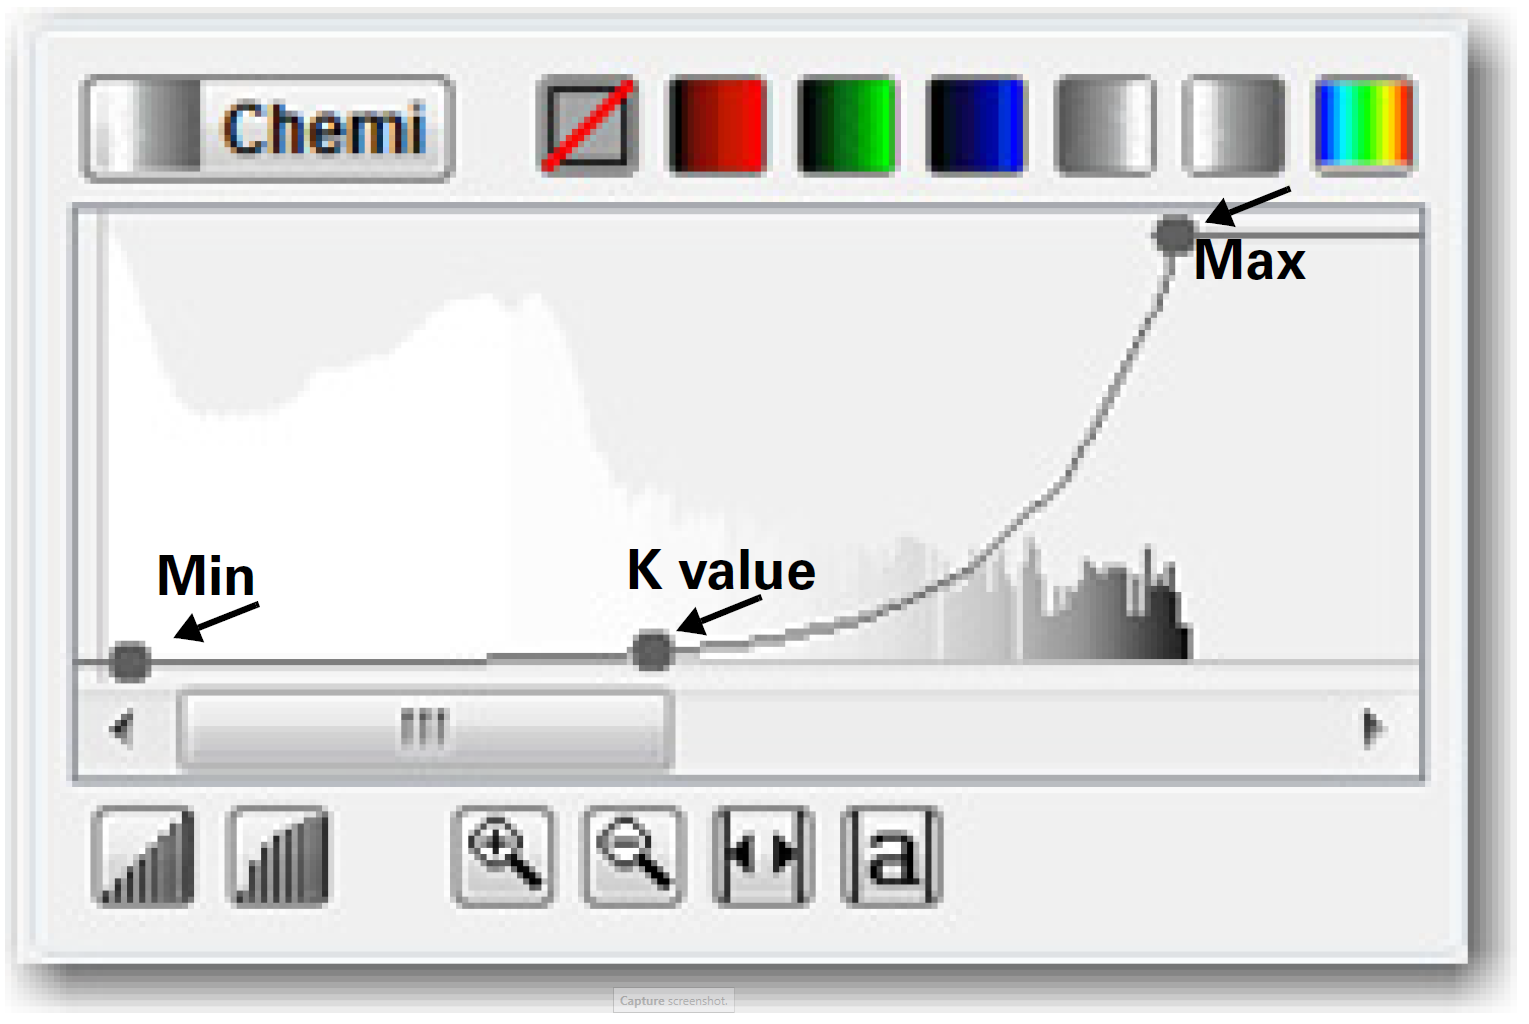
Overlaying the Display panel histogram is a curve with three adjustable points. Move the Max point to the left to map more of the higher intensity data to the brighter display pixels and make the bands appear darker. Move the Min point to the right to map the lower intensity data to the background color, creating a visually cleaner background. The middle point (K value) smoothly adjusts the mapping from linear to logarithmic. Changing to a more logarithmic mapping reduces the contrast between the lower and higher intensity data, so the appearance of less intense bands is improved while avoiding overly dark bands. Additional details on using the Display panel and adjusting curves can be found in the Image Studio Help System.
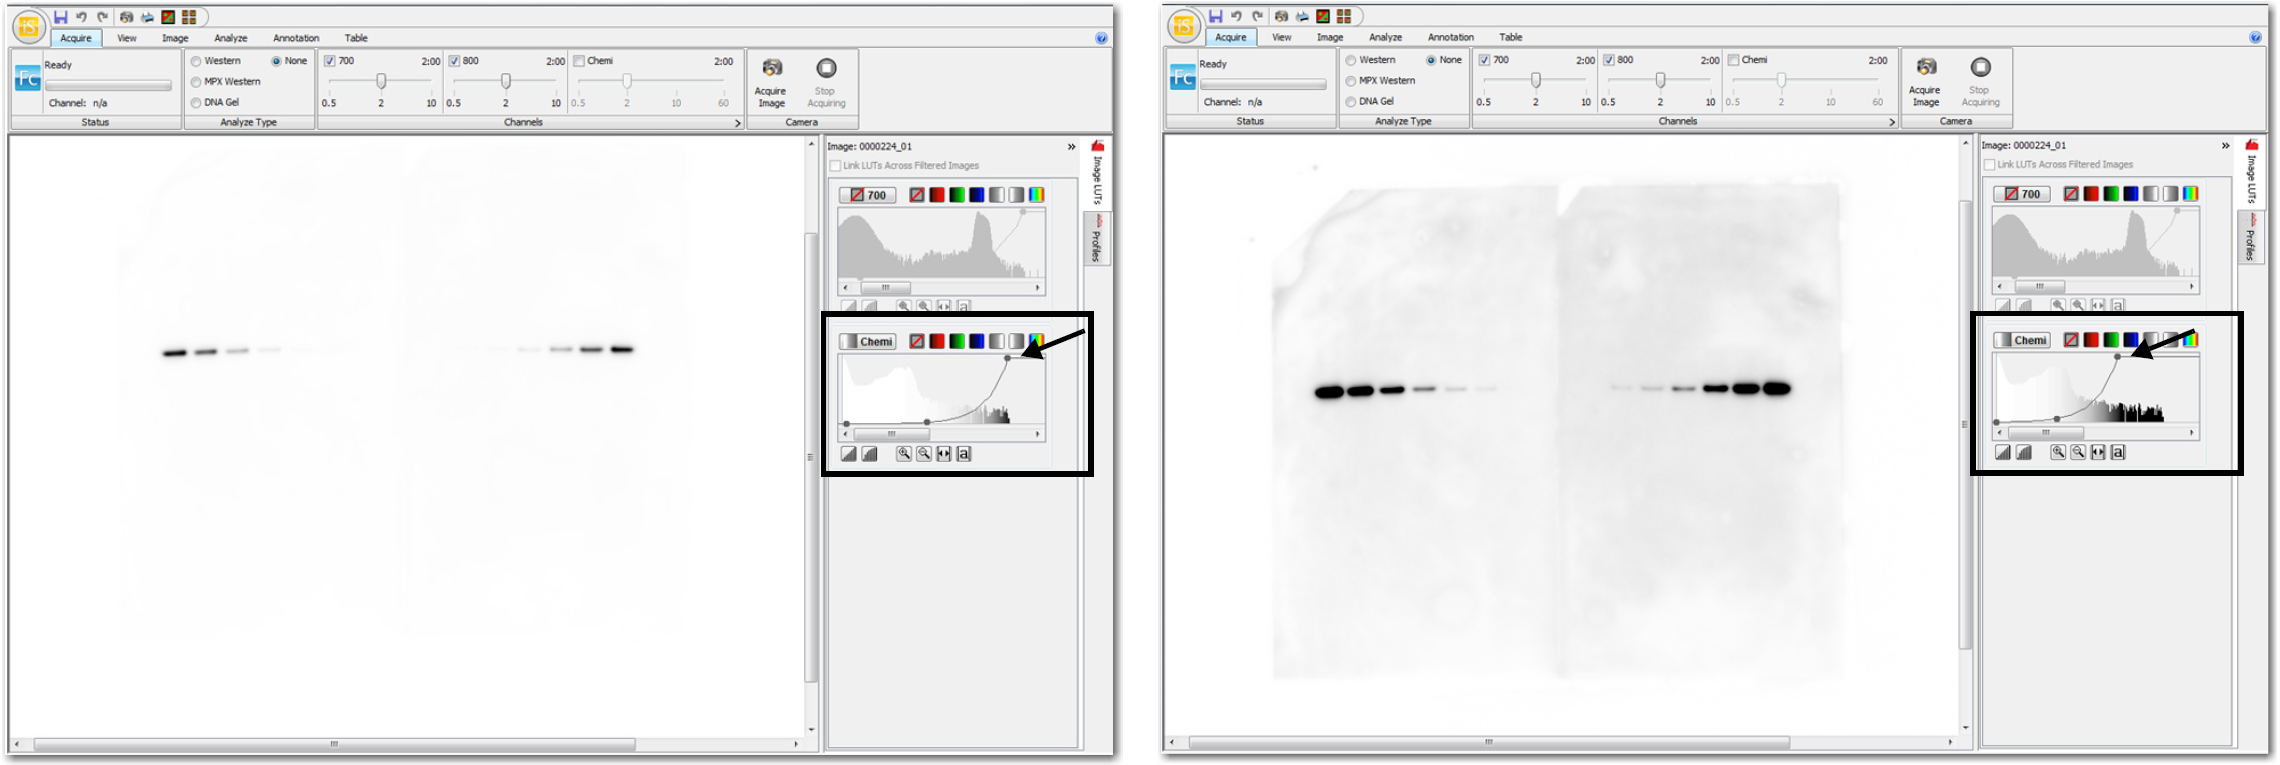
Optimize the Image Display (LI‑COR Acquisition and Empiria Studio)
For the Odyssey M Imager, Odyssey XF Imager, and Odyssey Fc Imager, click Image Display  above the image to adjust the image appearance in both LI‑COR Acquisition Software and Empiria Studio® Software.

Frequently Asked Questions
Blocking Buffer
Can I dilute the HRP-conjugated secondary antibodies in Intercept® Blocking Buffer?
Yes. Intercept Blocking Buffers may be used to dilute HRP-conjugated secondary antibodies and come ready to use in Intercept T20 Antibody Diluent. Find all the Intercept Blocking Buffer products at licor.com/intercept.
Can I use milk-based blockers?
Yes. Milk-based blockers can be used for chemiluminescent detection but should be avoided when detecting phosphoproteins or glycoproteins. Milk-based blockers may contain endogenous biotin and glycoproteins, resulting in higher background on the membrane.
What is the best blocker for chemiluminescent Western blots?
It is best to try several blockers to find the one that gives the most satisfying data for each antigen and antibody pair. There is no one best blocker for all conditions.
Primary and Secondary Antibodies
Why is the signal missing in the middle of the bands?
Too much secondary antibody on the membrane results in consumption of all the substrate in that area. Without substrate, there is no chemiluminescent signal and a blank spot appears in the center of the band. Try different dilutions of the primary and secondary antibodies to find which gives best results, or try changing the substrate.
Does it matter where I purchased the HRP-conjugated secondary antibodies?
The reactivity of secondary antibodies ranges widely between vendors. The ratio of HRP to antibody varies as well, and may affect the detection of the target. LI-COR offers high-quality secondary antibodies for chemiluminescent Western blotting.
WesternSure® Goat anti-Mouse HRP (P/N 926-80010), and WesternSure Goat anti-Rabbit HRP (P/N 926-80011) are optimized for use with WesternSure PREMIUM Chemilumines- cent Substrate (926-95000 and 926-95010) and are recommended for digital imaging.
Should the HRP-conjugated secondary antibodies be highly cross-adsorbed?
Highly cross-adsorbed secondary antibodies are essential for two-channel, multiplex detection; however, they are not necessary for detection of a single target.
Washing Buffer
Does it matter how I wash the membranes after antibody incubation?
Yes. Adequately washing membranes will greatly improve the appearance of the chemi- luminescent Western blot. Wash membranes with a saline-buffered solution containing
0.1 to 0.2% of a non-ionic detergent such as Tween® 20. Wash 4 times for 5 minutes each time, with ample wash solution, on a shaker or rotator.
Substrate
Which substrate do I use?
There are a wide variety of chemiluminescent substrates for HRP detection. Substrates that provide longer duration and mid-femtogram levels of sensitivity are recommended for best performance and sensitivity on digital imaging systems.
WesternSure® PREMIUM chemiluminescent substrate (LI-COR P/N 926-95000 and 926-95010) provides higher reactivity and longer duration and is ideal for use with the Odyssey M Imaging System, Odyssey XF Imaging System, Odyssey Fc Imaging System, and C‑DiGit Blot Scanner.
How do I apply the substrate?
Make sure the substrate is at room temperature before use. Substrate should be applied by following the manufacturer’s suggested methods for the amount of substrate to use and the incubation time prior to imaging. The substrate can be added directly to the sample side of the membrane (either by pipetting the substrate on the sample surface, or by pre-incubating the membrane in the substrate), allowed to incubate, and imaged without having to cover the membrane before scanning.
When choosing this method, the addition of a clear, plastic covering, such as a sheet protector, over the top of the blot can prevent possible drying. Image the plastic covering by itself first to determine if it scatters light, causing high background. You may need to try several types of plastic coverings before finding the best one.
The membrane dried during imaging. Can I apply more substrate and image again?
No. Applying more substrate to a dried blot will likely result in high background.
How do I keep the membrane from drying out?
For the Odyssey M, Odyssey XF, or Odyssey Fc, place a clear, flat plastic covering, such as a sheet protector, over the chemiluminescent Western blot to keep the substrate in contact with the HRP enzyme and to help prevent the blot from drying out during imaging. It is important to image the plastic covering by itself first to ensure it does not create high background.
When using the C‑DiGit Blot Scanner, the membrane should not dry out in the amount of time it takes to complete a scan. However, to maintain moisture on the membrane for an extended time, place a clear, flat plastic covering on top of the membrane to keep the substrate in contact with the HRP enzyme and to prevent the blot from drying out. Membranes can also be placed in a clear, flat plastic covering before scanning. Make sure there is no plastic extending beyond the scanning surface and into the outer lid seal.
Imaging
How do I keep my imaging equipment clean?
It is important to clean scanning surfaces and imaging trays before and after each use to prevent unwanted background. Detailed cleaning instructions may be found in your instrument operators manual (Odyssey M, Odyssey XF, Odyssey Fc, and C‑DiGit).
Can I use the Odyssey XF or Odyssey Fc Imaging Tray multiple times?
Be sure to clean the imaging tray before and after each use. If you have cleaned a used tray, image the tray by itself to see if there is any contamination left. If you still detect signal, clean the tray again and re-image. Trays should be discarded if they are damaged or if too much residual signal remains after cleaning. New trays can be found at licor.com/bio/accessories/odyssey-fc-imaging-trays.
Can I adjust the brightness and contrast of an image to enhance band visibility?
Yes. All image adjustment methods using Empiria Studio® Software, LI‑COR Acquisition Software, and Image Studio™ Software will not alter the data collected, or the quantification of the data. For detailed instructions on how to make these adjustments, visit licor.com/support.
References
1. Towbin, et al. (1979). Proc. Natl. Acad. Sci USA, 76; 4350-4.
Related Resources
Good Westerns Gone Bad: Maximizing sensitivity on chemiluminescent Western blots
licor.com/ChemiTech
Protein Electrotransfer Methods and the Odyssey Infrared Imaging System
licor.com/documents/t932473b94z25454q3kqazh3t830xfoy