Transferring Logged Data
Files can be using the Download utility that is built into the gas analyzer PC software or a File Transfer Protocol (FTP) application.
The Download utility allows you download and delete files that are stored on the USB device in the SmartFlux System. You can access the files remotely, so long as you can connect to your instrument over a network. The utility is a component of the gas analyzer software. Click the Download button to launch it.
![]()
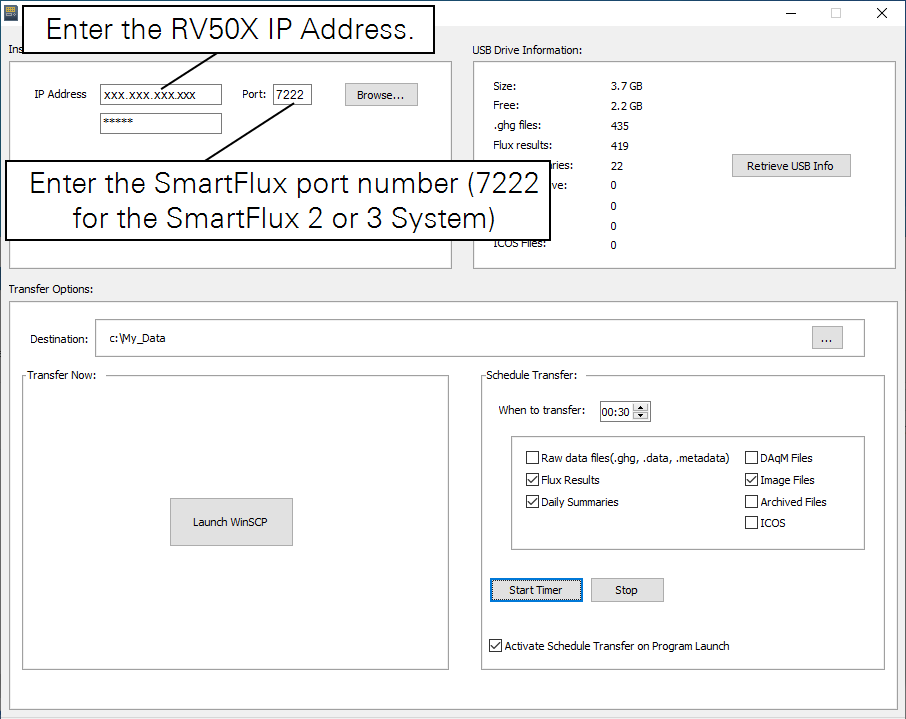
The application should automatically connect to the instrument, but if it doesn't, click Browse to view a list of instruments on the network. Select the instrument, click OK, enter the password (licor) and click Verify Connection. You may need to set the port if you are connecting with a cellular or satellite gateway. If your instrument is not listed, type the IP address into the IP Address field. If you are using a RV50X, set the Port to the same number that you have opened in the RV50X software.
USB Drive Information displays the size of the USB drive, available memory, number of each type of file.
Transfer Options are used to configure settings and other features:
- Transfer Now will allow you to use WinSCP to transfer files. WinSCP is a free file transfer application that can be installed as part of the win-GHG application. Click Launch WinSCP to open the application.
- Destination: This is where the transferred files will be saved. Ideally, this will be a directory on your computer. If you are transferring files to a server or cloud-based service such as a Dropbox, this is configured in the SmartFlux section of the application.
- Schedule Transfer: This section allow you to configure automatic file downloads to a computer.
- When to transfer: You can Transfer files daily at a scheduled time.
- You can close the application to your system tray (close it, but choose No) so it continues running in the background. Also be sure your computer does not go to sleep before the scheduled transfer. You may need to re-start the automatic download service if your computer is shut down and re-started.
- Files to transfer: Select any or all file types to transfer data files (you must select a file type before files are displayed). When you check a box, a corresponding tab is added to the box on the right. Here you can choose to download specific files or all of them.
- After configuring the transfer and selecting files, click Start Timer and allow the application to run in the background so it can download files as scheduled.
Tips for the Scheduled Download utility:
- If the downloader is already running, open it from your system "tray" rather than starting another instance of it.
- Set the download to begin at 00:15 (12:15 am) if you are using the SmartFlux System. That way all the logged files for the previous day will be processed before the download begins.
- Close the application to your system tray to keep it running in the background. Be sure the computer that runs the application is on and not in power saver mode.

You can also use third-party file transfer (SFTP) applications to transfer data, such as WinSCP or another application. In this case, connect using the instrument IP address and the following settings:
- Port: 22 or 2200 if you have forwarded port 22 to port 2200.
- Username: licor
- Password: licor
You will see all of the files in the file system. The files of interest are in a data folder.