Maintenance
The LI-710 requires little maintenance under normal circumstances. However, some routine attention will ensure that the instrument keeps running well over the long term, and will help you get better, more complete measurements.
Basic sensor checkup
You can conduct a basic check just by looking at the LI-710.
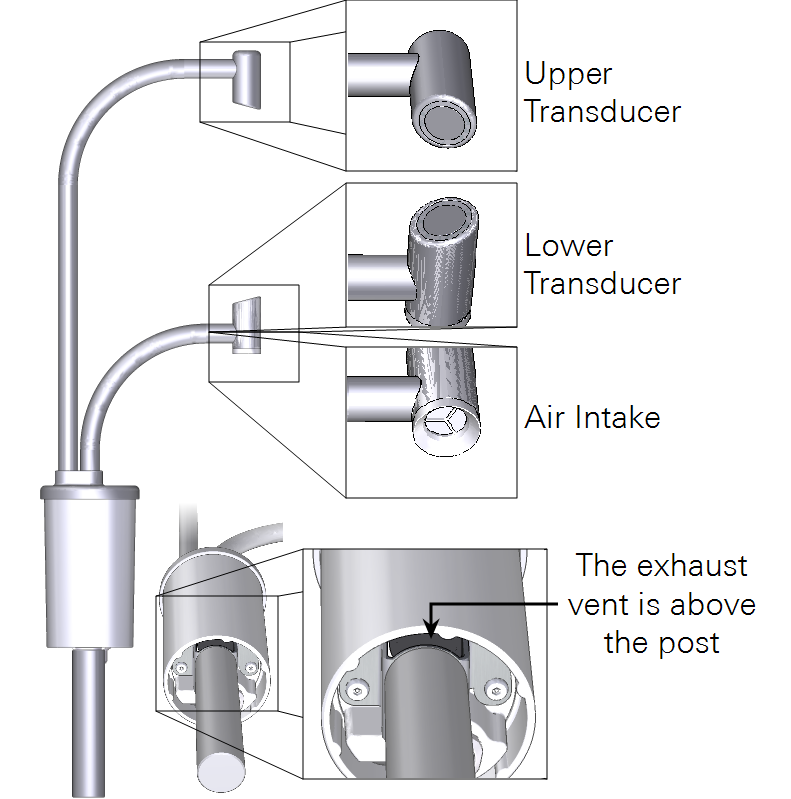
- Check the transducers to be sure they are not covered in bird droppings or dirt. Clean them with a moist cloth and mild detergent if necessary.
- Check the air intake - look for visible obstructions or anything that might interfere with air flow and remove it. If the filter is dirty, replace it (see Replacing the intake filter).
- Inspect the exhaust vent - look for insect colonies or nests. Clear anything that might obstruct the air flow (see Accessing the outlet vent).
Replacing the intake filter
The air intake filter should be replaced approximately once every two or three months, typically. In some conditions, the filter will not need to be replaced as often. In dusty conditions, it may need to be replaced more often.
Low flow rate or high drive voltage may indicate the filter is due for replacement. You can replace the filter and filter O-ring with new ones from the spares kit. This procedure describes how to replace the filter.
| Description | Part Number |
|---|---|
| Filter Replacement Kit | 9971-015 |
| Filter Pack (5) | 6571-002 |
| O-ring Pack (5) | 192-19986 |
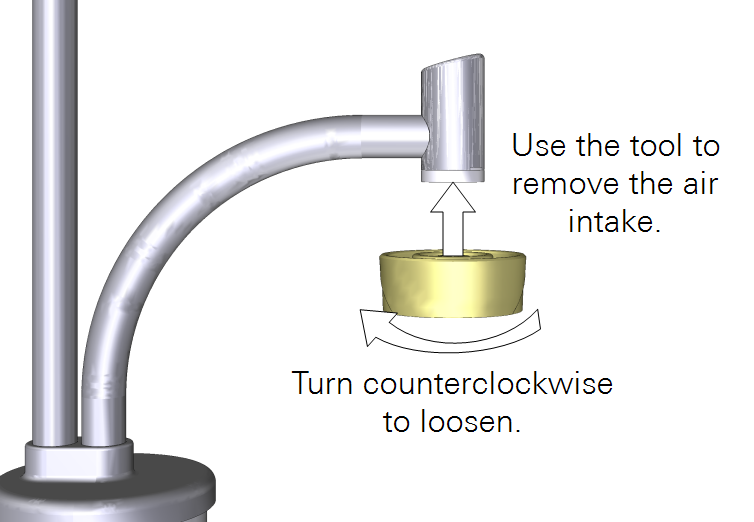
Caution: Do not use a pliers or other metal tools on the air intake! Doing so may deform the parts or alter the alignment of transducers. Instead, use the plastic air intake tool that is included in the spares kit (part number 6371-021).

The intake filter is on the bottom of the lower transducer housing.
- Power off the LI-710 - disconnect the cable.
- Align the intake removal tool with the keys on the air intake and turn it counterclockwise.
- Caution: Do not apply torque to the transducer housings. Doing so can affect the alignment and damage the sensor.
- Once it is loosened, you can remove the air intake with your fingers. Be sure that both the filter and O-ring come out when the intake is removed.
- Install a new filter and O-ring from the spares kit.
- Insert the filter into the air intake, followed by the O-ring.
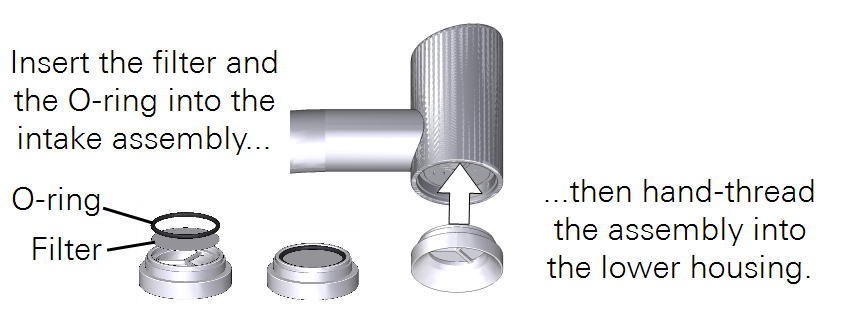
- Install the air intake.
- Do not cross-thread the air intake. Start tightening the intake with your fingers. Finish tightening it with the tool until it hits a hard stop - around 2 turns clockwise.
Filter replacement is complete.
Replacing the pump and O-rings
The pump inside the LI-710 has a limited life and will need to be replaced periodically. One replacement pump is included with the instrument spares. Additional pump replacement kits are available for purchase. This procedure describes how to replace the pump.
| Description | Part Number |
|---|---|
| Pump Replacement Kit | 9971-016 |
| Pump (1) | 286-17946 |
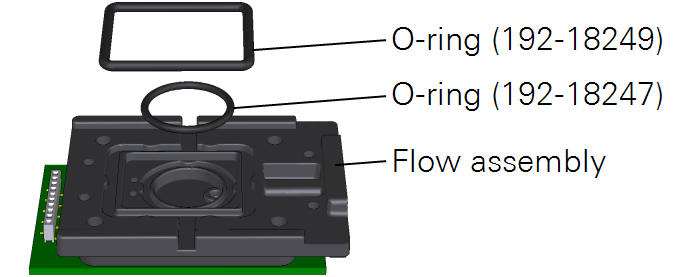
| Pump O-ring 29×2 mm VITON 75 (1) | 192-18249 |
| Pump O-ring 16×1.5 mm VITON 75 (1) | 192-18247 |
| M3×0.5-20 Installation Screws (4) | 151-18159 |
| 2.5 mm Hex Key (1) | 611-20555 |
- Power off the LI-710 - disconnect the cable.
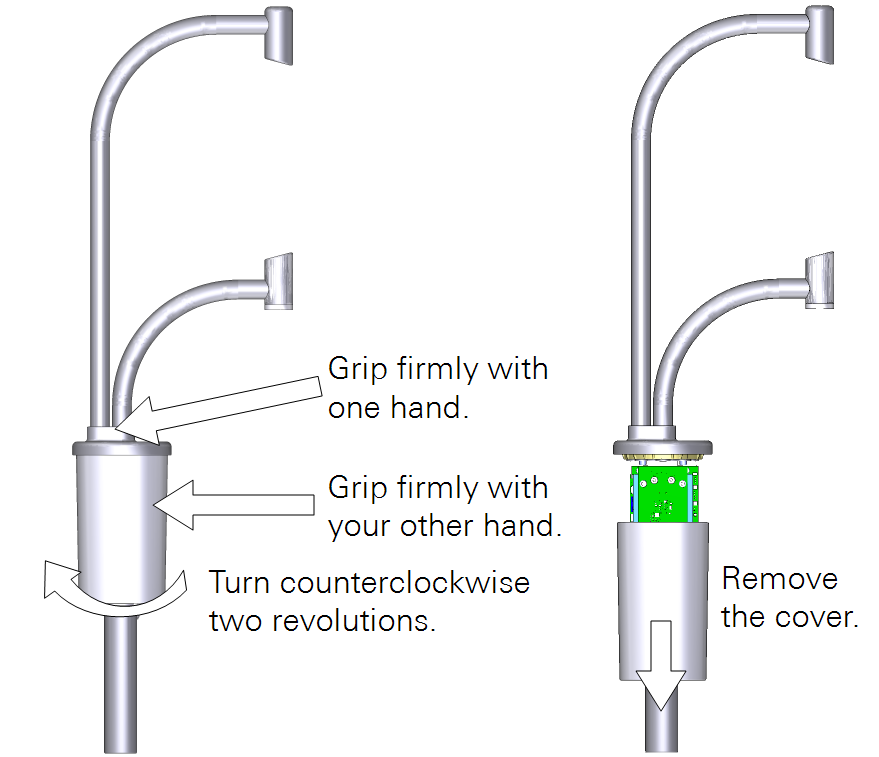
- Remove the electronics cover.
- Do not apply torque to the transducer housings or arms.
- Set the LI-710 on a workbench with the arms pointing away from you.
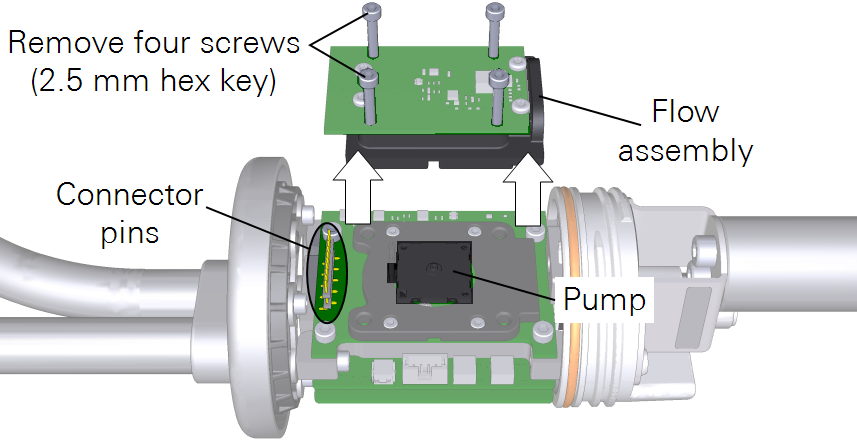
- Remove the flow assembly.
- Remove the four screws using the 2.5 mm hex key from the spares kit. Pull straight up while gently wiggling the flow assembly to separate it from the connector pins.
- Important: Do not bend the connector pins or remove any other screws.
- Remove the old pump.
- It will come out easily; use a tweezers if needed.
- Inspect the O-rings - if you see cracks or damage, replace them.
- Extra O-rings are in the spares kit. Both O-rings press into place in the flow assembly.
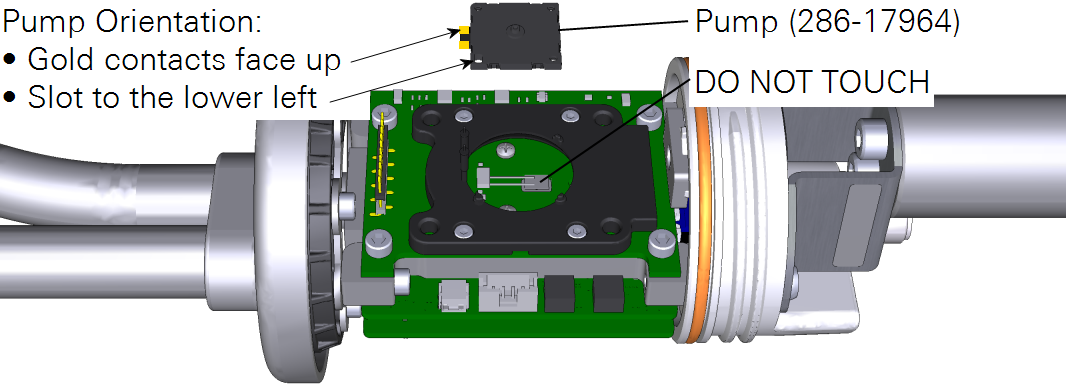
- Set the new pump in place.
- Important: Handle the pump by its corners. Do not touch the diaphragm or the board-mounted components under the pump. Align the new pump (part number 286-17964) with the keys.
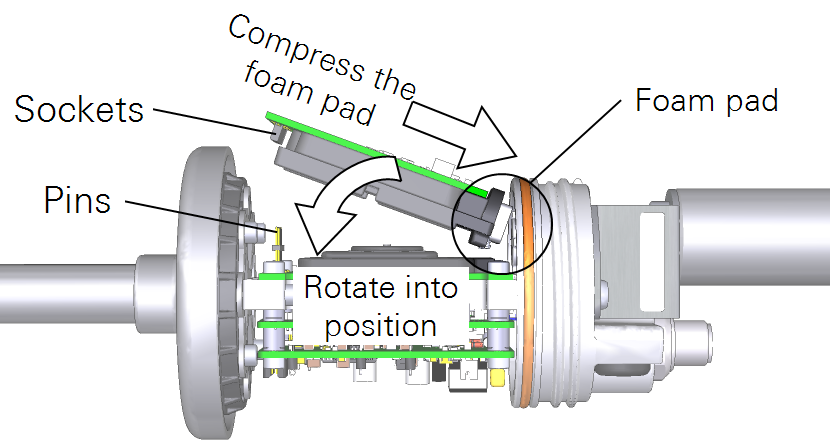
- Install the flow assembly.
- Compress the foam pad and then rotate the flow assembly into place. Be especially careful with the connector - ensure that each pin meets the corresponding socket, then press them together.
- Install the four screws that secure the flow assembly.
- Extra screws are in the spares kit (part number 151-18159).
- Install the cover.
- Tighten the cover until it hits a stop and will no longer turn - about two revolutions.


The pump replacement is complete.
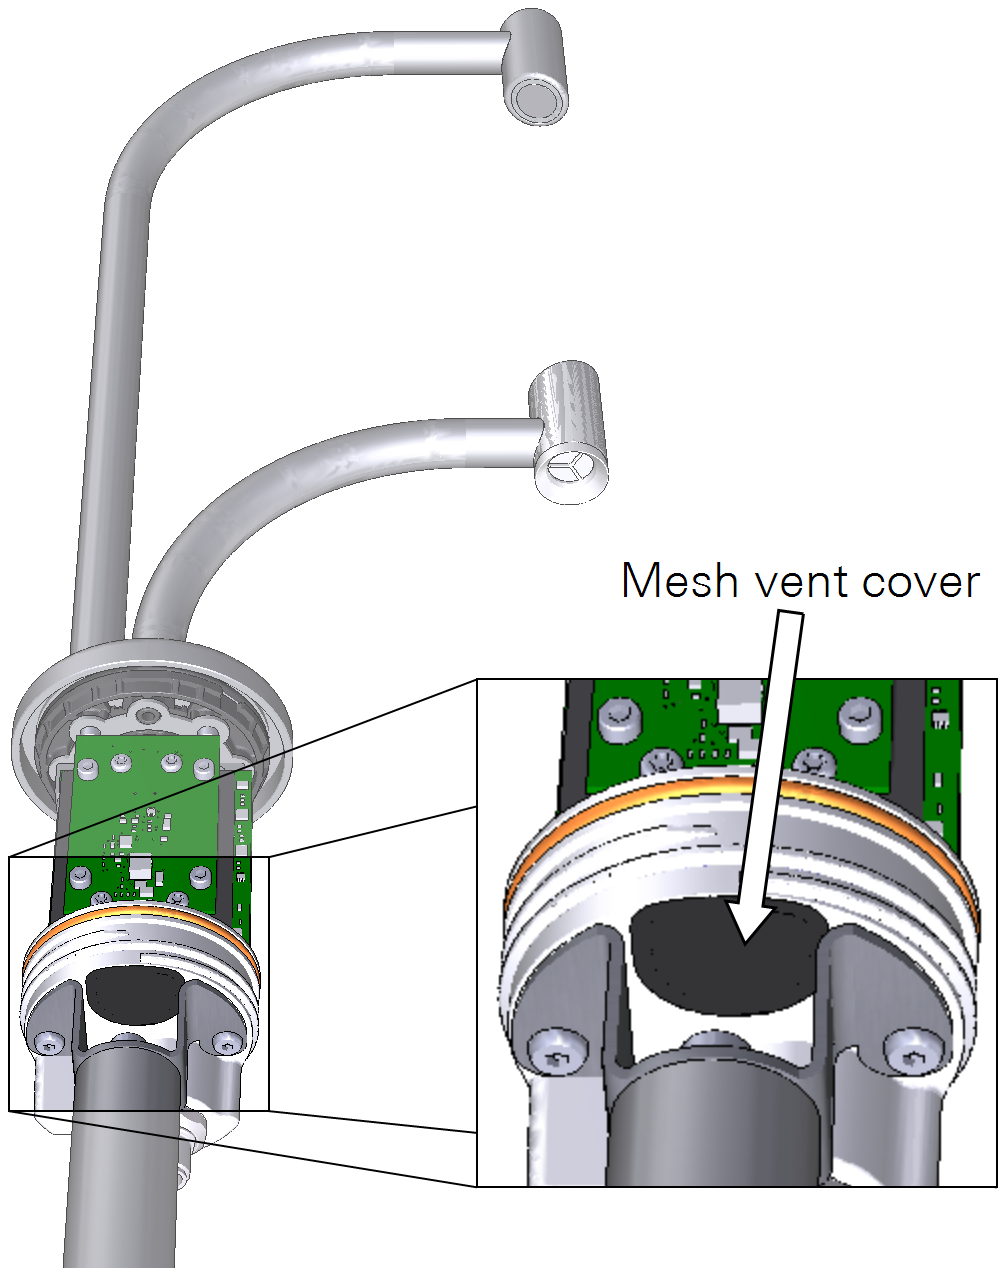
Accessing the outlet vent
Disconnect the power cable and then remove the cover to access the exhaust vent.
The vent is between the post and the sensor body. Do not remove the post or loosen the screws that secure it. Use a cotton swab to clear debris from the vent. Do not damage the vent screen.
Updating the firmware
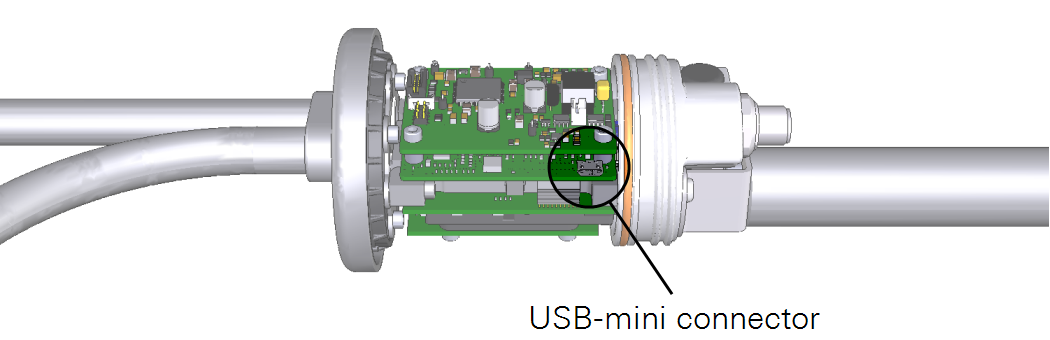
Firmware updates are carried out over the internal USB connector. To update the firmware:
- Download the firmware to a directory on your computer.
- Firmware updates will be provided at licor.com/support/LI-710/software.html.
- Power off the instrument by removing the power cable at the connector.
- Remove the electronics cover.
- Do not apply torque to the transducer housings or arms.
-

Warning: Potentially hazardous voltages may be present when the cover is removed and the instrument is powered on. Do not touch any internal components or surfaces while the external cover is removed and the instrument is powered on.
- Connect a user-supplied USB-mini cable between your computer and the connector on the circuit board.
- Connect the power cable to power the instrument ON.
- If the instrument is powered on while a USB cable is connected, it will mount a directory to your computer called FW_UPDATE. Open the directory if it doesn't open automatically.
- Copy the file you downloaded into the FW_UPDATE directory.
- When the LI-710 "notices" the new file, it will automatically close the window and initiate the update. You may see a message indicating that the update was successful.
- Disconnect the power and USB cables and install the electronics cover.
- Restart the LI-710 after updating the firmware.
- Be sure the USB cable is not connected when restarting for normal operation.
