Using an SDI-12-to-USB translator
An SDI-12-to-USB translator can give access to the LI-710 configurations and results.
Requirements for this tutorial
The following items are required to complete this tutorial:
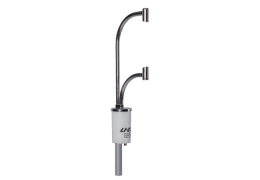
- LI-710 Evapotranspiration Sensor.
- SDI-12-to-USB Translator (we use the vegetronix.com translator for this tutorial).
- Personal Computer (Windows OS).
- Terminal Emulator (we use Tera Term).
You will connect the ground and BUS wires from the LI-710 to the data and ground connectors on the translator, and provide power to the LI-710 from an external power supply (see Figure 5‑2).
Connecting the device
Connect the wires and power on the LI-710, then connect the USB cable to your computer. The computer will establish a COM port, which may be indicated in the notifications or found in the Device Manager.

To connect to the SDI-12 translator:
- Launch a terminal program, such as Tera Term.
- Select Serial as the connection type, select the port for the USB translator, and then click OK.
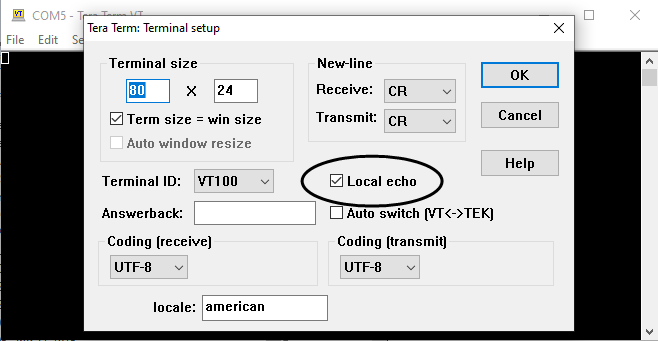
In the default configuration, Tera Term will pass your keystrokes directly to the COM port - you will not see what you have typed. Change the setting under Setup > Terminal, and check Local Echo and your keystrokes will appear in the terminal, along with replies from the sensor. This is a matter of convenience - so you can see what you are sending to the device.
Note: The New-line Receive and Transmit settings must be CR.
Communicating with a command-line interface
This section presents a variety of commands and replies that you can use to configure and view data from the device. This is a practical tutorial; you won't do this when the LI-710 is deployed. You will do this to observe the configuration and familiarize yourself with the data structure. Normally, communication with the LI-710 (including data logging) will be carried out by a data logger.
Use transparent mode
Some queries must be sent in transparent mode. This is accomplished by preceding the command with a capital T. In the following examples, the letter is included where needed.
Get the address
To request the address of the sensor connected to the SDI-12 bus, enter the following.
- Command: T ?!
- Reply: OK 0

The number in the reply (0 in this case) is the connected sensor's address.
Device information
Each LI-710 is configured with an address of 0. The first time you connect to an LI-710, it should be the only device attached to the SDI-12 array. After connecting initially, you can set the address and then power up the remaining SDI-12 devices.
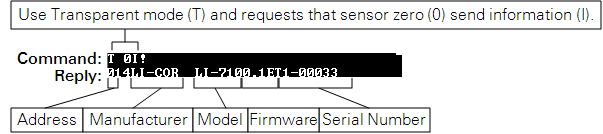
- Command: T 0I! (T for transparent mode followed by a space, the number zero, the capital letter I for information, ending with an exclamation point).
- Reply: 014LI-COR LI-7101.0ET100033 (identifying information for the sensor, including the device address, manufacturer, model, firmware version, and serial number)
Set the address
To change a sensor's address, the command starts with the address of the sensor to change followed by a capital A for address, followed by the new address number.
- Command: T 0A1! (T for transparent mode followed by a space, the number zero for the sensor with address 0, capital letter A for address, the number 1, which is the new address, and the exclamation point).
- Reply: OK 1 (the new address)
Adding a variable set to a scheduled output
To view the output, at least one of the four data packets must be added to the scheduler. The scheduler will inquire with the specified sensor on the specified schedule for the requested data at the specified interval (60 seconds in this example).
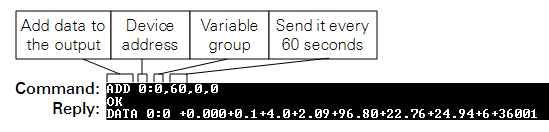
- Command: ADD 0:0,60,0,0
- Reply: OK DATA 0:0 (followed after a moment by parameters in the group)
To add four groups of variables, send the following four commands:
- Command: ADD 0:0,60,0,0
- Command: ADD 0:1,60,0,0
- Command: ADD 0:2,60,0,0
- Command: ADD 0:3,60,0,0
To remove a group (3 for example), send the following.
- Command: DEL 0:3
- Reply: OK
This will remove variable group 3 from the output of sensor 0. Use a modified version of the same command to remove variable groups 0, 1, or 2.
Adding the dataset to the scheduler is not enough; however, you must also request that the device send the data packets by turning the scheduler on (simply type START).
Turn off or on the scheduler
To keep the configuration but stop the transfer of data, simply send the command STOP. The sensor will retain settings but stop sending the data to the terminal program. To turn it back on, send the command START. The device will resume sending data at the specified interval.
Send a trigger (XT) command
Send the trigger command to compute results from data in volatile memory and restart the measurement period. Follow the trigger command with the READ command to report the results.
- Command: T 0XT!
- Reply: OK
Report the measurement immediately
After you have added a variable to the output, you can view the data in that group at any time by sending READ followed by the sensor address and the data group. It'll look like this:

- Command: READ 0:0
- Reply: OK DATA 0:0 (followed by parameters in the group 0).
You may need to turn off the scheduler (type STOP) for the device to respond to commands in transparent mode.
Logging data to your computer
You can record measurements directly to your computer. This may be practical if you have a computer that is dedicated to logging data. However, a personal computer may not be ideal because it may shutdown and not restart if power is disrupted, it may spontaneously restart after updates, or it may enter sleep mode. These are just a few things to consider if you are using a personal computer as a data logging device. Nevertheless, it may work for you, and if you deem these risks to be acceptable, proceed:
- In Tera Term, click File > Log.
- Select a directory where the file will be written.
- Click Log to start.
- Tera Term will write data to the file until you stop it or until something disrupts the process.
The logging options in Tera Term are somewhat limited compared with those available in dedicated data loggers. But, if your goal is to record the data, this will get it done for a short time period.