Adding Memory
The datalogger memory can be expanded up to 2 GB using an SD card or USB drive. There are two advantages to expanding the memory:
- The datalogger can record a lengthy backup of the biomet data in case of a network error or if the LI-7550 loses power.
- Data retrieval can be performed less frequently, as there is less risk that records will be overwritten or that logging will stop.
One disadvantage is that it takes the datalogger longer to initialize the file when the file size is large. It will take four or more hours to initialize a 2 GB log file.
Note: Data that are logged to the removable USB drive or SD card are encoded in a compressed format. The data must be exported through XTerm software, which will convert it to a readable text format; or bundled with logged .ghg data files in the LI-7550. You are not able to read files directly from the USB drive or SD card (unless you export the logged data to a directory on the card using XTerm).
Important: Only use industrial rated SD cards or USB drives. Be sure the drive is rated to withstand outdoor conditions, such as extreme cold and heat. Data may be lost if standard USB drives are used.
Important: Storage cards must be formatted as FAT16 or FAT32. NTSF is not supported. Only standard SD cards are supported. SDHC, SDXC, or SDIO are not supported at this time.
There are two main steps to this process: Add an SD card or USB drive and assign the log file to the SD card/USB drive.
- Insert the SD card or USB drive into the appropriate port on the datalogger.
- Connect to the datalogger via serial (COM1) or Ethernet (TCP/IP) using XTerm.
- Enter Setup Access and click the Setup tab.
- Click Log Files and click New at the bottom.
- Under Filename, click the options button
 .
. - Click New.
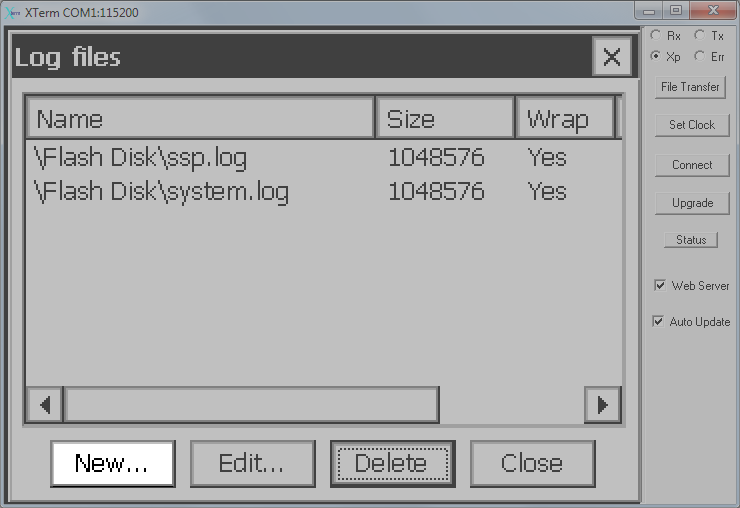
- Click the options button next to Filename and then Click Up.
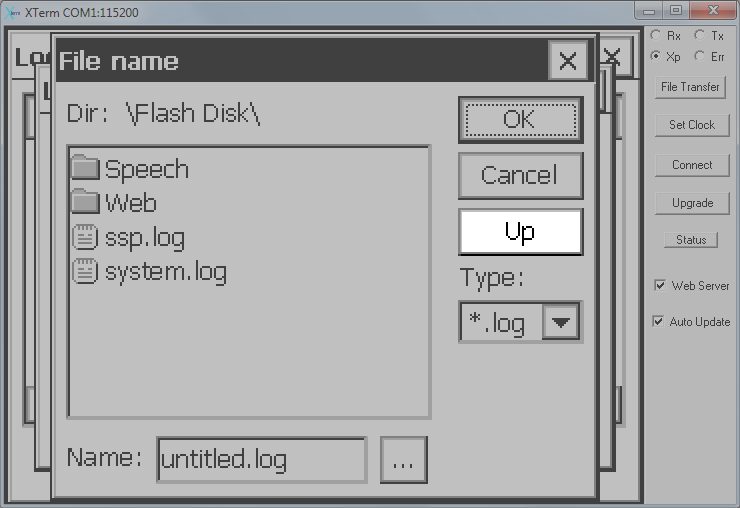
- Scroll to the folder called USB Card or SD Drive and double click it.
- Enter a Name for the log file and click OK.
- Enter the size for the log file in bytes.
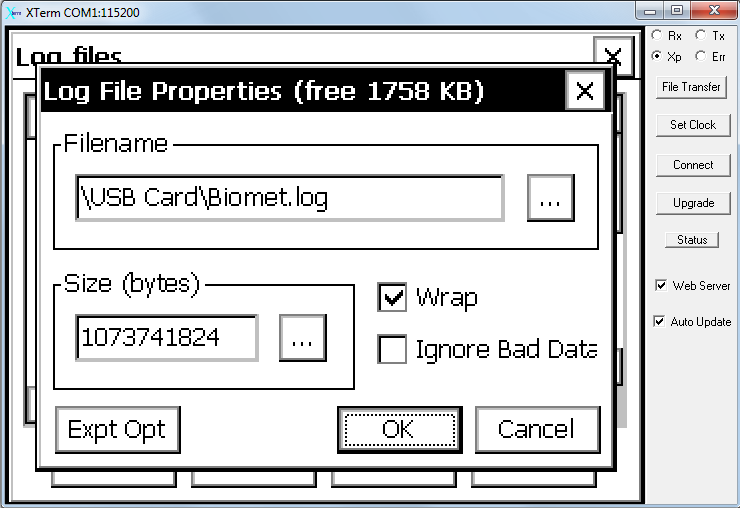
- Note: The datalogger will take 4 or more hours to initialize a 2 GB log file. The datalogger will initialize the log file every time it restarts. We recommend a smaller file size such as 56 MB; or complete this procedure when it suits your schedule (i.e., at the end of the day). The maximum log file size is 2 GB. In the example we show 1073741824 bytes, which is exactly 1 GB.
- Note: Since the log file destination was changed, be sure to configure the header settings for the new log file. Simply click the Expt Opt button and configure the header as described earlier. See Configure the Data Header.
- Note: Check the Wrap box to instruct the datalogger to overwrite old files when the drive becomes full. This is the recommended setting.
- Click OK and Close in the open windows.
- The datalogger will initialize the log file. Do not interrupt this process.
- To use the Log File in the SD/USB Drive, under the Setup tab, click Graphical Setup and then select Edit.
- Click the LogRec block at the top and click Edit Properties.
- Under Log name: select the directory and file you created in the previous step.
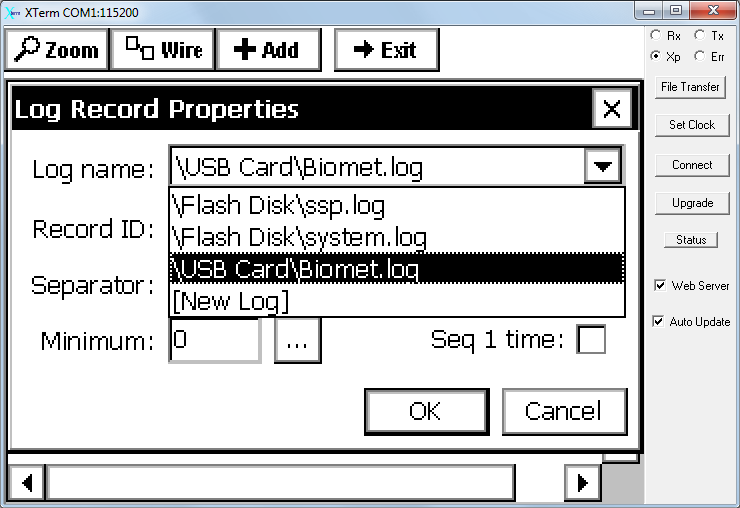
- Click OK and Exit, then click on the Main tab to save the changes. Now your data will be logged to a file on the USB drive or SD card.
- Note: The USB drive and SD card cannot simply be removed and swapped with a different one. The data must be exported through XTerm software, which will convert it to a readable text file.
- Unmount the Drive.
You may wish to remove the USB drive or swap it out for another one. You can do so simply by stopping datalogging and removing the USB drive or SD card. If you do remove the drive, you will need to revisit step 2 above and assign the Log name to a directory on the datalogger Flash Disk (internal memory) before the datalogger will log data. If you replace the drive with another, repeat steps 1 and 2 above to initialize the new drive.