Good Multiplexing Gone Bad
Introduction to Western Blot Multiplexing
Western blotting is a technique that was introduced in 1979 by Harry Towbin. The technique detects a specific protein’s presence from a complex protein mixture that has been immobilized on a membrane with specific antibodies. Over time, the desire to detect multiple proteins within a sample emerged, leading scientists to develop several methods for simultaneous protein detection on a single membrane—including Western blot multiplexing.
Historically, common methods included stripping and re-probing or cutting the membrane horizontally to isolate different molecular weight fractions that can be probed for target proteins. Multiplexing more than one target per membrane concurrently offers several advantages to these approaches:
Increases data accuracy and reproducibility
Simplifies data analysis and normalization
Saves time, samples, and reagents
Key Takeaways from This Guide
This guide presents nuances encountered when multiplexing more than one target per membrane and offers potential solutions that do not reduce assay accuracy. Numerous factors can lead to inaccurate multiplexing, including:
Incorrect antibody selection
Improper assay validation
Improper normalization strategy
Western Blot Multiplexing Basics
Multiple antigens can be detected simultaneously on the same blot using IRDye® conjugated secondary antibodies on all Odyssey Imagers and using VRDye™ conjugated secondary antibodies on the Odyssey M Imager. When performing a multiplexed Western blot, there are two basic changes that are made:
Primary antibodies are combined within the diluted antibody solution and incubated simultaneously with the membrane. The primary antibodies must be from different host species or subclasses.
IRDye® and VRDye™ Secondary Antibodies are combined in the diluted antibody solution and incubated simultaneously with the membrane.
Multiplexed detection requires careful selection of primary and secondary antibodies. The following guidelines provide information that will help successfully design multiplexing Western blot experiments.
There are several factors to take into consideration when planning and executing a multiplexing Western blot protocol.
See Fluorescent Western Blot Detection for a detailed, step-by-step protocol for multiplexing fluorescent Western blots.
Primary Antibody Selection
The primary antibodies must be derived from different host species, so they can be distinguished by secondary antibodies of different specificities. For example, rabbit, mouse, goat, and chicken primary antibodies will be discriminated by anti-rabbit, anti-mouse, anti-goat, and anti-chicken secondary antibodies, respectively.
Antibodies generated in species that are closely related—such as mouse and rat or goat and sheep—should not be multiplexed together, since the secondary antibodies will cross react with both species.
If the primary antibodies are mouse monoclonals from different IgG subclasses (i.e., IgG1, IgG2a, or IgG2b), then IRDye subclass-specific secondary antibodies can be used for multiplex detection. The same subclasses cannot be combined in a multiplexed Western blot (e.g., two IgG1 primary antibodies).
See Western Blot and In‑Cell Western™ Assay Detection Using IRDye® Subclass Specific Antibodies for more information.
Secondary Antibody Selection
Always use highly cross-adsorbed secondary antibodies for multiplexed detection. Failure to use cross-adsorbed antibodies may result in increased cross-reactivity.
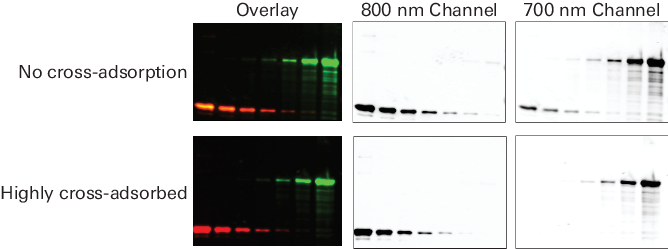
Figure 66. Highly cross-adsorbed secondary antibodies eliminate cross-reactive bands on multiplexed Western blots. Actin was detected in the 700 nm channel (red) with mouse anti-actin primary antibody and goat anti-mouse secondary antibody. Transferrin was detected in the 800 nm channel (green) with rabbit anti-transferrin primary antibody and goat anti-rabbit secondary antibody. The goat anti-rabbit secondary antibody was highly cross-adsorbed (IRDye® 800CW Goat anti-Rabbit) or not cross-adsorbed (alternate supplier). In the 700 nm image, the cross-adsorbed IRDye Secondary Antibody (bottom panel) shows no cross-reactivity with the mouse anti-actin primary. The non-cross-adsorbed antibody (top panel) cross-reacts with mouse anti-actin, generating spurious bands, which appear as yellow signal in the overlay image. Images were acquired using an Odyssey Classic Imager with detection sensitivity setting = 1.5 for both channels. For targets with the same or similar molecular weight, one secondary antibody must be labeled with an IRDye 680RD Secondary Antibody and the other with an IRDye 800CW Secondary Antibody. Any additional antibodies must be labeled with VRDye™ 490 Secondary Antibodies or VRDye 549 Secondary Antibodies. VRDye 490 Secondary Antibodies and VRDye 549 Secondary Antibodies should not be used in the same multiplex reaction to avoid channel bleed-through.
In general, IRDye 800CW Secondary Antibodies (800 nm channel) should be used to detect the less abundant protein target, and IRDye 680RD Secondary Antibodies (700 nm channel) should be used to detect the more abundant protein target. The 520 nm or 488 nm channels of an Odyssey M Imager should be primarily used for the most abundant targets or a total protein stain loading control, such as Revert™ 520 Total Protein Stain.
Successful Western blot multiplexing includes careful selection of secondary antibody specificity. For example, donkey anti-goat and goat anti-rabbit cannot be used in the same protocol.
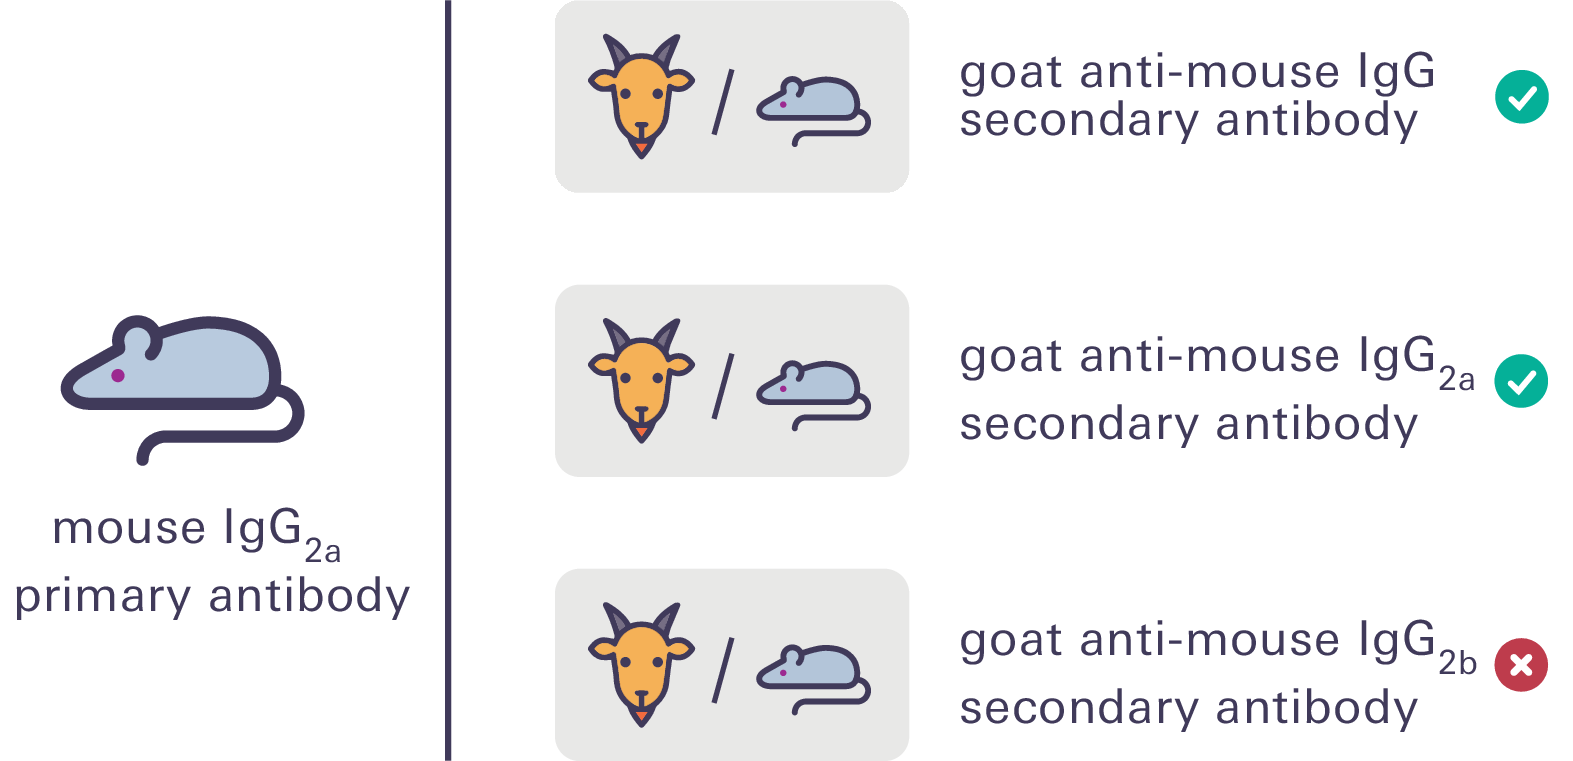
Figure 67. Your secondary antibody species must match your primary antibody host species. For primary antibodies of the same host species but different IgG subclasses, ensure you are using a subclass-specific secondary antibody. For example, when using a mouse IgG2a primary antibody, use a goat anti-mouse IgG or IgG2a secondary antibody but not a goat anti-mouse IgG2b secondary antibody. Secondary antibodies should be derived from the same host species (e.g., donkey anti-mouse, donkey anti-rabbit, donkey anti-goat, and donkey anti-chicken) whenever possible to eliminate the risk of cross-reactivity.
The table below shows examples of antibodies that can be multiplexed using Odyssey Imagers.
| Primary Antibody | Secondary Antibody | Secondary Antibody Dye | Imager | Channel (nm) |
| rabbit monoclonal | donkey anti-rabbit | IRDye® 800CW | Odyssey Imager | 800 |
| mouse monoclonal | donkey anti-mouse | IRDye 680RD | Odyssey Imager | 700 |
| goat polyclonal | donkey anti-goat | VRDye™ 549 | Odyssey M Imager | 520 |
Multiplexing Primary Antibodies from the Same Species
It can be difficult to get good antibodies in different species. Primary antibodies of the same species are detectable with the same dye-conjugated secondary antibody and are imaged and visualized in the same wavelength.
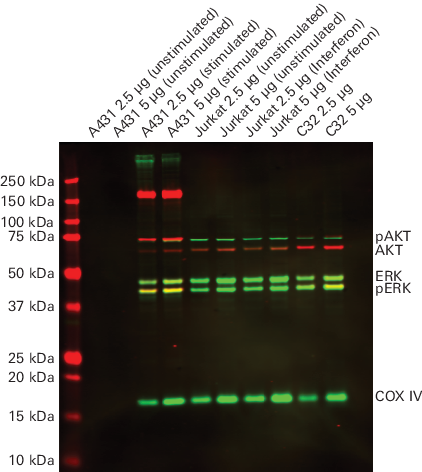
The target proteins must have distinct molecular weights to allow for good spatial separation and subsequently proper visualization and identification on the membrane.
Validation Steps for Multiplexed Western Blots
Before combining primary antibodies in a multiplexed Western blot, validation steps should be performed in the following order.
Step 1. Confirm primary antibody specificity
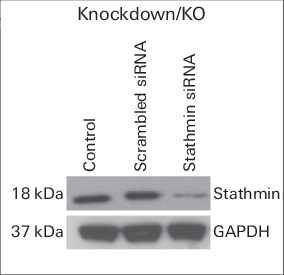
When planning to multiplex more than one protein on the same Western blot membrane, always confirm that the different targets of interest perform as expected under the same assay conditions. Perform preliminary blots with each primary antibody alone in the same assay conditions to determine the expected banding pattern and specificity.
Step 2. Ensure primary and secondary antibodies do not cross-react
Once the different primary antibodies have been validated, the possibility of cross-reactivity must be determined. To verify no cross-reactivity between primary and secondary antibodies, use the following recommended steps.
Run samples in triplicate on the same gel separated by molecular weight markers.
Transfer to a membrane that can be cut vertically between each replicate set.
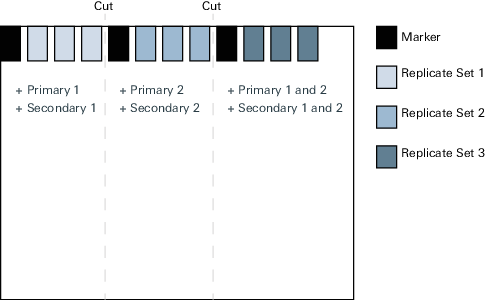
Figure 70. Example of how to cut the membrane and add primary and secondary antibodies on the membrane to verify no cross-reactivity. Incubate one replicate with primary antibody #1 only and the appropriate secondary antibody.
Incubate one replicate with primary antibody #2 only and the appropriate secondary antibody.
Incubate one replicate with both primary antibodies and both secondary antibodies.
Image the blots in proper imager channels. Band intensity should be identical among all three conditions for both targets, and no off-target bands should be present.
When multiplexing more than two targets, expand this protocol to account for each antibody combination.
Step 3. Determine the combined linear range of targets and internal loading control
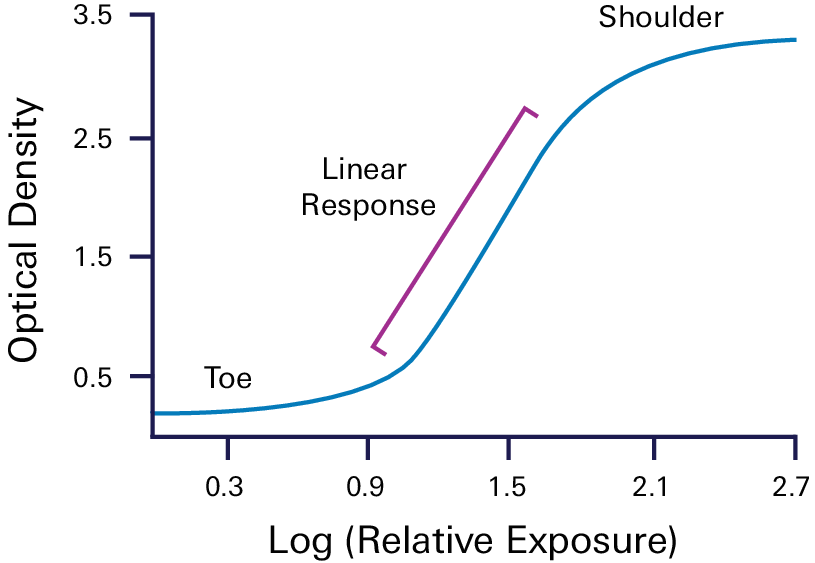
The linear range of detection is the range of sample loading that produces a linear relationship between the amount of target on the membrane and the band intensity recorded by the detector.
Outside this range, signal intensity is not dependent on sample loading and does not accurately reflect the amount of target present.
See Figure 1 in Determining the Linear Range for Quantitative Western Blot Detection for more information.
Quantitative Western blot analysis is accurate only if the target proteins and internal loading control (ILC) can be detected within the same linear range. An ILC is an endogenous reference protein(s) that is present in all samples at a stable level and is unaffected by experimental conditions. There are three types of ILC: housekeeping protein, pan or total target protein, and total protein stain.
A housekeeping protein is an endogenous protein to which the target is normalized and is present in all samples. A pan protein uses the total amount of target protein as its own ILC for normalization of a post-translational modification, such as phosphorylation. A total protein stain is when the target is normalized to the total amount of protein sample present in each lane.
The linear range must be determined experimentally for each target and ILC. The combined linear range is then used to determine how much sample should be loaded to produce a linear signal response for both the target and the ILC.
See Lambda U® On-Demand Western Blot Education Portal for courses on determining the linear range for quantitative Western blots.
Normalization of Multiplexed Western Blots
Normalization mathematically corrects for unavoidable sample-to-sample and lane-to-lane variation by comparing the target protein to an ILC.
For a normalization strategy to be accurate, it must conform to the core principle of normalization. To ensure that a strategy is accurate, verify that the ILC meets the following requirements.
The ILC must be unaffected by experimental conditions.
The ILC and targets must be detected within the same linear range.
The ILC must not interfere with target detection.
Choosing and validating an ILC that meets these requirements is fundamental to the design and accuracy of a quantitative Western blot.
Revert™ 700 Total Protein Stain and Revert 520 Total Protein Stain are recommended total protein stains for normalization on Odyssey Imagers when appropriate. Since they can be destained, additional multiplexing is possible since the stains will not use one of the channels for an ILC.
See the Normalization Handbook for more information on selecting and validating an ILC.
Data Analysis
The same recommendations for single-target Western blot data analysis should be applied when analyzing data from a multiplexed Western blot.
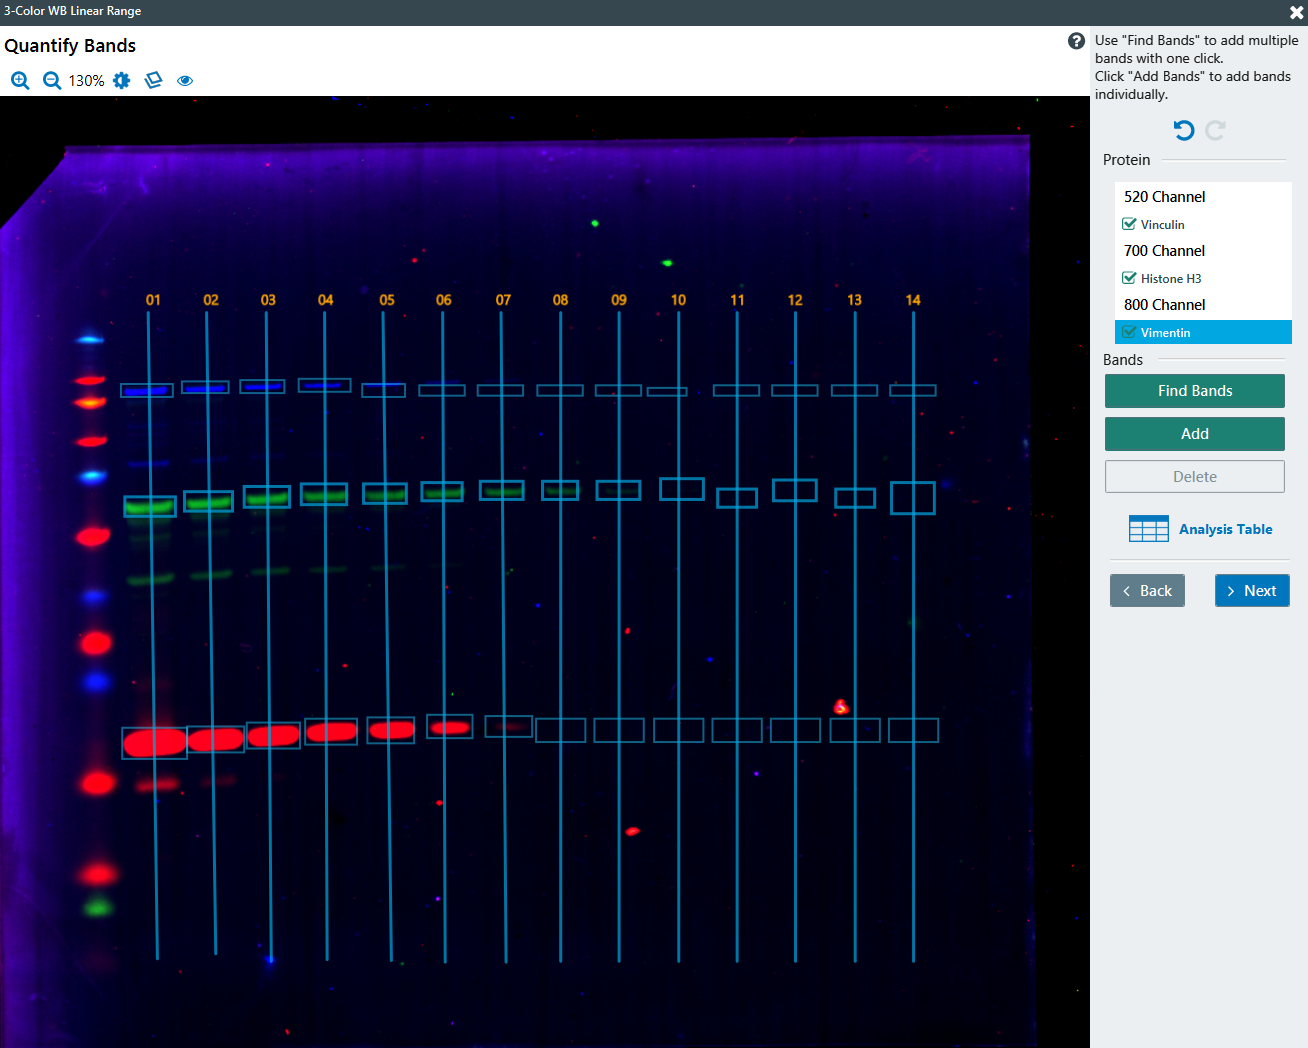
Use Empiria Studio® Software for data analysis. Empiria Studio eliminates variability from subjective choices, such as background subtraction selection, and built-in workflows guide users through each step for accurate analysis and improved consistency among users.
MPX™ Multiplexer Blotting System for Multiple-Target Western Blots
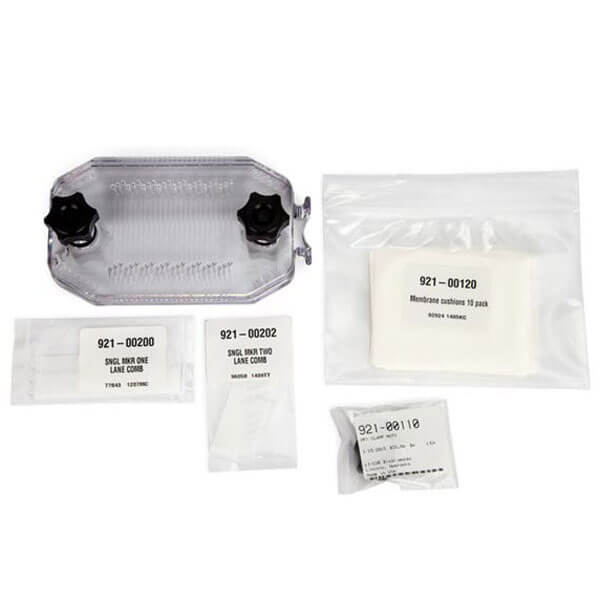
To increase your multiplexing capability and throughput, consider using the MPX Multiplexer Blotting System. The MPX Multiplexer Blotting System contains 24 channel ports that allow the analysis of 48 targets or more in up to three different samples on one membrane.
See the technical note One-Blot Western Optimization Using the MPX Multiplexer Blotting System for guidelines on using the MPX Multiplexer Blotting System with an Odyssey Imager.
Conclusion
In summary, this guide discusses how multiplexing Western blots increases data significance and reproducibility while saving time, samples, and reagents. Multiplexed Western blots require proper validation and optimization to eliminate cross-reactivity and ensure that all targets of interest—including the ILC—are analyzed within their combined linear range.
Resources
For more information about quantitative Western blot analysis, see the following resources.
Technical Documents
Lambda U® On-Demand Western Blot Education Portal Courses
Other Resources
Towbin, H., Staehelin, T., and Gordon, J. (1979). Electrophoretic transfer of proteins from polyacrylamide gels to nitrocellulose sheets: Procedure and some applications. Proceedings of the National Academy of Sciences, 76(9), 4350. https://doi.org/10.1073/pnas.76.9.4350
Pillai-Kastoori, L., Heaton, S., Shiflett, S. D., Roberts, A. C., Solache, A., and Schutz-Geschwender, A. R. (2019). Antibody validation for Western blot: By the user, for the user. Journal of Biological Chemistry, 295(4), 926–939. https://doi.org/10.1074/jbc.RA119.010472
References
1. Bordeaux, J., Welsh, A.W., Agarwal, S., Killiam, E., Baquero, M.T., Hanna, J.A., Anagnostou, V.K., and Rimm, D.L. (2010). Antibody Validation. BioTechniques, 48(3), 197-209. https://doi.org/10.2144/000113382